Hello MageComp Blog Readers?,
Have you checked our recently published blog? If “NO” then check it now What is hCaptcha, and how does it compare to Google reCaptcha? (hCaptcha Vs Google reCAPTCHA).
Today, I am going to illustrate to you all How to Setup Varnish for Magento 2 on an EC2 server? Does it sound interesting? Put all the belongings apart for some time and read this tutorial.
Introduction:
What is Varnish & Why Varnish is Essential for Magento Stores?
Varnish cache is utilized to speed up the website. Majorly, Varnish is known as an HTTP booster, designed to boost huge webpages and provide enhanced performance for your Magento 2 Store. Mainly varnish is developed for utilizing it with the HTTP protocol.
When Varnish is integrated with your Magento 2 store, then Magento will not require to give specific time and resources to serve replicate requests from the end-users. Overall this will help your Magento 2 store to increase store performance and raise customer experience of your store. All the received requests will be treated faster than before and the page load time will be improved from seconds to milliseconds.
Steps to configure Varnish installation:
Basically, this illustration is divided into 2 parts from here. I will explain how to Install Varnish for Apache Server as well as how to Install Varnish for Nginx Server so you can follow the tutorial according to your configuration respectively.
Note: Make sure you are configuring in Ubuntu System as this tutorial is recommended specifically for that only.
Install Varnish for Apache Server:
Follow the given below steps accordingly.
Install Varnish
sudo apt install varnish
Ensure twice that you are using a varnish version is 4.x or above. Check it using the below commands.
varnishd -V
Switch Apache’s Default port to 8080
sudo nano /etc/apache2/ports.conf
Now apply below changes
Listen 8080
Now open /etc/apache2/sites-available/000-default.conf
sudo nano /etc/apache2/sites-available/000-default.conf
Apply below changes
<VirtualHost *:8080>
Now at last Restart the Apache
sudo service apache2 restart
We are going to use varnish in webserver and that is apache so configure varnish to port 80
sudo mkdir -p /etc/systemd/system/varnish.service.d/

sudo nano /etc/systemd/system/varnish.service.d/override.conf
Add the following
[Service]

ExecStart=

ExecStart=/usr/sbin/varnishd -j unix,user=vcache -F -a :80 -T localhost:6082 -f /etc/varnish/default.vcl -S /etc/varnish/secret -s malloc,512M
Save and Close the file
Now Run the below-given command to regenerate the dependency tree
sudo systemctl daemon-reload
Restart Varnish
sudo service varnish restart
Now we will verify by checking the ports
sudo netstat -tulpn
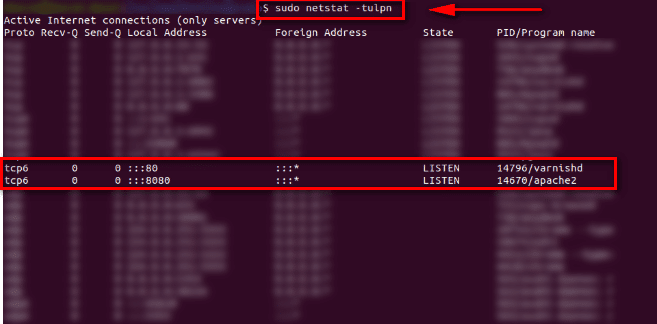
As per the above Screenshot you can view Varnish is listening on port 80 and Apache on 8080.
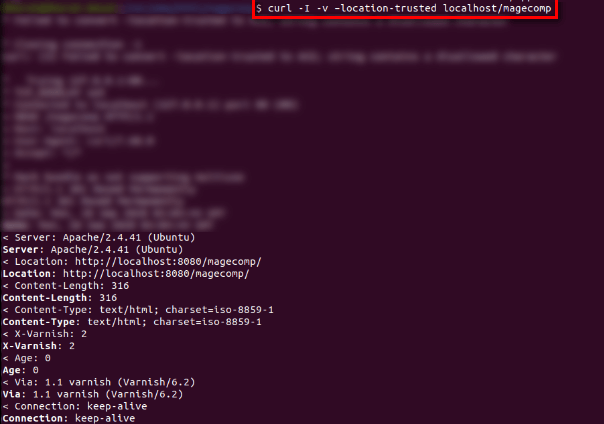
After this, we will verify it with Magento installation by running the CURL command to view the headers
curl -I -v –location-trusted ‘<your Magento base URL>’
Check for headers in the below screenshot
Install Varnish for Ngnix Server:
Follow the given below steps accordingly.
Install Ngnix
sudo apt install varnish
Ensure twice that you are using varnish version is 4.x or above. Check it using the below commands.
varnishd -V
Switch Ngnix Default port to 8080
sudo nano/etc/nginx/sites-available/magecomp.conf
Now apply below changes
Listen 8080
Now open/etc/nginx/sites-available/magecomp.conf
sudo nano /etc/nginx/sites-available/magecomp.conf
Apply below changes
<VirtualHost *:8080>
Now at last Restart the Ngnix
sudo service ngnix restart
We are going to use varnish in webserver and that is apache so configure varnish to port 80
sudo mkdir -p /etc/systemd/system/varnish.service.d/

sudo nano /etc/systemd/system/varnish.service.d/override.conf
Add the following:
[Service]

ExecStart=

ExecStart=/usr/sbin/varnishd -j unix,user=vcache -F -a :80 -T localhost:6082 -f /etc/varnish/default.vcl -S /etc/varnish/secret -s malloc,512M
Save and Close the file
Now Run the below-given command to regenerate the dependency tree
sudo systemctl daemon-reload
Restart Varnish
sudo service varnish restart
Now we will verify by checking the ports
sudo netstat -tulpn
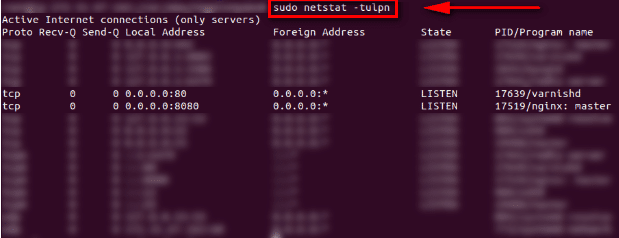
As per the above Screenshot you can view Varnish is listening on port 80 and Ngnix on 8080.
After this, we will verify it with Magento installation by running the CURL command to view the headers
curl -I -v –location-trusted ‘<your Magento base URL>’
Check for headers in the below screenshot

Steps to configure varnish in Magento 2 store:
Navigate to STORES > Settings > Configuration > ADVANCED > System > Full Page Cache:
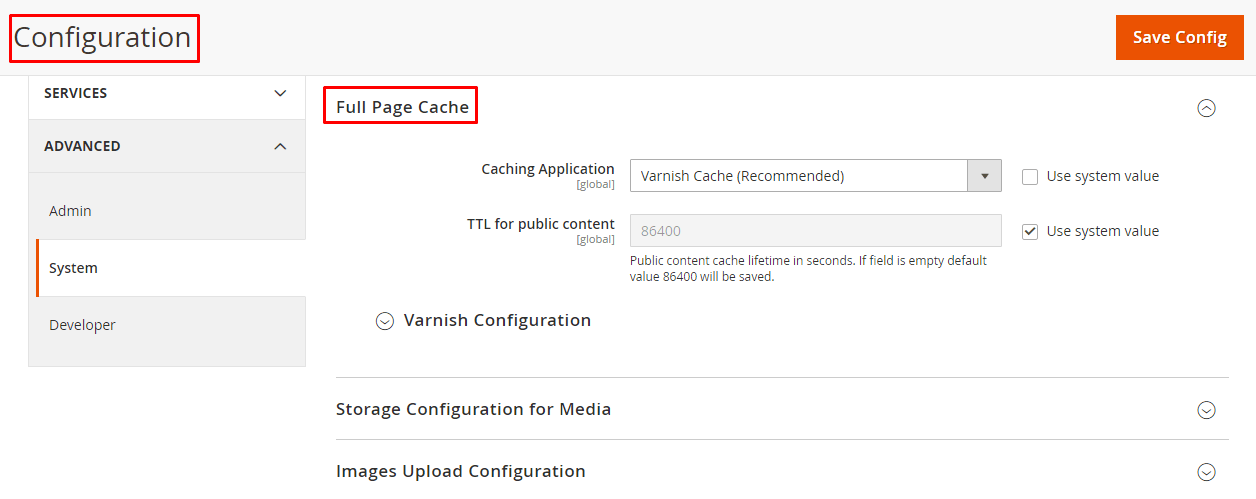
Now, select the Varnish Caching from the Caching Application list and tap to Save Config.
After the above configuration, your Magento 2 store is utilizing the Varnish cache instead of the default Full-Page Cache. Now implement the below steps for configuring Varnish with Magento.
Below the Varnish Configuration inside the Magento, you will need to change Access-list & Backend Host to your Magento server IP and Save the Configuration.
Don’t forget to open your 8080 port for your server instance as your Apache and Ngnix is listening on 8080
Tap to Export VCL for Varnish that depends on the installed varnish version
Now confirm it by implementing the below command.
sudo varnishd -V
Here we have used Varnish 5 therefore we will tap to Export VCL for Varnish 5:
For Backup of your existing default.vcl
sudo cp /etc/varnish/default.vcl /etc/varnish/default.vcl.bak2
You can rename exported varnish.vcl to default.vcl and copy to /etc/varnish/ directory
mv <download_directory>/varnish.vcl default.vcl

cp <download_directory>/default.vcl /etc/varnish/default.vcl
In case you find an error then follow the below steps:
Remove Health Check
.probe = {

    .url = "/pub/health_check.php";

    .timeout = 2s;

    .interval = 5s;

    .window = 10;

    .threshold = 5;

   }
Remove Grace Period
sub vcl_hit {

    if (obj.ttl >= 0s) {

        # Hit within TTL period

        return (deliver);

    }

    if (std.healthy(req.backend_hint)) {

        if (obj.ttl + 300s > 0s) {

            # Hit after TTL expiration, but within grace period

            set req.http.grace = "normal (healthy server)";

            return (deliver);

        } else {

            # Hit after TTL and grace expiration

            return (miss);

        }

    } else {

        # server is not healthy, retrieve from cache

        set req.http.grace = "unlimited (unhealthy server)";

        return (deliver);

    }

}
Remove Collect All Cookies
std.collect(req.http.Cookie);
Remove the Following from sub vcl_deliver
# Not letting browser to cache non-static files

    if (resp.http.Cache-Control !~ "private" && req.url !~ "^/(pub/)?(media|static)/") {

        set resp.http.Pragma = "no-cache";

        set resp.http.Expires = "-1";

        set resp.http.Cache-Control = "no-store, no-cache, must-revalidate, max-age=0";

    }


    unset resp.http.X-Magento-Debug;

    unset resp.http.X-Magento-Tags;

    unset resp.http.X-Powered-By;

    unset resp.http.Server;

    unset resp.http.X-Varnish;

    unset resp.http.Via;

    unset resp.http.Link;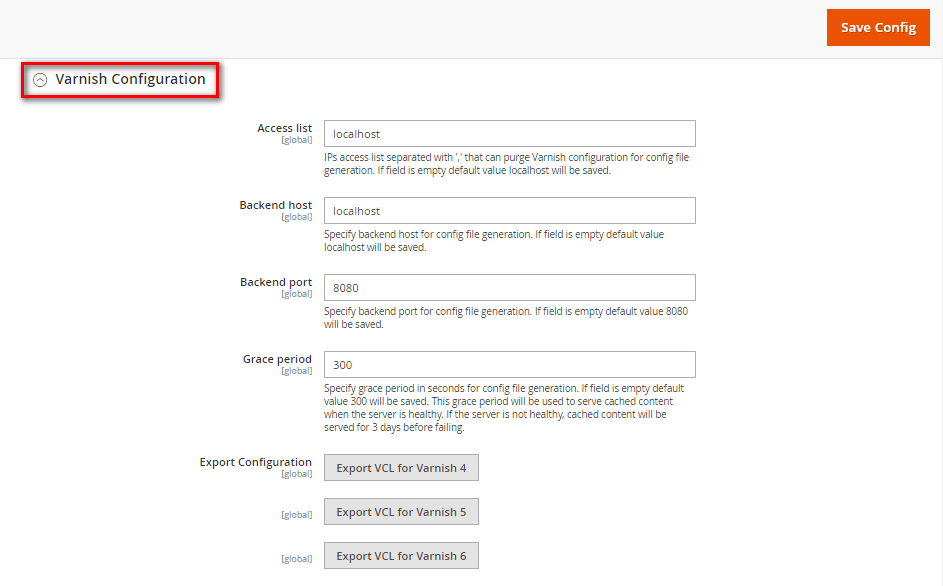
Now, Setup Magento Admin to Purge Varnish Cache
Run the below command to purge Varnish cache from the cache management tool in Admin
php bin/magento setup:config:set –http-cache-hosts=your-magento-server-ip:varnish-port
Verify Varnish cache
Check <magento_root>/var/page_cache directory is empty:
Log in to your Magento server, or switch to, the Magento file system owner.
Run the given below commands:
rm -rf <magento_root>/var/page_cache/*
Access one or more cacheable Magento pages.
Check the var/page_cache/ directory.
If you find the directory empty, Kudos You have triumphantly configured Varnish and Magento.
If you cleared the var/page_cache/ directory, restart Varnish.
That’s It You are good to go.
Conclusion:
Hopefully, all are able to configure Varnish for Magento 2 on the EC2 server by implementing the above steps in your system. In case of any queries you come across comment down in the comment section, I will be happy to help.
Make sure to share the article with your Magento Developer Friends.
Happy Varnishing!