Hello Magento Buddies!
Have you been juggling here and there to find the perfect module that can send all kinds of notification messages to your users and admins too? Here we are with a solution.
The SMS Notification Extension for Magento 2 is a complete package in itself that can enable you to send various kinds of notifications to the end-users.
You can send different types of notifications like numerous order updates messages, messages containing the order invoice, messages to remind the users of their leftover cart, and messages to send when an out-of-stock product that the customer has been eyeing is back in stock.
Let me walk you through the whole configuration part of the SMS Notification Module for Magento 2.
Contents
How to Configure SMS Notification Extension in Magento 2?
To start with, Install the SMS Ultimate Extension for Magento 2 and navigate to Stores > Configuration.
After that, follow the below-explained steps:
General Configuration
- SMS Ultimate Notification – From the dropdown field, enable or disable the extension as per requirement
- OTP Type – Here you can select your OTP Type as per your choice.
- OTP Length – In this field, you can select your desired OTP Length
- Button Style CLass – This field is provided to add multiple CSS classes with space.
- Import Phonebook – In this field you can import the CSV phonebook with names and mobile numbers
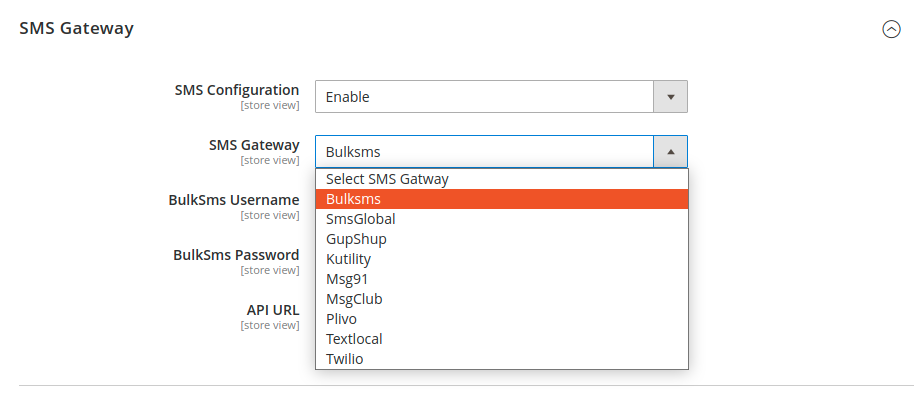
Configuration Settings for SMS Gateway
SMS Configuration – From the dropdown field, enable or disable the SMS Gateway to send SMS messages.
SMS Gateway – From the numerous gateways available, you can select the SMS gateway that you have been using.
BulkSms Username – Provide a username for sending BulkSMS.
BulkSms Password – Provide a Password for sending BulkSMS.
API URL – Provide an API URL for sending BulkSMS.
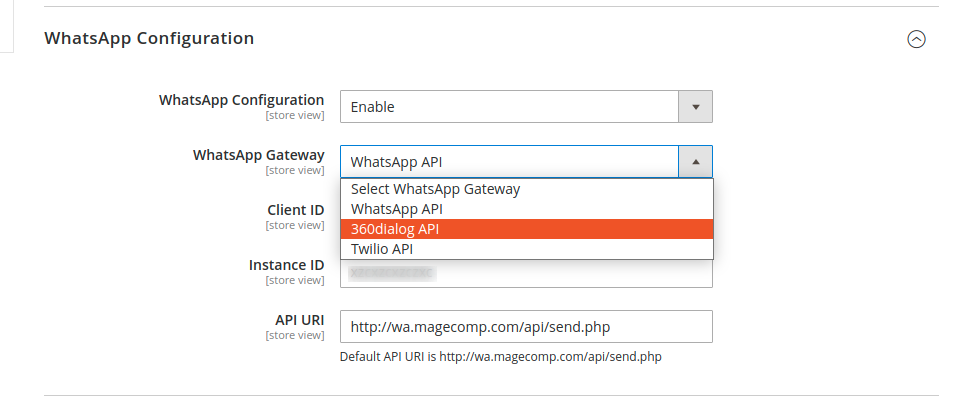
Configuration Settings For Whatsapp Gateway
WhatsApp Configuration – From the dropdown field, enable or disable the WhatsApp Configuration to send WhatsApp Message.
WhatsApp Gateway – From the given options, you can select the WhatsApp gateway that you have been using.
Client ID – Mention your Client ID in this field.
Instance ID – Mention the Instance ID in this field.
API URL – Mention the API URL in this field.
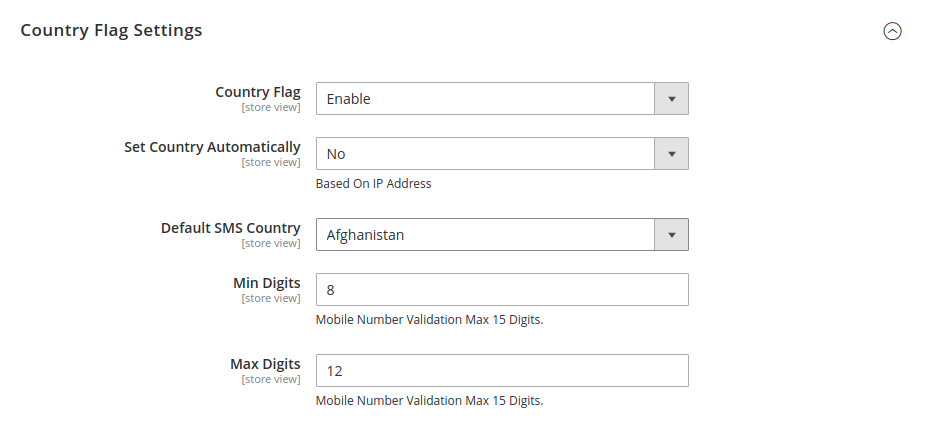
Configuration Settings for Country Flag
Country Flag – From the dropdown field, enable or disable the settings to display the country flag.
Set Country Automatically – To automatically fetch the country based on IP address, set this field to Yes, otherwise No.
Default SMS Country – In this field, set a default country to send SMS.
Min Digits – To validate the mobile number of a specific country, set the minimum number of digits it should have.
Max Digits – To validate the mobile number of a specific country, set the maximum number of digits it should have.
User Templates
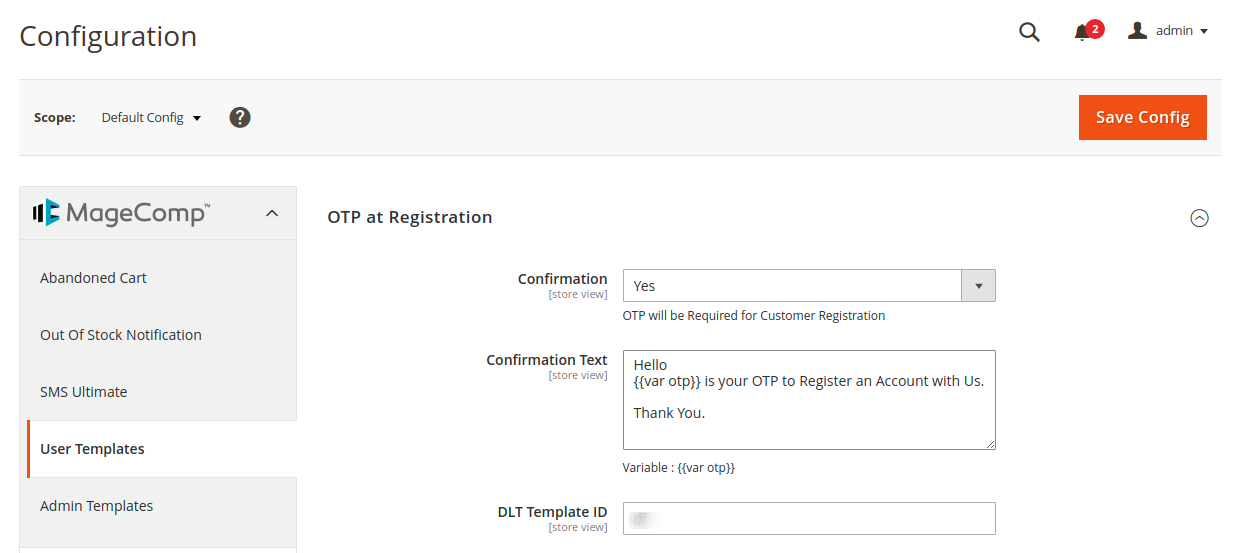
Configuration for OTP Confirmation at Registration
To perform these configuration settings, navigate to User Templates from the left panel.
Confirmation – Set this field to Yes if you want to make OTP at registration compulsory.
Confirmation Text – The text you write here will be sent to the customer as OTP with a predefined message. You can send OTP with the help of variables.
DLT Template ID – Control the SMS spam by mentioning the DLT Template ID here.
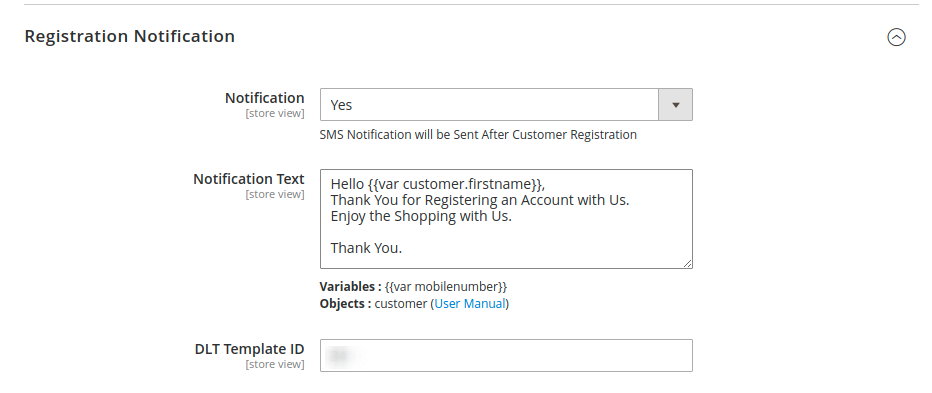
Configuration for the Registration Success Notification
Notification – To send a successful registration message to the user, set this field to Yes otherwise No.
Notification Text – Send a Message with Variables in it.
DLT Template ID – Control the SMS spam by mentioning the DLT Template ID here.
Settings for OTP confirmation text to change mobile number
Confirmation – Set this field to Yes if you would allow the user to change their mobile number from the My Account section.
Confirmation Text – Enter the message that you wish to send to the user with variables in it.
DLT Template ID – Control the SMS spam by mentioning the DLT Template ID here.
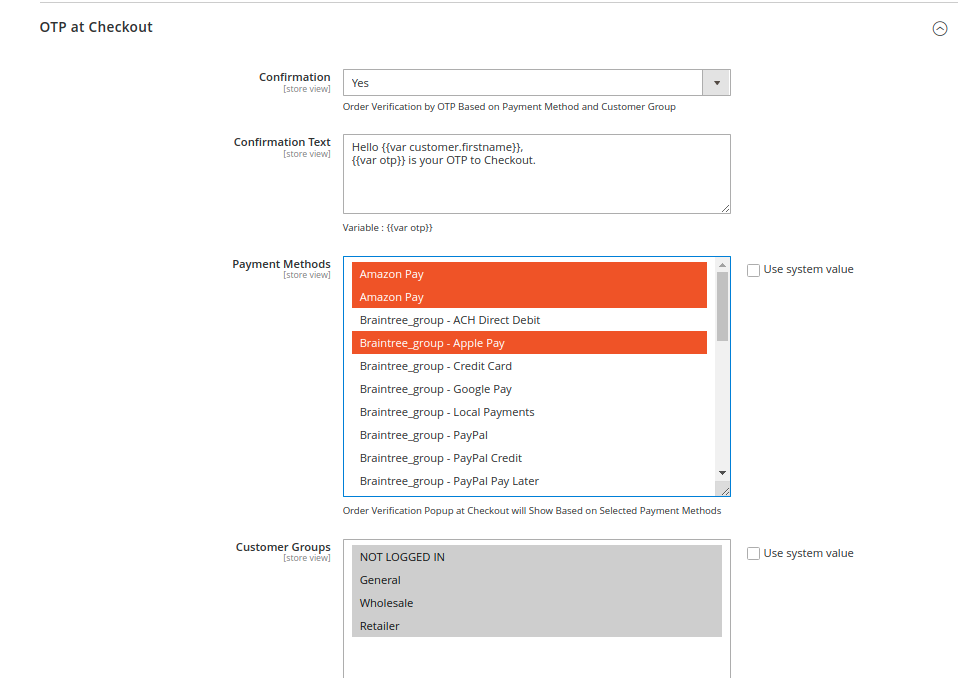
Settings for OTP confirmation text at checkout
Confirmation – Set this field to Yes to send OTP message at the time of checkout
Confirmation Text – Enter the message to send to the user with an OTP variable.
Payment Methods – Select the payment methods of your choice here. This will be displayed as the order verification popup at checkout.
Customer Groups – Select the customer groups from which you want to accept the order.
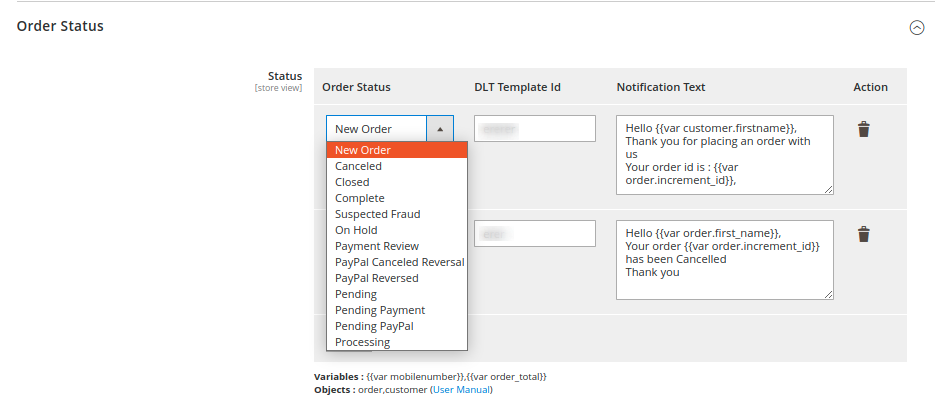
Order Status and Notification Text template settings
Order status – Send notifications to customers at various order events. Select one by one.
DLT Template ID – Mention the DLT Template ID to avoid SMS spamming.
Notification Text – Here you can write the message to send to the user at the specified order event. You can also add variables to it to make the message personalized to the user.
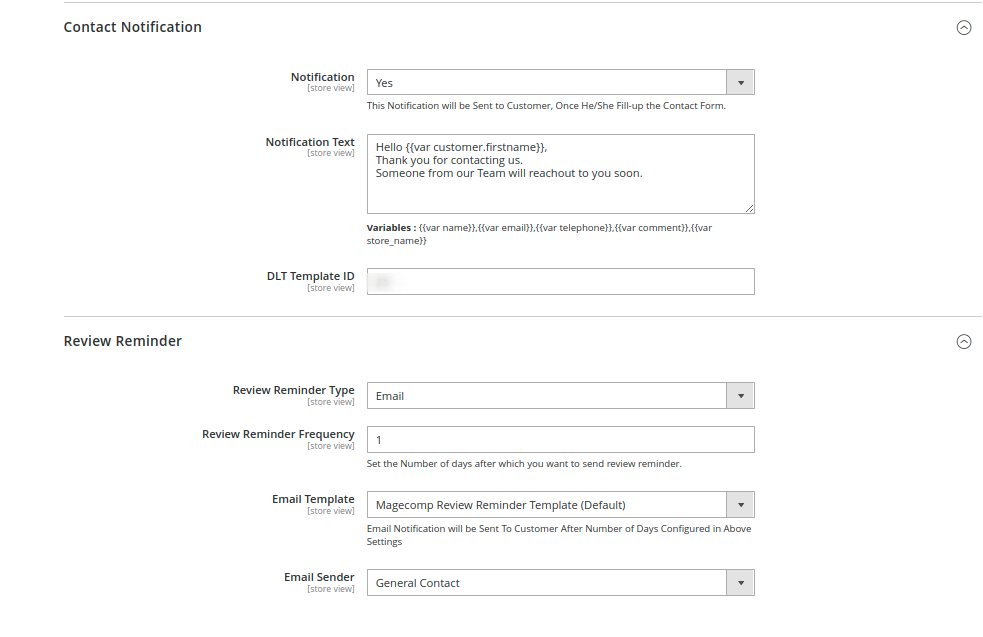
Configuration for Contact Notification and Review Reminder
Contact Notification
Notification – Set this field to Yes if you want to send a notification to the users when they complete filling up the contact information.
Notification Text – Here you can write the message that you want to send to the user as the contact completion notification. You can also add variables to it to make the message personalized to the user.
DLT Template ID – Control the SMS spam by mentioning the DLT Template ID here.
Review Reminder
Review Reminder Type – From the drop-down menu, select the type with which you want to send reminders to users to review your product or service.
Review Reminder Frequency – Here you can set the number of days after which you want to send a review reminder.
Email Template – Select the template to send to the user after the above-specified number of days.
Email Sender – here you can select the sender of the email from the dropdown menu.
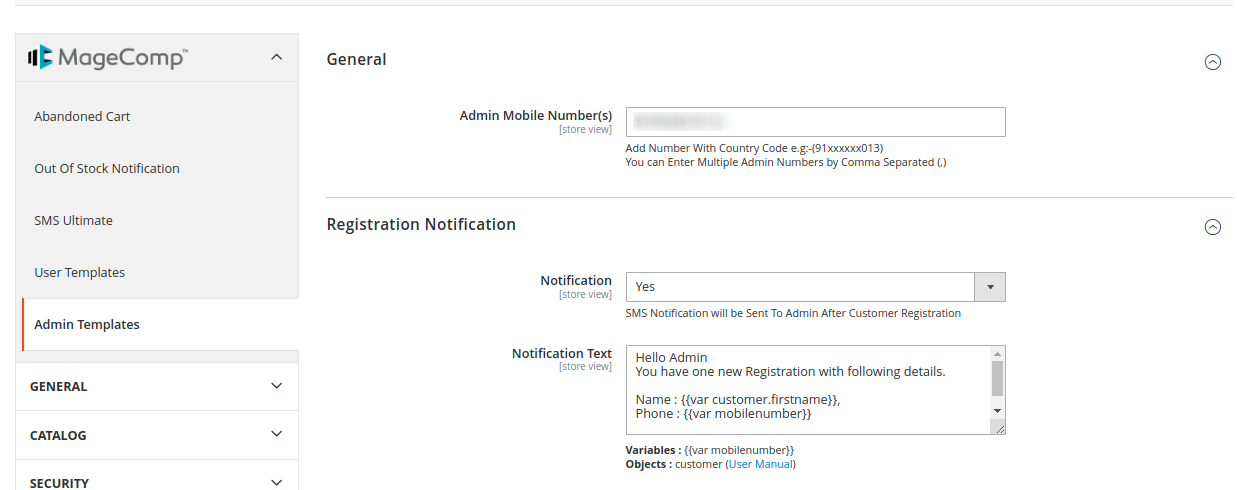
Admin Templates
To perform these configuration settings, navigate to Admin Templates from the left panel.
Mobile Number and Registration Settings for Admin
General
Admin Mobile Number – Here, you can enter the admin mobile number on which you want to receive notifications. You can also specify more than one mobile number separated by a comma. In that case, you will receive notifications on various numbers. Make sure to specify the country code.
Registration Notification
Notification – Set this field to Yes if you want to receive a registration notification on the specified admin mobile number.
Notification Text – Here you can specify the text message to be sent to the admin when a user registers.
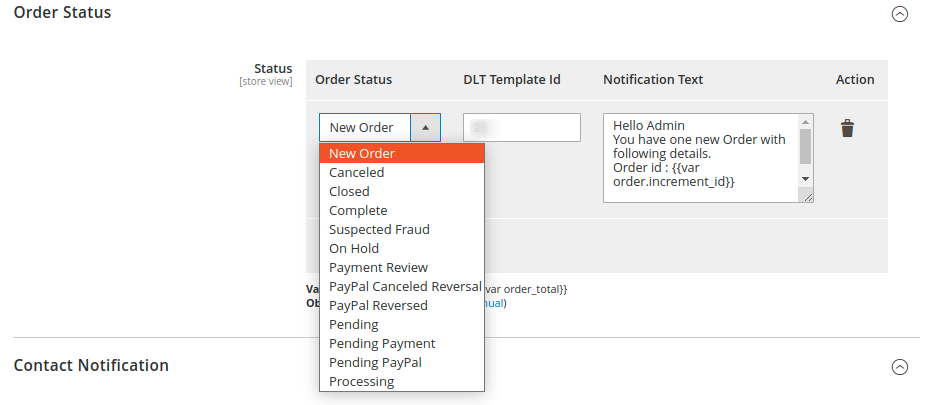
Order Status and Notification Text template settings for Admin
Order Status – Send notifications to the admin at various order events of a particular customer. Select from the drop-down menu one by one.
DLT Template Id – Mention the DLT Template ID to avoid SMS spamming.
Notification Text – Here you can write the message that you want to send to the admin at the specified order event. You can also add variables to it to make the message personalized to the user.
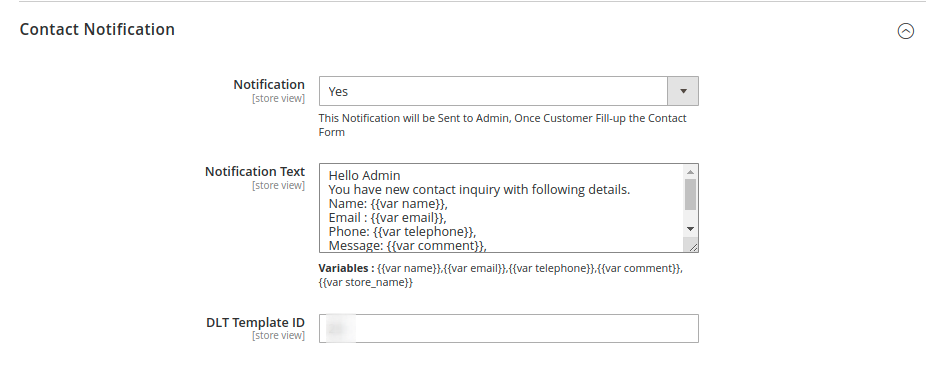
Configuration of Contact Notification for Admin
Notification – Set this field to Yes if you want to send a notification to the admin when a customer completes filling up the contact information.
Notification Text – Here you can write the message that you want to send to the admin as the contact completion notification of the user. You can also add variables to it to make the message personalized to the admin.
DLT Template ID – Control the SMS spam by mentioning the DLT Template ID here.
Abandoned Cart Notification
Get to know more about how to set the Abandoned Cart Notification configuration Here!
Out of Stock Notification
Get to know more about how to set the Out of Stock Notification configuration Here!
Admin Grid of SMS Ultimate
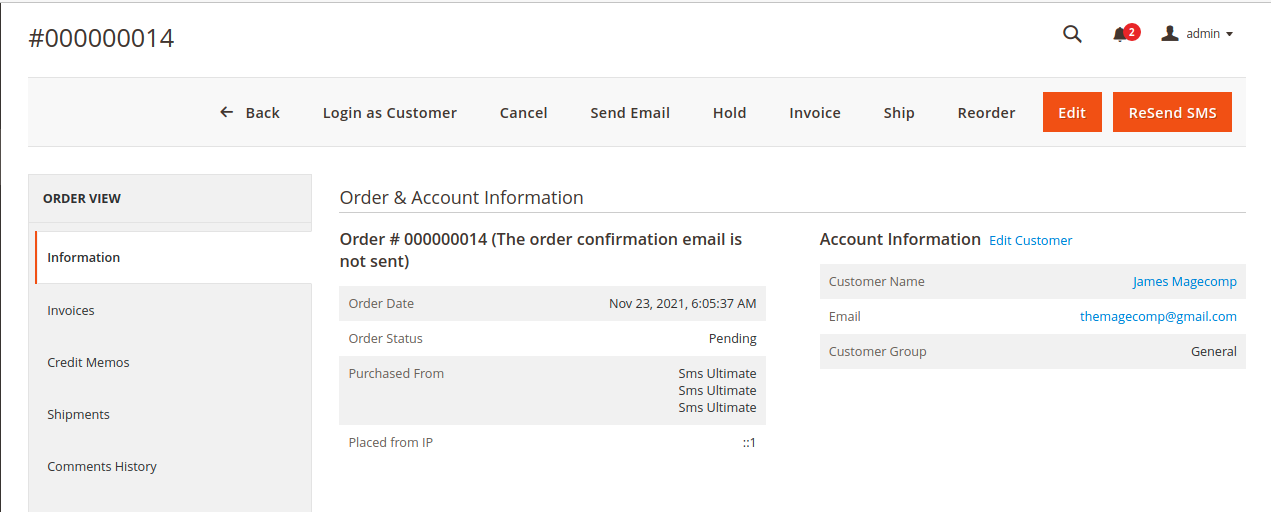
Order Confirmation Email Resend
From the left panel of Order View, You can verify the data of emails that were left unsent to the users with their account details.
Send Custom SMS for Order
Mobile Number – Here you can specify the contact details with country code
DLT Template ID – Type in an ID for the DLT Template.
SMS Text – Set a personalized message to be sent to the user.
Backend Options for SMS Ultimate
Various Backend Choices are open for SMS Ultimate. Select all the options one by one to complete its configuration
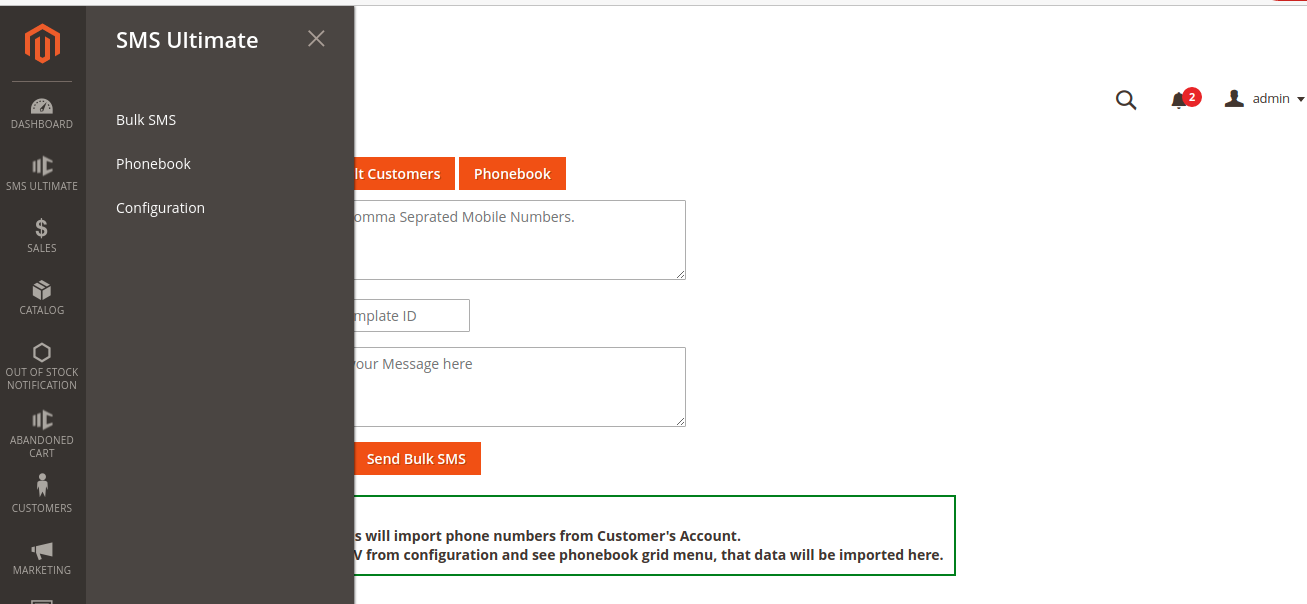
Send Bulk SMS via Admin grid
Import Numbers From – Upload a CSV file here containing all the phone numbers of the customers.
Mobile Numbers – Enter manifold of the contact details in this field
DLT Template ID – Avoid SMS Spamming by mentioning the DLT Template ID here.
SMS Text – In this field, enter the message you want to send to all the customers at once.
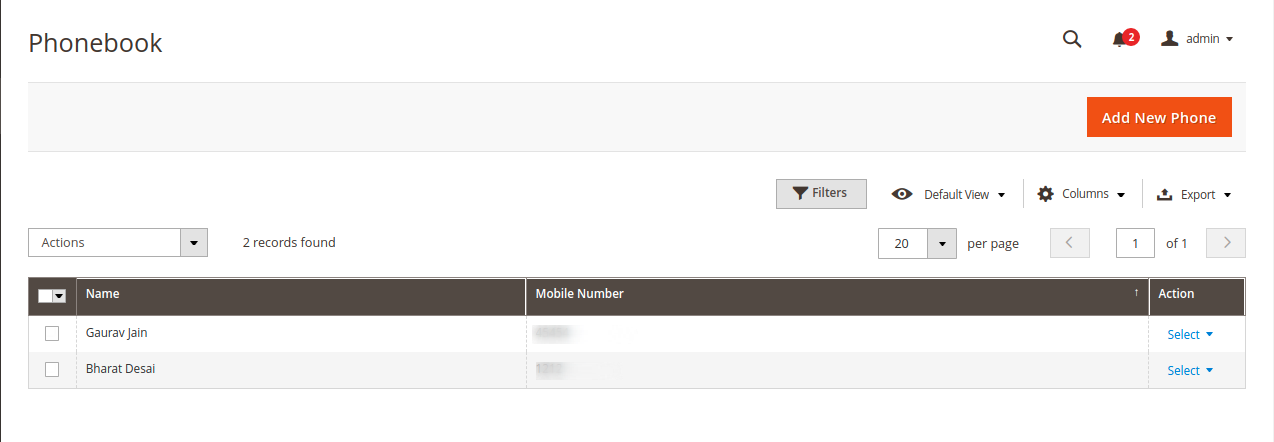
Phonebook in the Admin Grid
All the customers’ names, mobile numbers will be added to the above-shown admin grid.
Customer view of SMS Ultimate
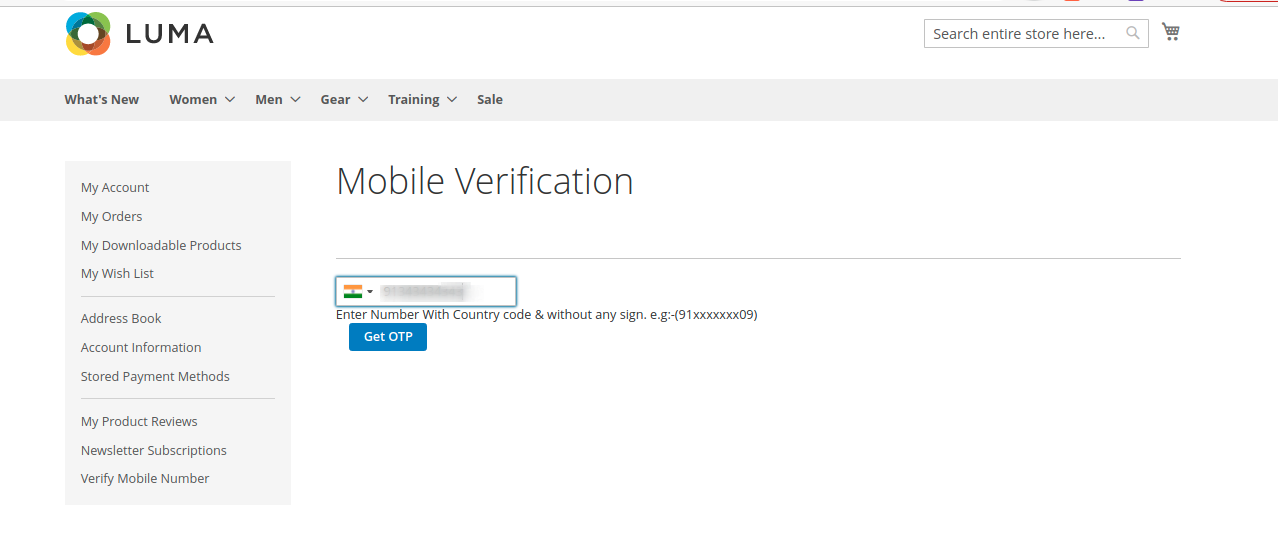
Front end display of the OTP verification to be needed at the customer registration form.
Front end display of the OTP verification to be needed at the My Account section to change the mobile number.
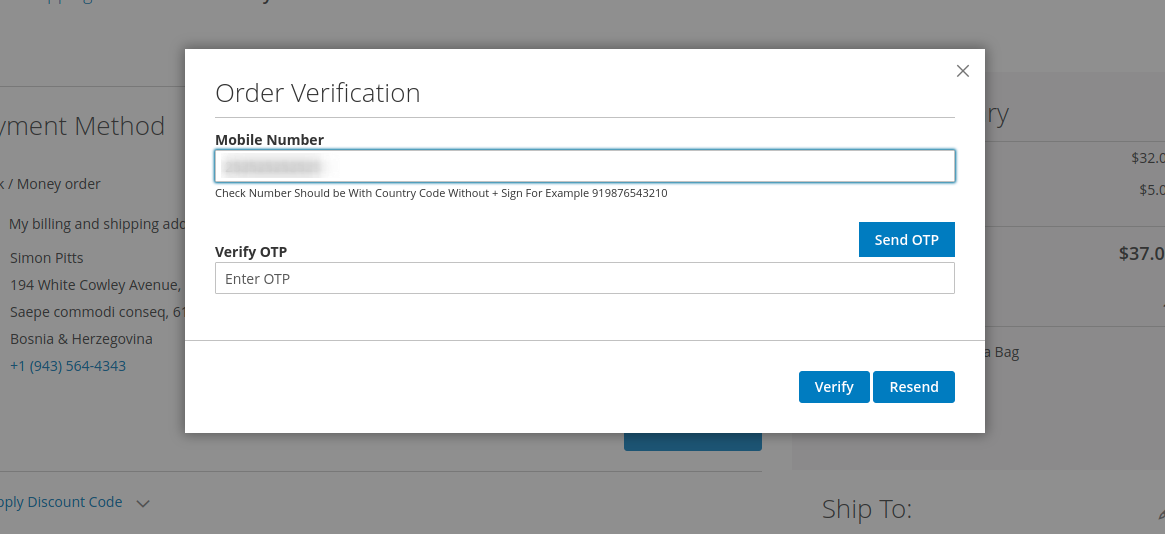
Front end display of the OTP verification to be needed at the checkout to verify the order.
Wrap Up!
So that was all about how you can send various kinds of SMS notifications to your customers.
Feel free to buy the SMS Ultimate for Magento 2 from Here. And if you have any doubts about the configuration part or any other problems if you face, reach out to us via our Support Portal
Relevant Read – How to Enable Push Notifications for your Magento 2 Store
Happy Reading!


