Hello Magento Friends,
Goods and Services Tax (GST) is the new tax applied on goods and services since July 2017 by the Indian Government. For online merchants, it is necessary to enforce this GST tax and implement rules as per GST in their online stores. So today let’s figure out How to Setup Indian GST with Magento 2.
Why do you need Indian GST Extension for your Magento 2 Store?
With the implementation of GST taxes, Magento merchants need to apply GST tax rates on all the products of their stores.
Indian GST Extension for Magento 2 helps to create and calculate GST taxes on the orders placed to your Magento 2 store. The module automatically creates GST rules and rates and apply it on the good and services of your Magento 2 store. All the rules and operations are applied based on the GST standards by the Indian Government.
Features of Indian GST Extension for Magento 2:
- Automate the GST process for your Magento 2 store.
- Apply GST for a specific product, category, or globally.
- Set GST Rates for multiple products with the help of a CSV file.
- Set if the product prices will be including or excluding GST rates.
- The admin will be able to generate GST reports based on a specific order or a specific product.
- Show GSTIN number in all your Magento store-related documents.
- Allows adding CIN and PAN number in your Magento store-related documents.
- GST applied orders will be displayed in order view, invoice, credit memo, shipment, new order Email, and PDFs.
Steps to Setup Indian GST with Magento 2:
Step 1: Install Indian GST Extension for your Magento 2 store.
Step 2: When you have successfully installed the extension, go to Stores > Configuration.
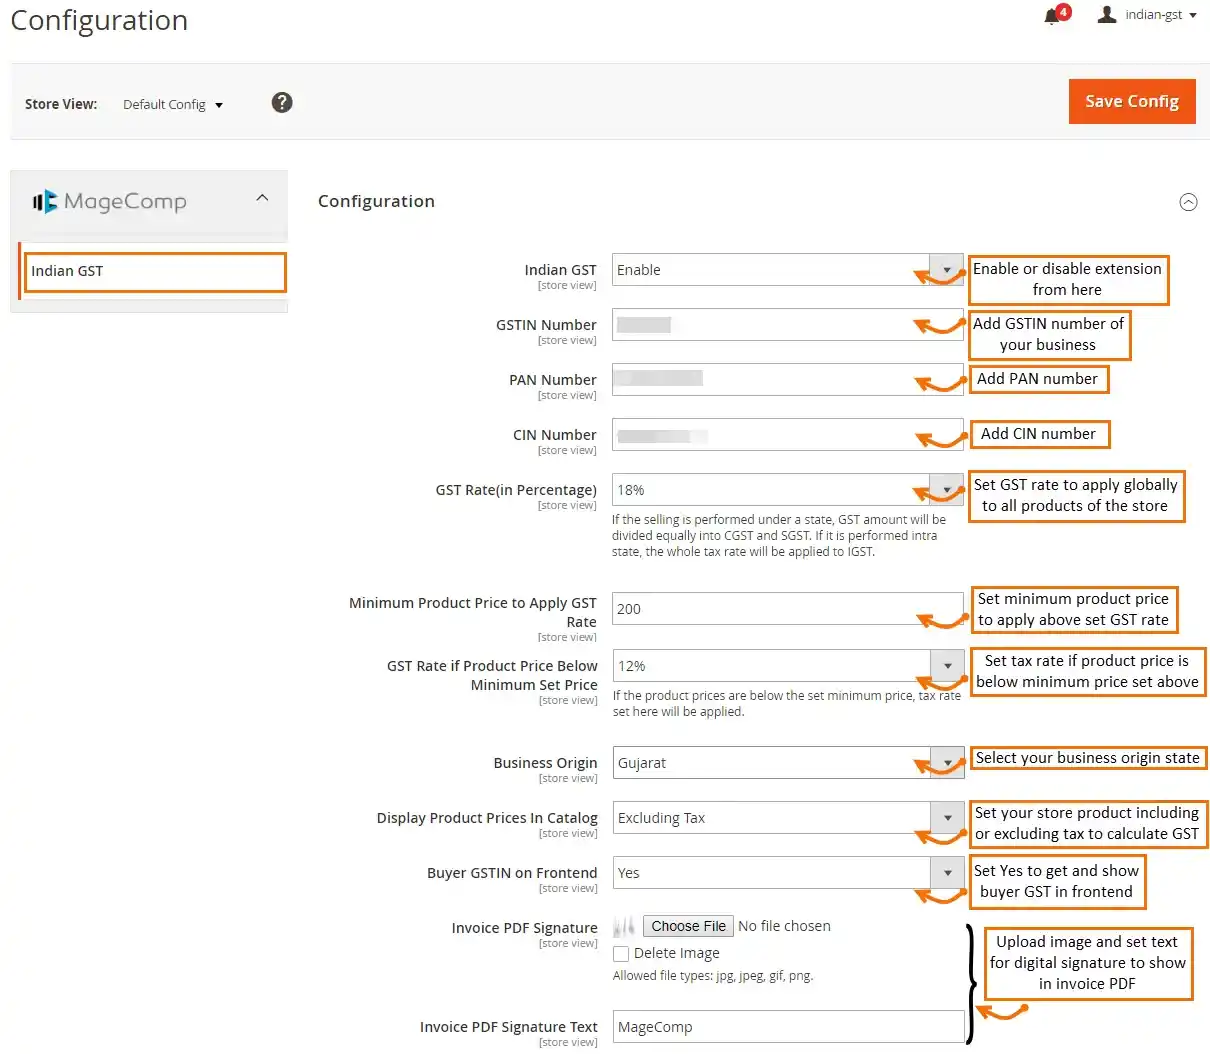
Step 3: General Configuration
- Indian GST: Enable or Disable the extension from here.
- GSTIN Number: Enter the GSTIN number of your business to include it with order details.
- PAN Number: Enter the PAN number of your business to show in the invoice PDF.
- CIN Number: Enter the CIN number of your business to show in the invoice PDF.
- GST Rate: Set GST rate for the store products to apply on orders that will be applicable to all store products.
- Minimum Product Price to Apply GST Rate: Set minimum price to apply GST rate on products.
- GST Rate if Product Price Below Set Minimum Price: Set GST rate if the product price is below the minimum set in above.
- Business Origin: Select the state from which you are selling. This helps managing SGST, CGST, and IGST.
- Display Product Prices in Catalog: Set products including or excluding tax to calculate GST.
- Buyer GST on Frontend: Select Yes to allow adding buyer GST from the frontend.
- Invoice PDF Signature: Upload a digital signature image to show in invoice PDF.
- Invoice PDF Signature Text: Set the signature text to show in the invoice PDF.
- At last, Save Config.
Step 4: Shipping GST Settings
- Apply GST on Shipping Charge: Enable or Disable GST charges on shipping from here.
- Display Shipping Prices: Set shipping prices including or excluding tax to calculate GST.

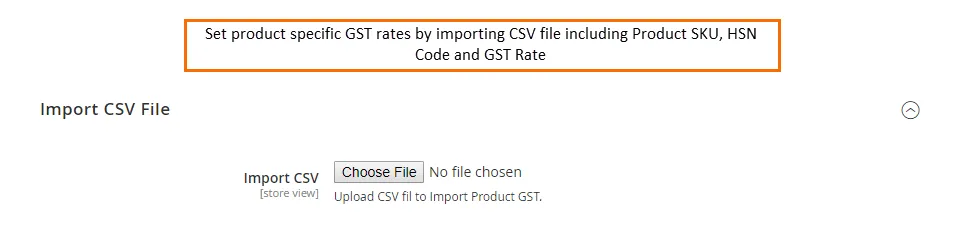
Step 5: Import CSV File
Import a CSV file with product information like SKU, HSN code, and GST rate. This will save your time and efforts for setting up GST rates for the individual products.
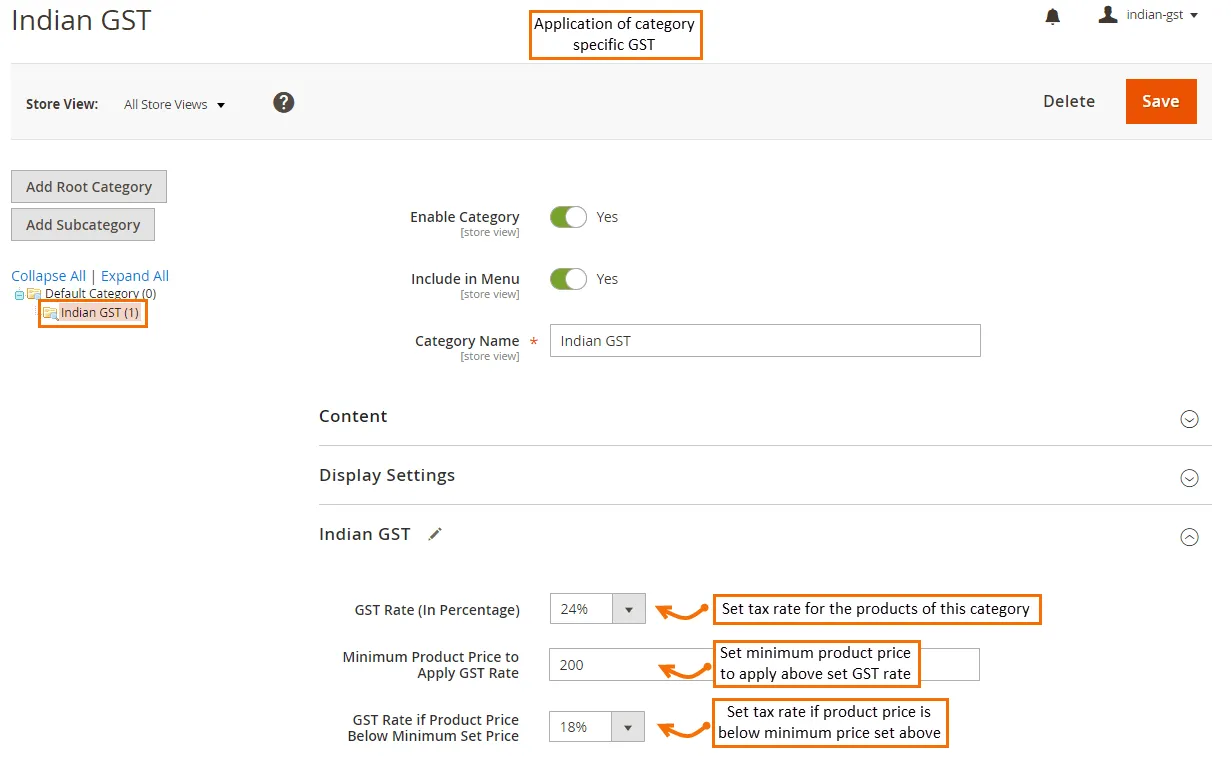
Step 6: Apply Category Specific GST
- You can set different tax rates for different categories. For that select a category from Catalog > Category.
- Expand the Indian GST Tab and set GST Rate, Minimum Product Price to Apply GST Rate, and GST Rate if Product Price Below Minimum Set Price.
- And click the Save button.
Step 7: Apply Product Specific GST
- You can set separate tax rates for a specific product as well. For that select a product from Catalog > Category.
- Expand the Indian GST Tab and set HSN Code, GST Rate, Minimum Product Price to Apply GST Rate, and GST Rate if Product Price Below Minimum Set Price.
- And click the Save button.

That’s it for the Magento 2 Indian GST configuration.
Once you are done with the configuration, you can see Indian GST enabled in your Magento 2 store frontend as well as backend. Below is the list where the GST will be applied or seen on your Magento 2 store.
- Checkout Page
- My Account Page
- Backend Order View Page
- Order Invoice
- Credit Memo
- Interstate GST applied on order
- Order Email
- Invoice PDF
- Buyer GST Number while Registration
- Backend GST Reports
If you face any difficulty with the Indian GST configuration for your store, our support team is always ready to help you.
Conclusion:
Hence, this way you can Setup Indian GST with Magento 2. In case of any doubts, feel free to comment below. Share the article via your social media platforms.
Happy Reading