
Google tag manager is a tag management system that creates tags and passes user interaction data. Rather than setting up everything manually, Google Tag Manager gives space to create complex & custom tags, saves time, adds scalability to your site implementation and most importantly, it’s easy to use. Implementing Google Analytics through Google Tag Manager needs much efforts but ultimately it simplifies future upgrades & enhancements as modifications can be done through GTM rather than each page of your website. Here, we will show you how to setup Google Analytics in Magento with Google Tag Manager.
Steps to setup Google Tag Manager in Magento:
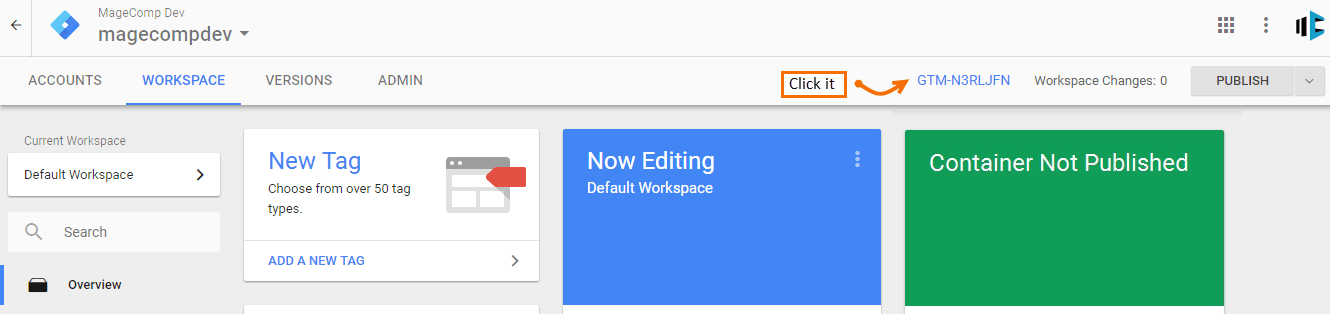
- First of go to Google Tag Manager, add your account if already not created. Here you can find your container ID, click on it and you can find two codes to paste in your website pages.
- Copy the code and paste both of them exactly below body tag of your website. Here you will find instructions to put both the code at different places but it’s not working properly in Magento. So follow our instruction as above.
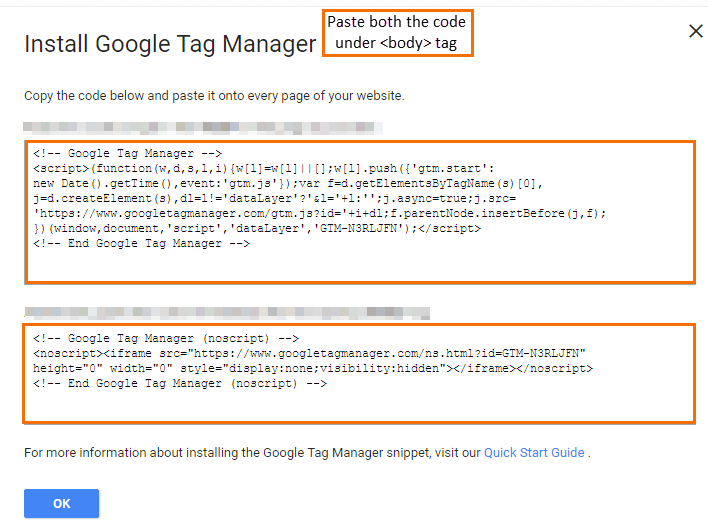
- First of go to Google Tag Manager, add your account if already not created. Here you can find your container ID, click on it and you can find two codes to paste in your website pages.
Setup Google Analytics:
The below steps are same as inserting analytics code into site which will start tracking page views and other information.
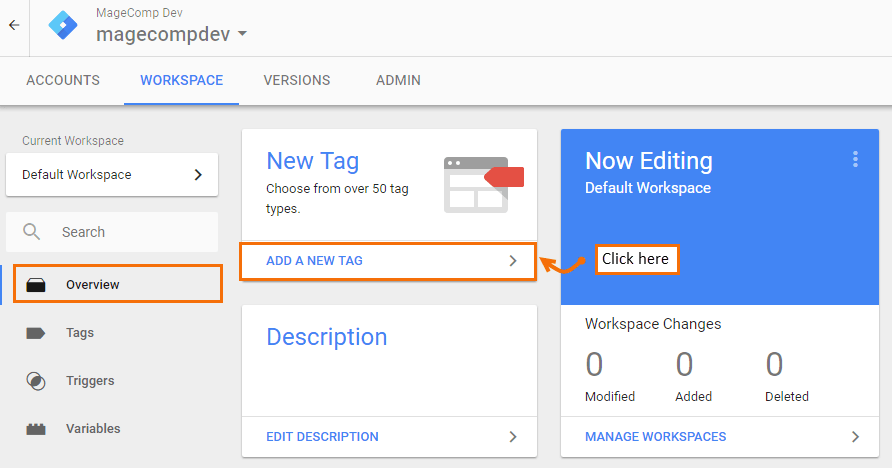
- Go to Google Tag Manage, Open “Overview” tab and click “Add New Tag”.
- Name the tag with “Universal Analytics” and click “Choose a tag type to begin setup”.
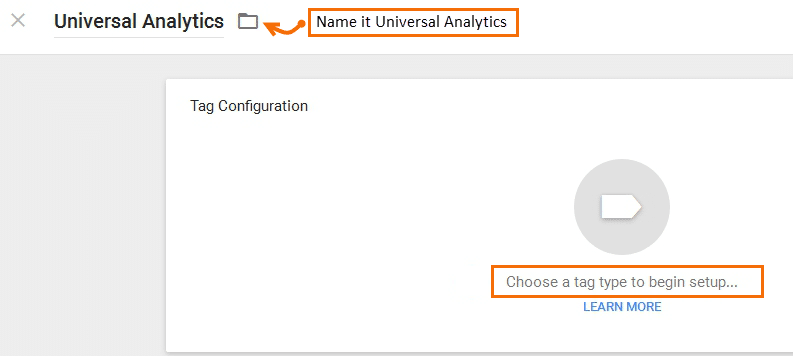
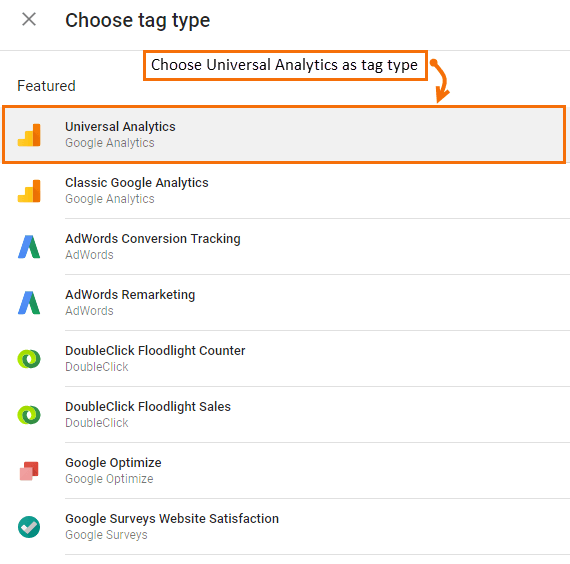
- Select tag type as “Universal Analytics” from the options.
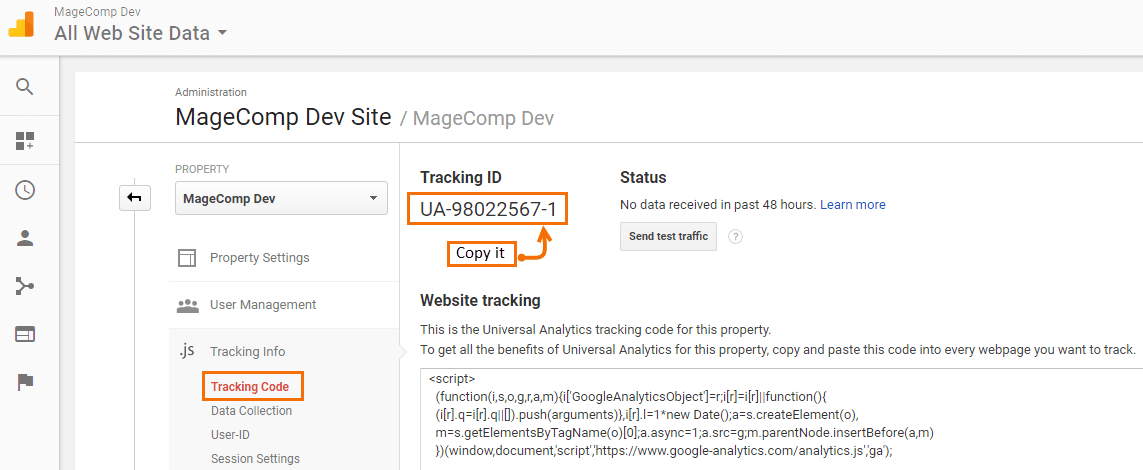
- Go to Google Analytics and get tracking ID from admin under “Tracking Info” and copy it. If you haven’t created Google Analytics account, create an account first using this guide.
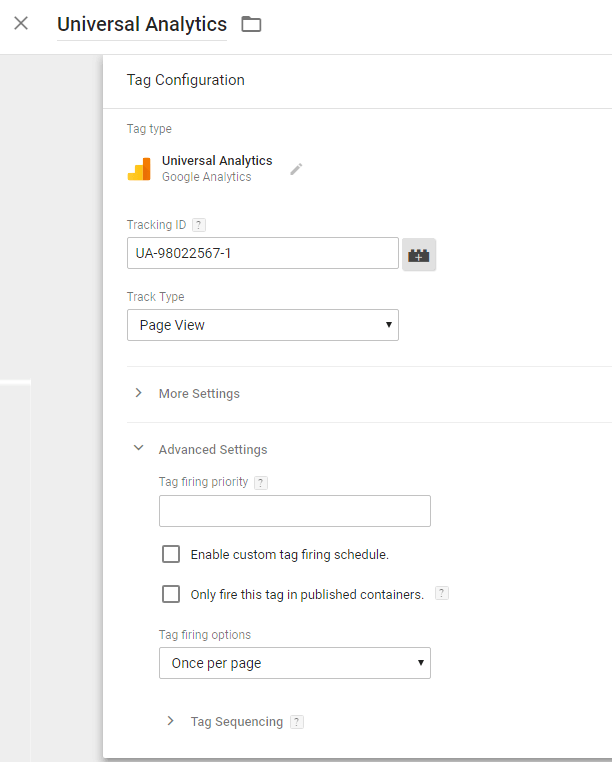
- Insert copied Tracking ID into “Tracking ID” field. Select “Page View” under “Track Type” and then click “Advanced Settings” and select “Once Per Page” under “Tag firing options”.
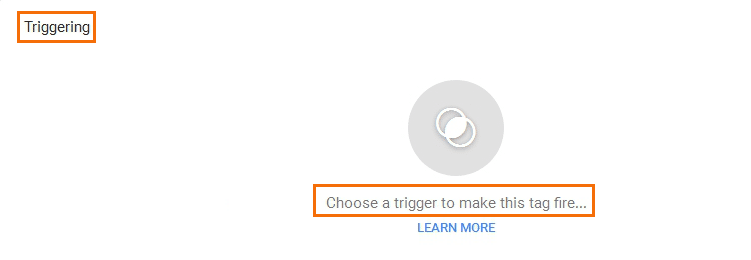
- Select “Triggering” section below and click “Choose a trigger to make this tag fire”.
- Select “All Pages”, save the tag and click “Publish” from the admin.

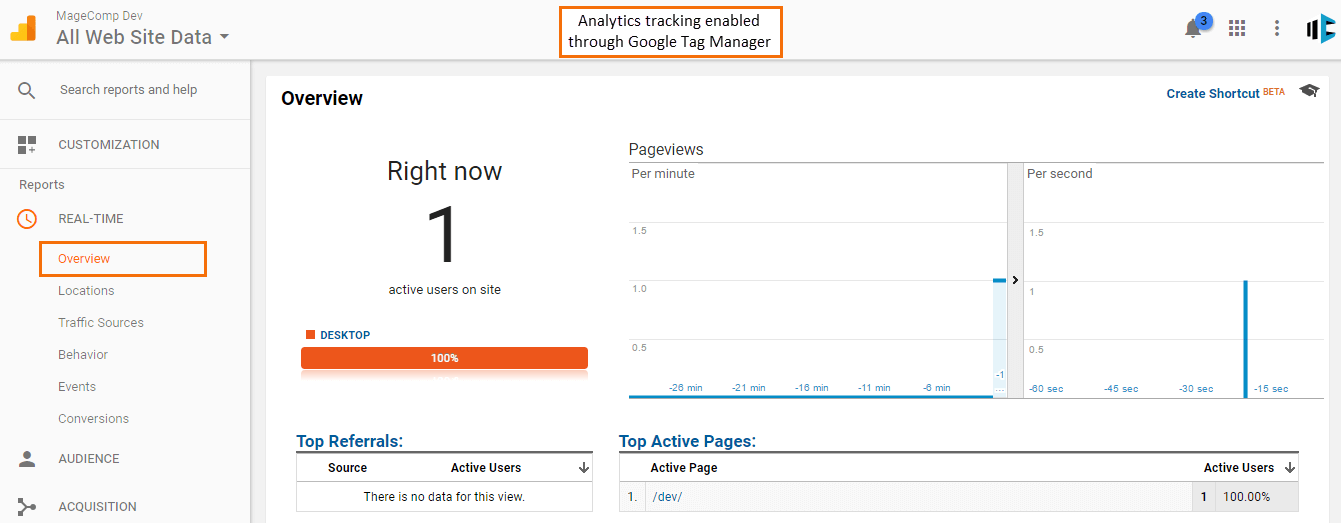
- To track live users on your website in Google Analytics, go to your website from another browser, click on some links. Open Real time –> Overview in Google Analytics. Here you can see total number of live users with other related details.
- Go to Google Tag Manage, Open “Overview” tab and click “Add New Tag”.
Set up Ecommerce Transactions:
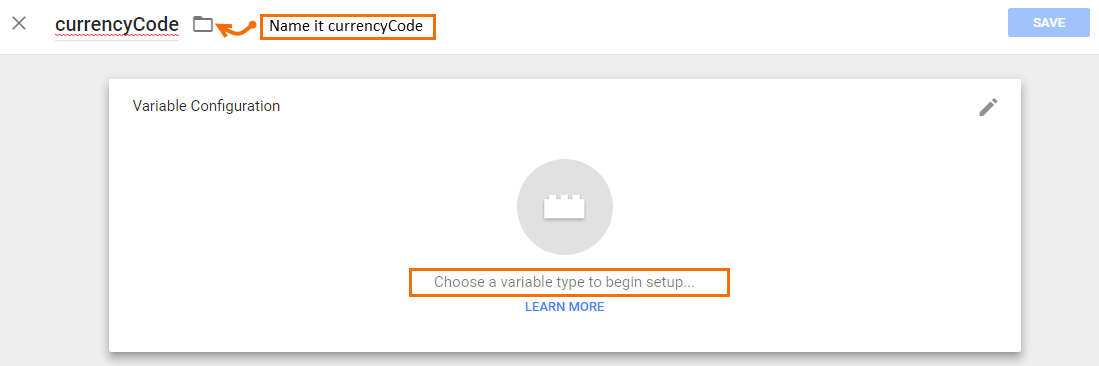
- Go to GTM, open “Variables” tab. Under “User-Defined” variables and click “New”. Create new variable, name it “currencyCode”. Now click “Choose a variable type to begin setup”.
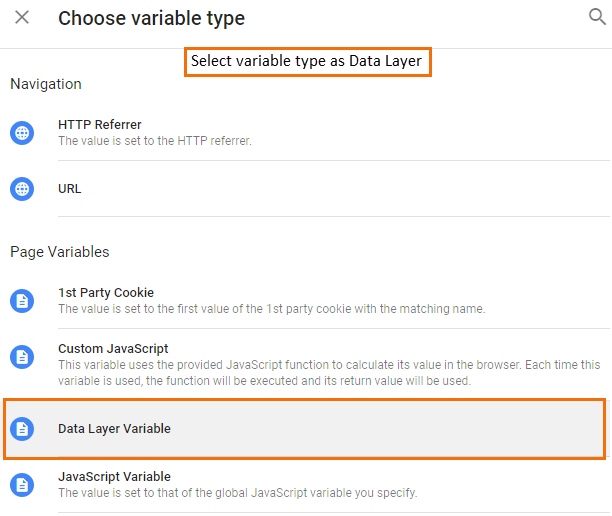
- Select variable type as Data Layer Variable.
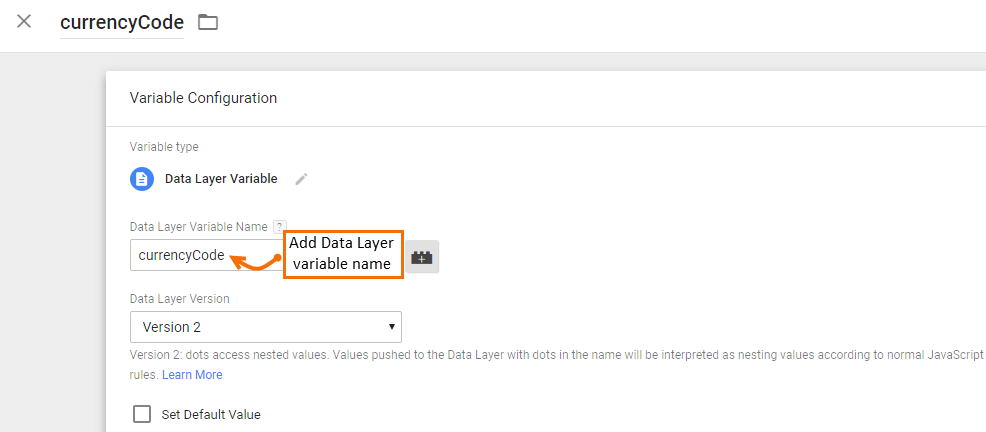
- Enter “currencyCode” as “Data Layer Variable Name”. Keep the Data Layer version selected as version 2 and click “save”.
- Now go to “Overview” tab and click “Add a new tag”. Enter tag name as “Order” and click “Choose a tag type to begin setup”. Click “Universal Analytics” under tag type. Insert Google Analytics tracking ID just as we did before. Here, select “Transaction” as track type. Now click “More settings” –> “Fields to set” –> “Add Field” and enter Field Name “currencyCode” and Value as {{currencyCode}}.

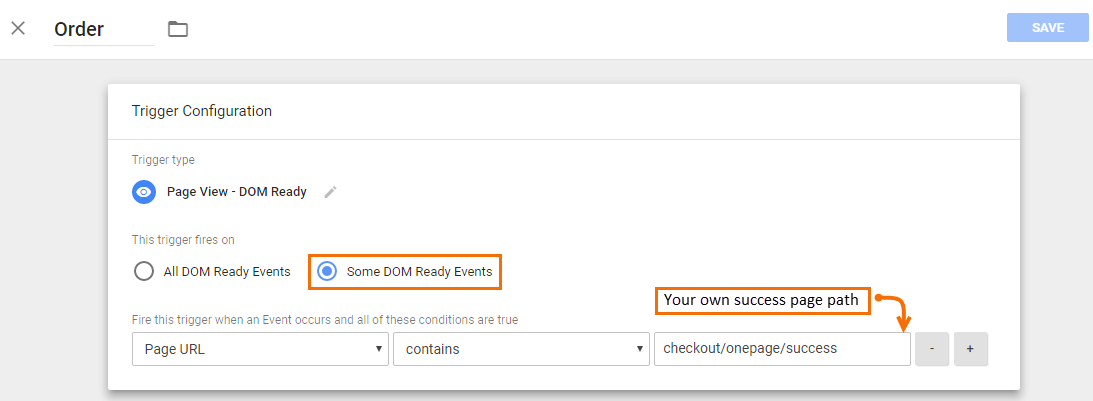
- Now go to triggering section and click “Choose a trigger to make this tag fire”. Click + sign from the top right corner. Enter trigger name as “Order” and click “Choose a trigger type to begin setup”. From “Choose trigger type”, select “DOM Ready”. Now select “Some DOM Ready Events” under “This trigger fires on” and select values “Page URL”, “Contains” respectively and insert “checkout/onepage/success” into the third field which is Magento default success order page. If you have custom URL for success page, add that path. Save the trigger. After saving the trigger you will see the summary of creating the tag. Click “Save” and then “Publish”.
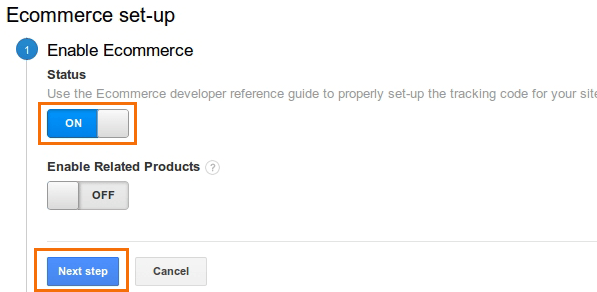
- Now go to Google Analytics and click on Ecommerce Settings in admin panel. Enable Ecommerce, click “Next Step” and Submit.
- Now put the following code in your success.phtml file available at \app\design\frontend\[your_theme_package]\template\checkout\success.phtml
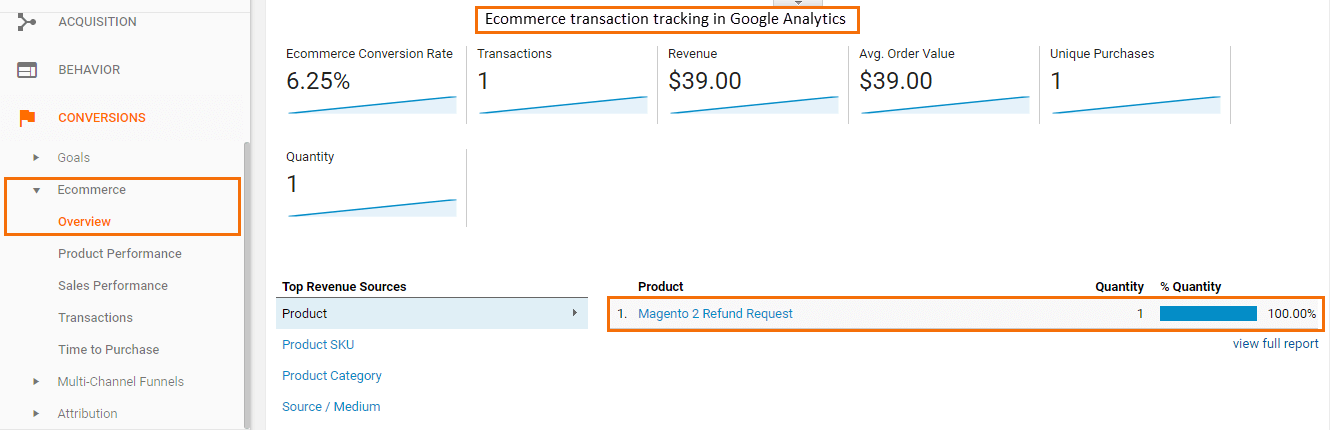
<!--?php $order = Mage::getModel('sales/order')->loadByIncrementId($this->getOrderId()); $items = $order->getAllVisibleItems(); $products = array(); foreach ($items as $item) { $price = $item->getPrice(); $product = $item->getProduct(); $prd = Mage::getModel('catalog/product')->load($item['product_id']); $cat_name=''; $cats = $prd->getCategoryIds(); foreach ($cats as $category_id) { $_cat = Mage::getModel('catalog/category')->setStoreId(Mage::app()->getStore()->getId())->load($category_id); $cat_name.= $_cat->getName().' '; } $products[] = array( 'sku' => $item->getSku(), 'name' => $item->getName(), 'category' => $cat_name, 'price' => round($price, 2), 'quantity' => (int)$item->getQtyOrdered() ); } $data = array( 'transactionId' => $order->getIncrementId(), 'transactionTotal' => max(round($order->getGrandTotal(), 2), 0), 'transactionTax' => round($order->getTaxAmount(), 2), 'transactionShipping' => round($order->getShippingAmount(), 2), 'currencyCode' => $order->getOrderCurrencyCode(), 'transactionProducts' => $products ); $data = json_encode($data); ?--> <img src="data:image/gif;base64,R0lGODlhAQABAIAAAAAAAP///yH5BAEAAAAALAAAAAABAAEAAAIBRAA7" data-wp-preserve="%3Cscript%3E%0AdataLayer%20%3D%20%5B%20%3C%3Fphp%20echo%20%24data%3B%20%3F%3E%20%5D%3B%0A%3C%2Fscript%3E" data-mce-resize="false" data-mce-placeholder="1" class="mce-object" width="20" height="20" alt="<script>" title="<script>"> - After setting up as above, you can track Ecommerce Transactions in Google Analytics at Conversions –> Ecommerce –> Transactions. To test Ecommerce Transactions, place some test orders from your store. Check back Google Analytics at above path and you can see the Ecommerce Transactions data. Note that Ecommerce transactions are not displayed real time. Usually it takes up to 24 Hours to refresh the transaction data so just check back if you can’t find transaction.
- Go to GTM, open “Variables” tab. Under “User-Defined” variables and click “New”. Create new variable, name it “currencyCode”. Now click “Choose a variable type to begin setup”.
Hope this step by step guide has enough helped you to setup Google Tag Manager in Magento. Still, if you find any queries or you stuck somewhere, let me know, I’ll be glad to help you. Send your feedback through commenting.
Even you can Download PDF of this guide to save for later use.