Hello Magento Friends,
In this blog, I will teach How to Add a Tooltip in the ui_component Form Field in Magento 2.
The tooltip provides additional information about the field. UI_Component Form in admin contains fields. You can give additional info on that field using a tooltip.
If you want to add a tooltip in the UI_Component Form Field in Magento 2, use the below steps
Steps to Add Tooltip in ui_component Form Field in Magento 2:
Step 1: First, create a ui_component file.
Check out the below article to create a UI Component form.
How to Create UI Component Grid and Form in Magento 2
Step 2: Now move to the below path
app/code/Vendor/Extension/view/adminhtml/ui_component/uiexample_form.xml
And add the code as follows.
|
1 2 3 4 5 6 7 8 9 10 11 12 13 14 15 16 17 18 19 20 21 22 23 24 25 26 27 28 29 30 31 32 33 34 35 36 37 38 39 40 41 42 43 44 45 46 47 48 49 50 51 52 53 54 55 56 57 58 59 60 61 62 63 64 65 66 67 68 69 70 71 72 73 74 |
<?xml version="1.0" encoding="UTF-8"?> <form xmlns:xsi="http://www.w3.org/2001/XMLSchema-instance" xsi:noNamespaceSchemaLocation="urn:magento:module:Magento_Ui:etc/ui_configuration.xsd"> <argument name="data" xsi:type="array"> <item name="js_config" xsi:type="array"> <item name="provider" xsi:type="string">uiexample_form.grid_record_grid_list_data_source</item> <item name="deps" xsi:type="string">uiexample_form.grid_record_grid_list_data_source</item> </item> <item name="label" xsi:type="string" translate="true">Add New Record</item> <item name="config" xsi:type="array"> <item name="dataScope" xsi:type="string">data</item> <item name="namespace" xsi:type="string">uiexample_form</item> </item> <item name="template" xsi:type="string">templates/form/collapsible</item> <item name="buttons" xsi:type="array"> <item name="save" xsi:type="string">Vendor\Extension\Block\Adminhtml\Edit\Save</item> </item> </argument> <dataSource name="grid_record_grid_list_data_source"> <argument name="dataProvider" xsi:type="configurableObject"> <argument name="class" xsi:type="string">Vendor\Extension\Model\DataProvider</argument> <argument name="name" xsi:type="string">grid_record_grid_list_data_source</argument> <argument name="primaryFieldName" xsi:type="string">id</argument> <argument name="requestFieldName" xsi:type="string">id</argument> <argument name="data" xsi:type="array"> <item name="config" xsi:type="array"> <item name="submit_url" xsi:type="url" path="*/*/save"/> </item> </argument> </argument> <argument name="data" xsi:type="array"> <item name="js_config" xsi:type="array"> <item name="component" xsi:type="string">Magento_Ui/js/form/provider</item> </item> </argument> </dataSource> <fieldset name="general_information"> <argument name="data" xsi:type="array"> <item name="config" xsi:type="array"> <item name="collapsible" xsi:type="boolean">false</item> <item name="label" xsi:type="string" translate="true">General Information</item> <item name="sortOrder" xsi:type="number">20</item> </item> </argument> <field name="name" sortOrder="10" formElement="input"> <settings> <dataType>text</dataType> <visible>true</visible> <label translate="true">Name</label> </settings> </field> <field name="title" sortOrder="20" formElement="input"> <settings> <dataType>text</dataType> <visible>true</visible> <label translate="true">Title</label> </settings> </field> <field name="content" sortOrder="30" formElement="input"> <!-- Add Below Code To Add tooltip on Field--> <settings> <dataType>text</dataType> <visible>true</visible> <tooltip> <link>https://www.google.com</link> <description translate="true">Tool-tip content for the identiier field.</description> </tooltip> <label translate="true">Content</label> </settings> <!-- --> </field> </fieldset> </form> |
Note – You have to add the “<tooltip>” tag into the “<settings>” tag to add a tooltip to the field.
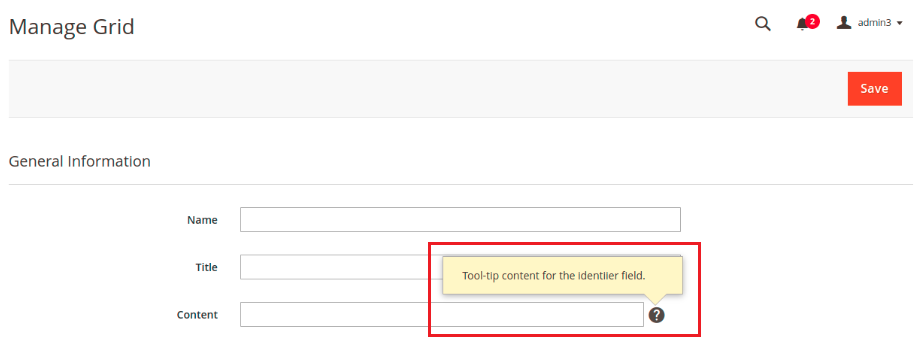
Output:
As you can see in the below image, the Content field contains a tooltip.

Conclusion:
This way, you can add a Tooltip in the ui_component Form Field in Magento 2. If you have difficulty with the above code, connect with me through the comment box. Share the article with your friends, and stay in touch with us for more Magento 2 tutorials.
Happy Coding!

