
Today everyone owns a smartphone and is a crucial part of people’s life. Most people sleep next to their phone and it is the first thing they check right after waking up. Hence the prominence of mobile phones has elevated.
It’s all-important to build a mobile application to gain more profits. Creating a mobile app means you are halfway there. The next half path can be completed by submitting your app to the App Store and Google Play Store.
Google Play Store is one of the essential elements for android users without any doubt. The dominance and popularity of Google Play are certainly very high. At present, there are 2.8 million apps on Google Play Store. Hence, having your App on Google Play will prove useful to you.
But now the question is, How to Submit Your App to the Google Play Store? No worries, we have got you covered here. With the help of a detailed step-by-step process, you can successfully submit your app to Google Play.

How to Submit Your App to the Google Play Store?
Now that you have gotten your app ready and decided to get into the Google Play Store, follow the detailed steps to efficiently publish an app to Google Play.
Step 1: Google Play Console
In order to publish your app on Google Play, a developer account is mandatory. Google Play Console is a backend software where developers can submit their android app to the Google Play store and manage it. The Google Play Console charges a one-time nominal fee of $25 to create an account and access numerous control features provided by the platform. Once registered, you can submit your app to Google Play Store for free.
Step 2: Google Merchant Account
If your app involves in-app purchases or you decide to sell paid apps, you need a Google Merchant Account to manage sales. From your Google Play Console, go to Download reports and select Financial. To access this page, you will be required to create a Google Merchant Account. To create one, click on Setup up a merchant account.
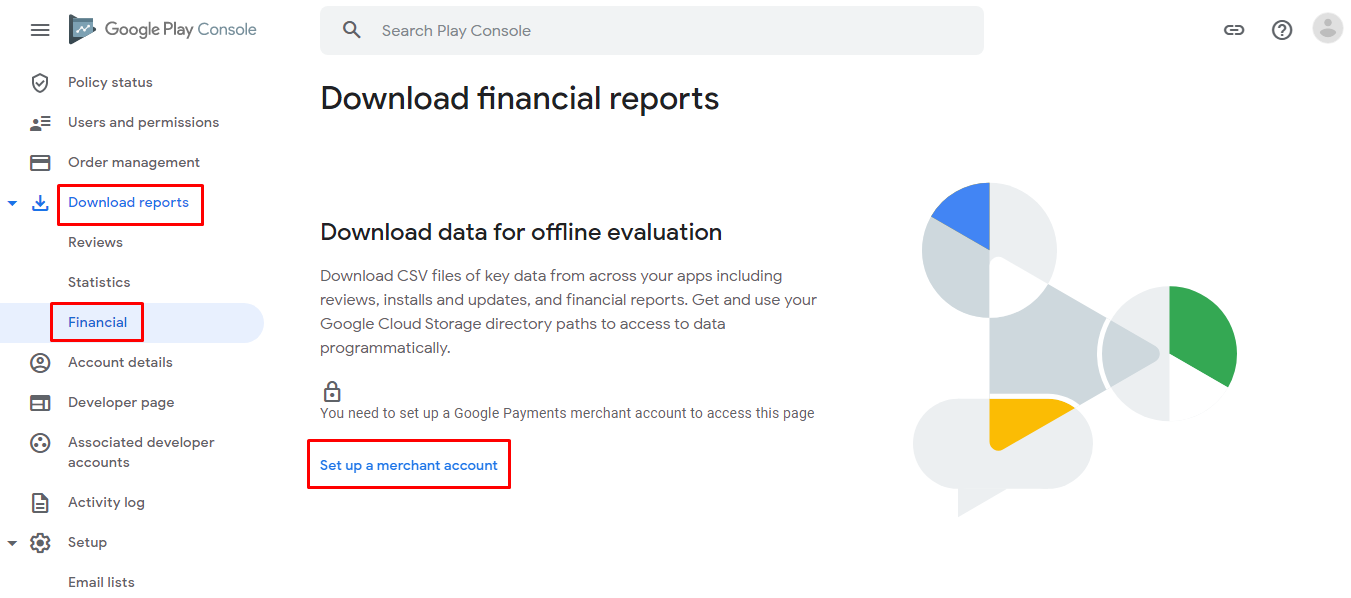
Once your Google Merchant Account is created, it will automatically link to Google Play Console. Now you can manage, review and download your financial reports.
Step 3: Create App
Finally, the actual process starts for submitting your app to Google Play. From your Google Play Console, select All Apps from the left menu and click on Create App.

As you create a new app, you need to enter your App details.
- App name – Enter the name of your app up to 30 characters long. Your App on the Google Play Store will appear with this name.
- Default language – Set the language of your app from the dropdown menu.
- App or game – Select whether it is an app or a game. However, you can even change this afterward from the store settings.
- Free or paid – Specify whether your app will be available free or the user needs to pay for it. Although it can be updated from the Paid app page later on. Note – You can only change this until you publish your app. Once the app is published you cannot transform your app from free to paid.

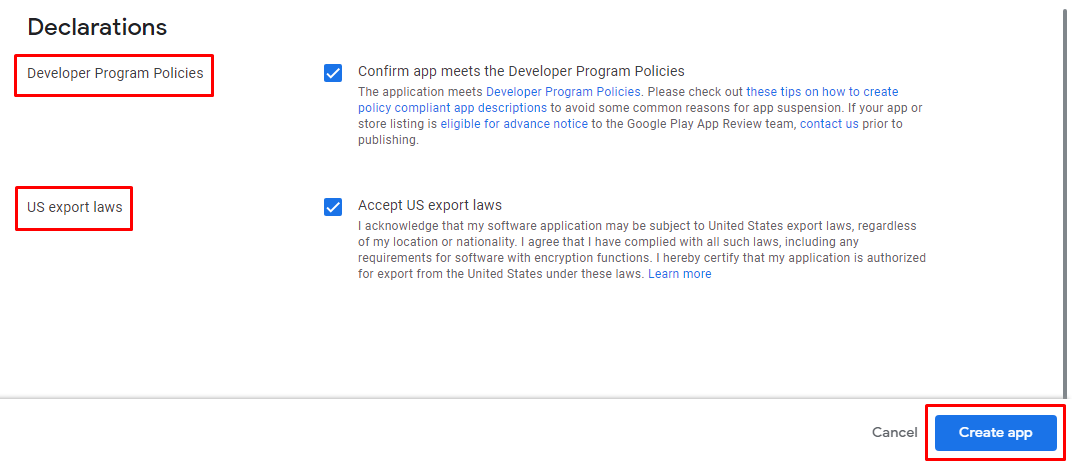
Then Google Play Console asks for affirmations from you. Make sure your app matches the Developer Program Policies and Accept US export laws. Then click on Create App.
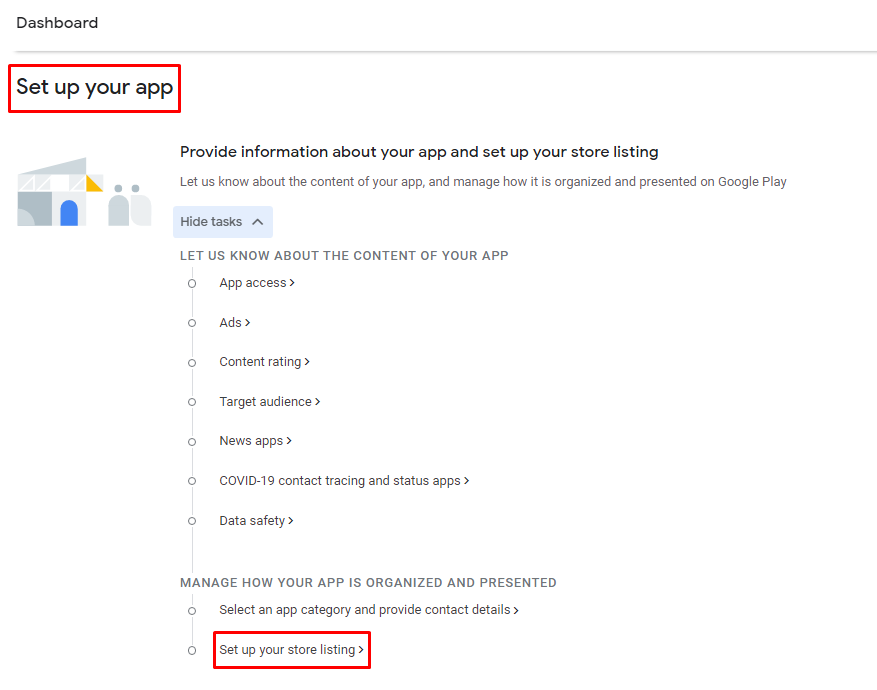
Step 4: Set up Store Listing
As soon as you click on Create App, you will be redirected to the App Dashboard. Expand the Set up your app option and select Set up your store listing.
Under App Details, enter the info of your android app.
- App name – You have already entered the name but if you wish to change, you can now.
- Short description – Enter the short description for your app up to 80 characters.
- Full description – Give an explanation of up to 4000 characters for your app with targeted keywords to help Google show your app to the relevant audience.

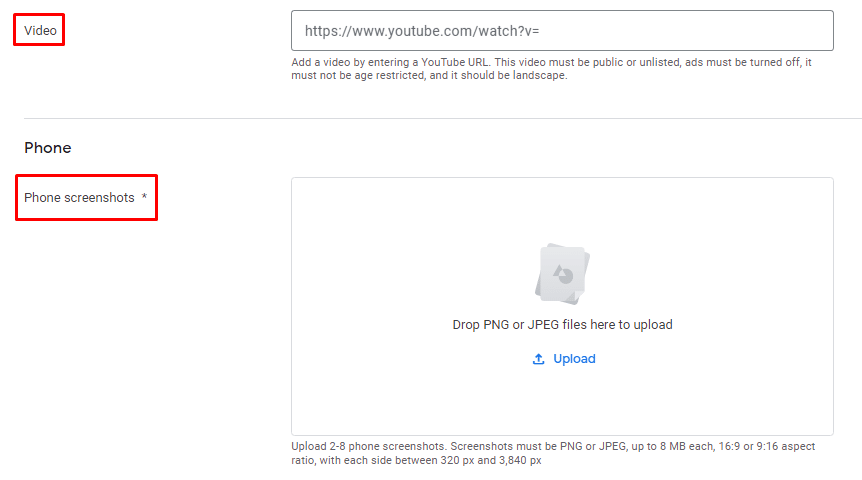
Under Graphics, you can upload app icon, screenshots, video, feature graphic.
- App icon – Upload an image that will be visible as the icon of your app. Make sure the image adheres to the size limit.
- Feature graphic – Add an image for your app that can be used for promotional purposes.
![]()
- Video – Insert a youtube link for the video of your app. It also holds some terms and conditions, ensure you publish your video accordingly on Youtube.
- Phone screenshots – You can add a minimum of 2 and a maximum of 8 screenshots for mobile phone display following the size limit and aspect ratio.
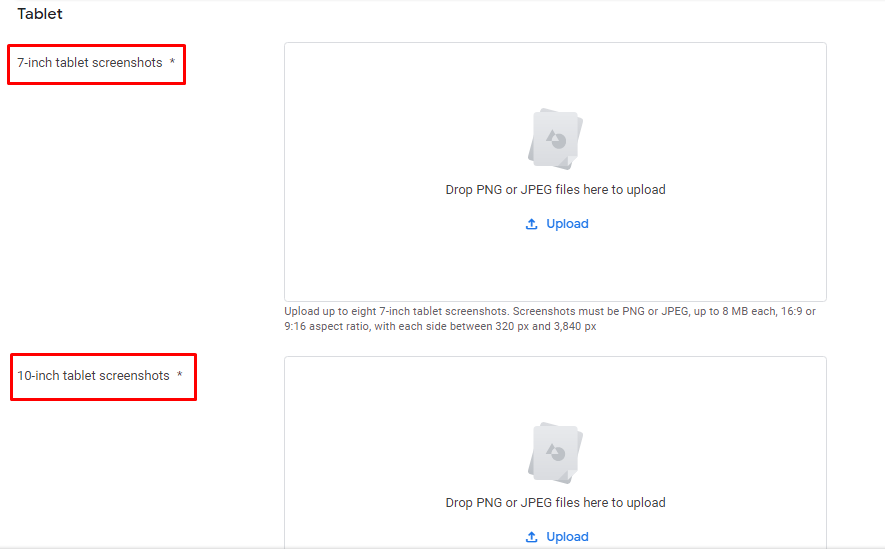
- 7-inch tablet screenshots – Upload up to 8 screenshots for a 7-inch tablet size screen. Do not forget to follow the size limit and aspect ratio.
- 10-inch tablet screenshots – Upload up to 8 screenshots for a 10-inch tablet size screen. Do not forget to follow the size limit and aspect ratio.
Hit the Save button once you are done with uploading details.
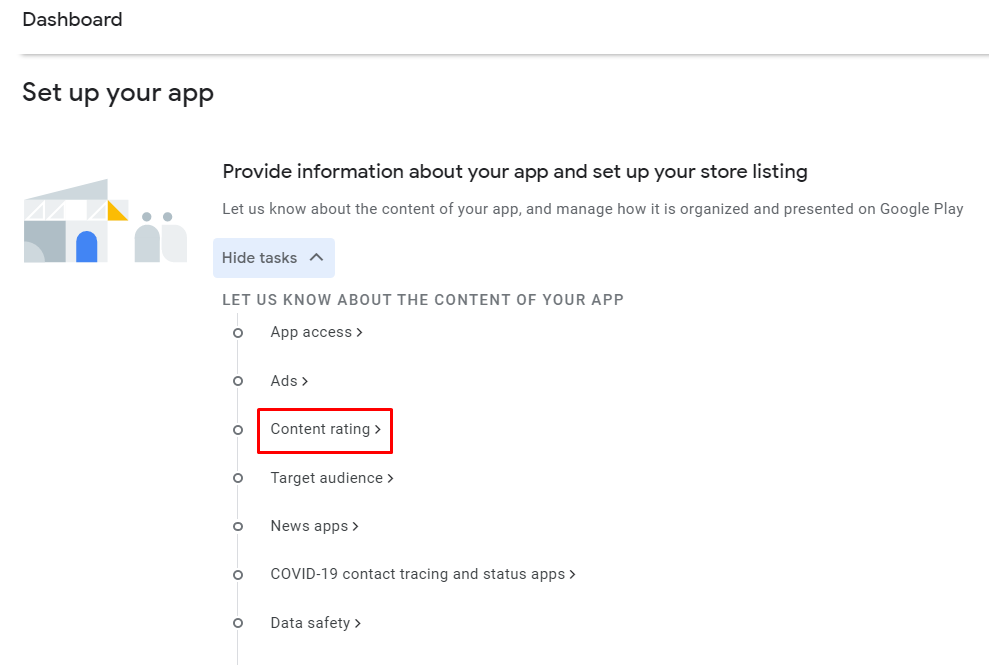
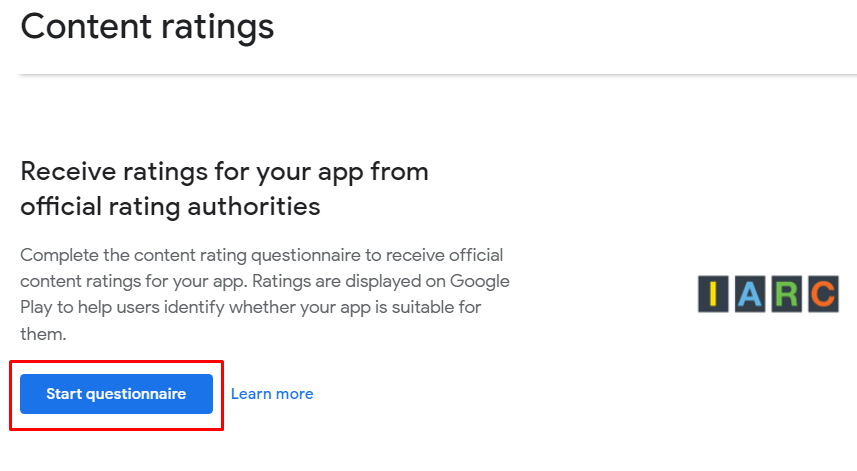
Step 5: Content Rating
The next step is for Content Rating. This step is very important otherwise it will be considered an Underrated app and will be removed from Google Play Store. So Content Rating is imperative.
From your app Dashboard, go to Set up your app and select a Content rating.
Select Start questionnaire
First is the Category option in the Content Ratings menu.
- Email address – Enter the email address that can be used to contact you.
- Category – Select the category of your app.
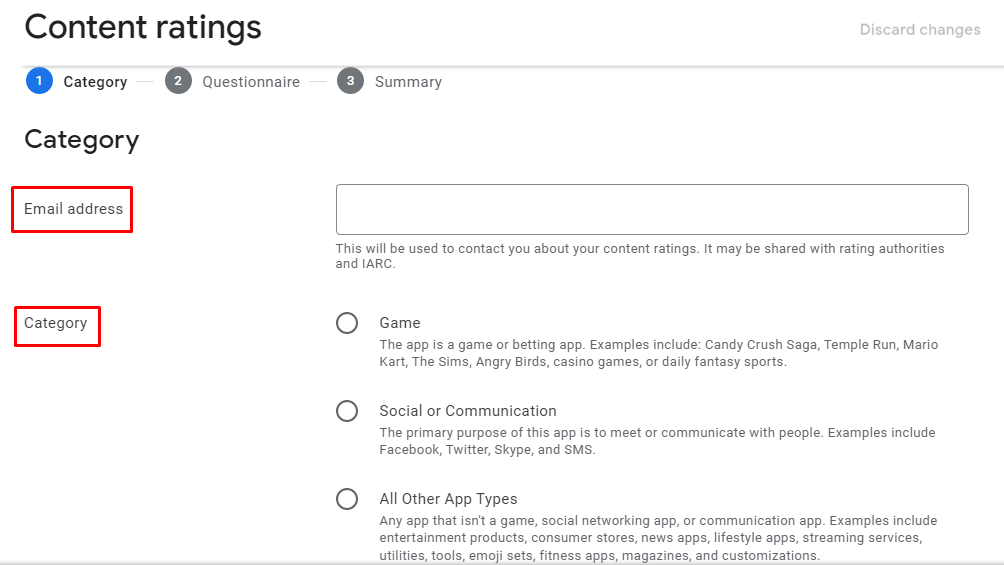
Click Next and you will be asked a few questions about your app. Answer them to let Google Play Store know more about your android app.

Then it will show the Summary of the ratings and you can hit Submit to apply the changes.
Step 6: App pricing
Now, it’s time to specify whether your app will be free or paid. If it is paid you can set the pricing of your app. Go to App pricing under the Monetize section in the left menu.

Note – You can transform a free app into a paid one but vice versa is not possible.
Step 7: Upload App Bundles or AAB Files
Now arrives the principal step for which all the trauma is going on. Finally submit your app file to Google Play. Here you need to decide whether you want to release internal testing, alpha testing, beta testing, or production testing.
For that, from the App dashboard, go to the appropriate section and select Create a new release.
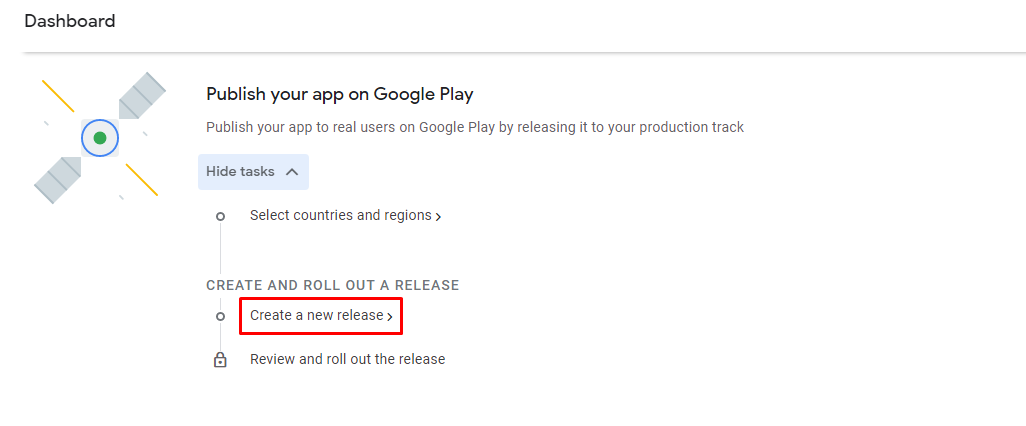
Now, select Create new release.

Then upload an .AAB file of your app and add Release details
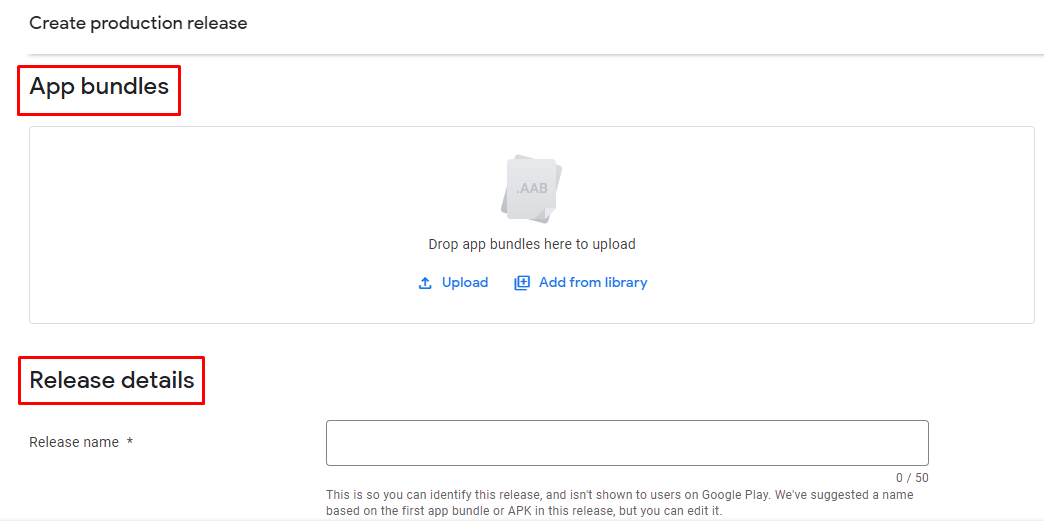
When you are done with all the details, you can check for errors and correct them. Then you can finally go for the Start rollout release for your android app.
Bingo! Your app is released for review to Google Play Store. Now all you have to do is wait for Google Play’s approval. It will take up to 7 days to get it approved. Once approved, it will be available publicly for download on Google Play Store.
Wrapping Up
Hope this guide will help you submit your app successfully to the Google Play Store. After publishing you need a strong marketing strategy for your mobile app. Keep on updating and modifying your app. Track the app analytics to get an idea of which area needs improvements.
Occupied in other areas of your business and don’t have time to focus on mobile applications? Not to worry, we are here for you! Get a ready-made mobile app


That is a fantastic explanation about submitting your app to the google play store.