Hello Magento Folks,
Welcome again in the Magento Tutorial series where you will find precise and detailed solutions of all the Magento related topics and issues. Today I am here to guide you all through How to install themes in Magento 2 step by step. Kidly visit the previously published article with the detailed solution for How to Remove Customer Account Navigation Links In Magento 2.
Introduction
Mainly, Magento includes all the rich themes and functionalities required for an online store at this time. It includes all the features for which Magento is known as one of the best Ecommerce platforms in this time. To make your store attractive, the installation of the best theme in your Magento 2 Store is a mandatory task for all.
Choosing the right theme that will fit perfectly in your store is also an important task. And making that task easy for you here in this article Top 10 Best Responsive Magento Themes for 2021. The theme will be more effective in making your store attractive, improved features and looks and user-friendly. Nowadays as the book is judged by its cover your online store is also judged by the looks and customer experience.
Steps to Configure Install Theme In Magento 2:
Download the Theme
Download your wisely chosen Magento 2 Theme which will be in the zipped form. After downloading the theme make sure to unzip the downloaded theme and you will get two folders namely App and Pub.
Upload the Theme
After completing the above step simply navigate to your store and upload the App and Pub folder to the root directory of your Magento 2 store.

Run Commands
Now, connect your Magento 2 store with the SSH and navigate to the root directory of your Magento 2 store.
Then run the below given command of upgrade:
php bin/magento setup:upgrade
After performing the above step run the given below command for deploy of the static content:
php bin/magento setup:static-content:deploy
Apply the Theme
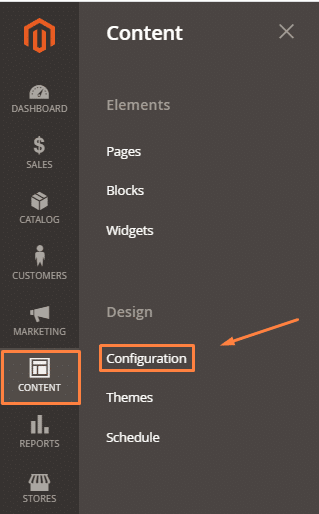
Now, go to the admin panel and navigate to Content → Configuration as shown in the screenshot below.
Now click on the edit button as shown in the screenshot below.

Choose your uploaded theme from the dropdown and click on save configuration as shown in the screenshot below.

Choose your uploaded theme from the dropdown and click on save configuration as shown in the screenshot below.

After the implementation of the above easy steps you can visit the website the theme will be applied.
Over to You!
Therefore, after performing the above give steps you will be able to upload and apply the theme in your Magento 2 store. In case of any difficulties you find in the implementation of the above steps then kindly contact our Support Team and they will guide you through this.
Don’t forget to share this article with all your Magento members and also comment down your reviews regarding the article.
Happy Reading.


