Welcome again, Shopify Amigos, ?
Today in this tutorial, we are going to learn how to add product images on Shopify.
Shopify product images play a vital role in helping customers confirm their buying decisions quickly.

Importance of Adding Product Image on Shopify
Images can easily grab customers’ attention than just text. Only 16% of your customers bother to read the text. This is why having high-resolution images on your Shopify store is very important.
For products, having product details and product images on Shopify store is equally important. Hence, adding product media to your Shopify stores will help your customers know the appearance of your product and convert easily.
Shopify allows you to add a maximum of 250 images. Also, Shopify automatically creates different product image sizes as per the different fields of your Shopify shop theme. For example, if any customer wants to view a zoomed-in image of your product, then Shopify will display a large product image on the product page.
So, let’s learn
How to add product images on Shopify?
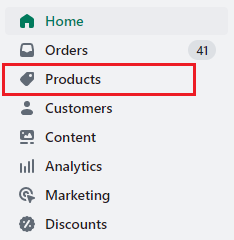
Step 1 –
Go to Shopify Admin > Products.
Step 2 –
Select the Product name to which you want to add the image.

Step 3 –
For instance, you have selected the Black Tie product.
Now the product page will open in front of you, where the first field is for the product Title, the second for the product Description and the third for the product Media.
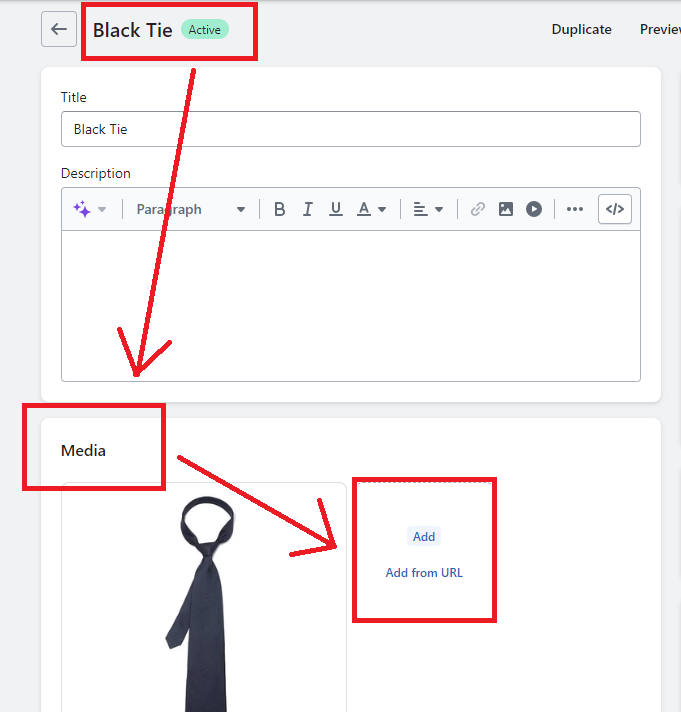
Here in this field, you are provided two options for adding the product image via your desktop device or by adding the image URL.
Choose the Add option if you want to add the product media from your desktop library.
Choose Add from URL option if you want to add the product media directly from the URL itself.
“Reminder: You can follow these same steps for adding product media from any mobile device (iOS & Android).”

Closing Phrase
It was easy, wasn’t it? I am sure you did not have a clue at all about how this task can be.
So now that you have learned this easy-peasy task, you can do it on your own effortlessly. But before taking it further, you must know the requirements for Shopify product image sizes and then add product images on Shopify according to the requirements.
Hope this Shopify tutorial was helpful for you, but if you need any further help with any major Shopify customization, then contact a Shopify development agency, get all your queries answered and then hire a Shopify developer according to your needs.
Happy Shopifying! ?
—————————————————————————————————————————————–
Frequently Asked Questions
(1) How do I add a product image on Shopify?
Answer: To add a product image on Shopify, follow these steps:
- Log in to your Shopify admin dashboard.
- From the sidebar, click on “Products” to access your product listings.
- Select the product for which you want to add an image, or create a new product by clicking on the “Add product” button.
- Within the product editing page, scroll down to the “Images” section.
- Click on the “Add image” button or drag and drop the image file from your computer into the designated area.
- Choose the image you want to upload from your computer’s files.
- After selecting the image, you can adjust the position, size, and cropping by using the available editing tools.
- Add an “Alt text” for the image. This text is displayed when the image cannot be loaded and also aids in accessibility.
- If desired, you can add additional images by repeating the process.
- Click on the “Save” or “Save product” button to apply the changes.
(2) What are the recommended image dimensions for product images on Shopify?
Answer: Shopify recommends using square images with a minimum resolution of 2048 x 2048 pixels. This ensures that your images look sharp and professional on various devices and screen sizes. However, the platform can handle images of different sizes and aspect ratios, so you have flexibility in choosing the image dimensions that best fit your products.
(3) Can I edit or remove a product image after uploading it on Shopify?
Answer: Yes, you can edit or remove a product image on Shopify. To edit an image, go to the product editing page, scroll down to the “Images” section, and click on the image you want to modify. This will open the image editor, where you can make changes to the position, size, or cropping. To remove an image, simply click on the trash bin icon or the “Remove” option next to the image in the “Images” section.
(4) Can I rearrange the order of product images on Shopify?
Answer: Yes, you can change the order of product images on Shopify. In the product editing page, go to the “Images” section and click and hold the image you want to move. Drag it to the desired position within the image list, and Shopify will automatically update the order.

(5) Are there any file size limitations for product images on Shopify?
Answer: Shopify has a file size limit of 20 MB for individual images. It’s generally recommended to optimize your images for web use to ensure faster loading times. If your image file size exceeds the limit, you may need to resize or compress the image before uploading it to Shopify.
(6) Can I add multiple images to a single variant of a product?
Answer: Yes, you can add multiple images to a single variant of a product on Shopify. When editing the product variant, you’ll find an “Images” section where you can upload or select additional images specifically for that variant. This allows you to showcase different views or variations of a product within the same listing.