Welcome back, Shopify Friends,
Data is the most crucial thing in this digital world, and all your Shopify data is stored in different files. Also, there are many reasons why a Shopify merchant has to upload specific files to their Shopify store.
A Shopify merchant might need to add a blog post to the website or product, an entire product page, product collections, product images, or a business logo to any page or a file your customers might need to download for certain reasons.

This Shopify tutorial will teach you how to upload, delete and manage your Shopify files.
Shopify File Requirements
All the files that are needed to be uploaded to your Shopify store must have a size of less than 20 MB. Trial membership users cannot use this feature.
- All the image files must be in the format of .png, .gif, and .jpg.
- All the video files must be in the format of .mp4 and .mov.
- If there are any .svg files, they will automatically be converted into .png files while uploading.
Upload Files
Uploading Shopify files account is simple. You just need to follow these quick steps below –
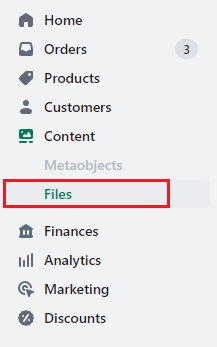
Step 1 – Shopify Admin > Content > Files
Step 2 – Select Upload Files.
Step 3 – Select the files you want to upload to the Shopify store from your computer.
Delete and Manage Files
All your uploaded files will be saved in the following path Content > Files
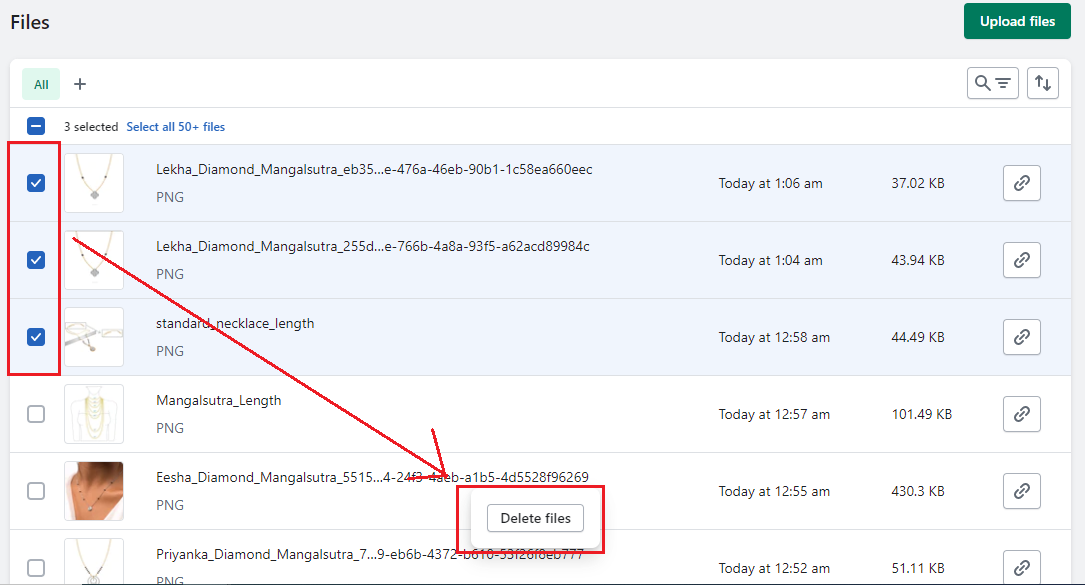
Managing a dozen of files is easy, but managing them in bulk is even easier than deleting them individually.
Step 1 – Select the checkbox before the product name in the leftmost corner. You can also select multiple products at once.
Step 2 – Select the Delete Files button on the page’s bottom.
Ending Note
I am sure you did not believe that uploading, managing and deleting files in Shopify was this easy.
All you need is to follow these mentioned steps, and you can nail the task.
Before starting the task, ensure all your files meet all the Shopify guidelines.
If you need any customization to your Shopify store or develop a new Shopify store from scratch, hire Shopify developers and every thing will be done with a snap of time.
Happy Shopifying!?

—————————————————————————————————————————————–
Frequently Asked Questions
(1) How can I upload files in Shopify?
Answer: To upload files in Shopify, you can follow these steps:
- Log in to your Shopify admin panel.
- From your dashboard, navigate to “Settings” and select “Files.”
- Click on the “Upload files” button.
- Choose the file you want to upload from your computer.
- Once selected, click on the “Open” or “Choose” button to start the upload.
- Wait for the upload to complete. You will see a progress bar indicating the status.
- Once uploaded, the file will appear in the list of files.
(2) How can I manage files in Shopify?
Answer: To manage files in Shopify, you can use the following methods:
- Edit file details: From the “Files” section in your Shopify admin, find the file you want to edit and click on its name. You can then modify the file name, description, and alt text.
- Create folders: Shopify allows you to organize your files into folders. To create a folder, go to the “Files” section, click on the “Create folder” button, enter a name for the folder, and click “Save.”
- Search and filter files: You can search for files using keywords or filter them based on file type, date, or name. Use the search bar or the available filter options to find specific files.
- Use file URLs: Each file in Shopify has a unique URL that you can use to link or embed the file on your website or in your product descriptions. Copy the file URL and use it wherever needed.
(3) How can I delete files in Shopify?
Answer: To delete files in Shopify, follow these steps:
- From your Shopify admin panel, go to “Settings” and select “Files.”
- Locate the file you want to delete in the list.
- Click on the checkbox next to the file name to select it.
- Once selected, click on the “Actions” button and choose “Delete selected.”
- Confirm the deletion by clicking “Delete” in the pop-up window.
Please note that deleting a file is permanent, and once deleted, it cannot be recovered. Make sure to double-check before deleting any files.
(4) Can I upload and manage multiple files at once in Shopify?
Answer: Yes, you can upload and manage multiple files at once in Shopify. Follow these steps:
- From the “Files” section in your Shopify admin, click on the “Upload files” button.
- Select multiple files from your computer by holding down the Ctrl (Windows) or Command (Mac) key while selecting the files.
- Click on the “Open” or “Choose” button to start the upload.
- Wait for the upload to complete. You will see a progress bar indicating the status.
- Once uploaded, the files will appear in the list of files, and you can manage them individually as needed.

(5) Are there any limitations or restrictions on file uploads in Shopify?
Answer: Yes, there are some limitations and restrictions on file uploads in Shopify:
- File size limit: The maximum file size allowed for upload in Shopify is 20 MB.
- File types: Shopify supports various file types, including images (JPEG, PNG, GIF), audio files (MP3), video files (MP4), documents (PDF, DOC, TXT), and more. However, certain file types such as executable files (EXE) are not allowed for security reasons.
- Storage limit: The amount of storage space available for your files depends on your Shopify plan.