Hello Laravel Friends,
In this Laravel tutorial, I will explain How to Upload Image in Laravel.
Using these steps, you can upload any media file in Laravel smartly. Before starting, we need some prerequisites.
Prerequisites:
Need to set up a Laravel project on your PC.

Steps to Upload Image in Laravel:
Step 1: Install spatie media library
Run the below command into your project root directory
$ composer require spatie/laravel-medialibrary
Introduction of spatie/laravel-medialibrary:
This package can associate all sorts of files with Eloquent models. It provides a simple, fluent API to work with.
Step 2: Setup spatie/laravel-medialibrary
Run the below command
$ php artisan vendor:publish --provider="Spatie\MediaLibrary\MediaLibraryServiceProvider" –tag="migrations"
This command publishes the migrations file and that Service provider.
$ php artisan migrate
Migrate the media table into your database.
Step 3: Make the User route
Add the below code in your route/web.php
use App\Http\Controllers\UserController;
use Illuminate\Support\Facades\Route;

Route::get('/users', [UserController::class, 'index'])->name('user.index');
Route::get('/user', [UserController::class, 'create'])->name('user.create');
Route::post('/user', [UserController::class, 'store'])->name('user.store');
Step 4: Create a Controller to process the request
$ php artisan make:controller UserController
Now navigate to the below path
app/Http/Controllers/UserController.php
Then add the code as follows
<?php

namespace App\Http\Controllers;

use App\Models\User;
use Illuminate\Http\Request;

class UserController extends Controller
{
    public function index(Request $request)
    {
        $users = User::all();
        return view('user.index', compact('users'));
    }

    public function create(Request $request)
    {
        return view('user.create');
    }

    public function store(Request $request)
    {
        $user = User::create([
            'name' => $request->name,
            "email" => $request->email,
            "password" => $request->password,
        ]);
        if($request->hasFile('avatar') && $request->file('avatar')->isValid()){
            $user->addMediaFromRequest('avatar')->toMediaCollection('avatar');
        }
        return redirect()->route('user.index');
    }
}
Step 5: Create a Blade file
In your view directory, create 2 files – create.blade.php and index.blade.php
Move to the following path
resources/views/user/index.blade.php
Add below code-snippet
<!DOCTYPE html>
<html lang="{{ str_replace('_', '-', app()->getLocale()) }}">
<head>
    <meta charset="utf-8">
    <meta name="viewport" content="width=device-width, initial-scale=1">
    <title>Upload Media in Laravel</title>
    <link href="https://cdn.jsdelivr.net/npm/bootstrap@5.0.2/dist/css/bootstrap.min.css" rel="stylesheet">
</head>
<body>
    <div class="container">
        <div class="d-flex p-2 bd-highlight mb-3">
            <a href="{{ route('user.create') }}" class="btn btn-dark">Add</a>
        </div>
        <table class="table">
            <thead>
                <tr>
                    <th>#</th>
                    <th>Name</th>
                    <th>Email</th>
                    <th width="30%">Avatar</th>
                </tr>
            </thead>
            <tbody>
                @foreach($users as $key=>$item)
                <tr>
                    <td>{{ ++$key }}</td>
                    <td>{{ $item->name }}</td>
                    <td>{{ $item->email }}</td>
                    <td><img src="{{$item->getFirstMediaUrl('avatar', 'thumb')}}" / width="120px"></td>
                </tr>
                @endforeach
            </tbody>
        </table>
    </div>
</body>
</html>
Now navigate to the following path
resources/views/user/create.blade.php
Then add the code as follows
<!DOCTYPE html>
<html lang="{{ str_replace('_', '-', app()->getLocale()) }}">
<head>
<meta charset="utf-8">
<meta name="viewport" content="width=device-width, initial-scale=1">
<title>Upload Media in Laravel</title>
<link href="https://cdn.jsdelivr.net/npm/bootstrap@5.0.2/dist/css/bootstrap.min.css" rel="stylesheet">
</head>
<body>
<div class="container">
<div class="col-6 m-auto">
<div class="card ">
<div class="card-header">
<div class="d-flex p-2 bd-highlight mb-3 justify-content-between">
<h4 class="card-title m-0">User Create</h4>
<a href="{{ route('user.index') }}" class="btn btn-outline-danger btn-sm h-auto">Go Back</a>
</div>
</div>
<div class="card-body">
<form action="{{ route('user.store') }}" enctype="multipart/form-data" method="post">
@csrf
<div class="mb-3">
<label>Name</label>
<input type="text" name="name" class="form-control">
</div>
<div class="mb-3">
<label>Email</label>
<input type="email" name="email" class="form-control">
</div>
<div class="mb-3">
<label>Password</label>
<input type="password" name="password" class="form-control">
</div>
<div class="mb-3">
<label>Avatar:</label>
<input type="file" name="avatar" class="form-control">
</div>
<div class="d-grid">
<button class="btn btn-primary">Store</button>
</div>
</form>
</div>
</div>
</div>
</div>
</body>
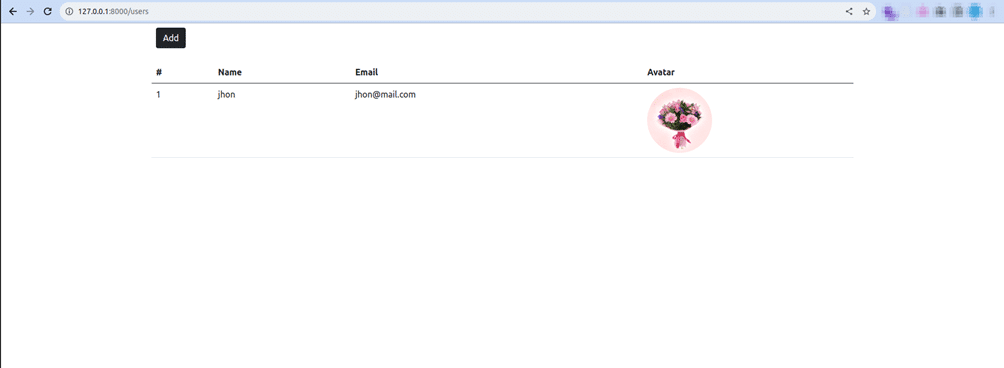
</html>Step 6: Now run your magic at 127.0.0.1:8000 URL
$ php artisan co:ca
$ php artisan ro:ca
$ php artisan serve
Output:
Conclusion:
That’s it! You’ve successfully implemented image uploads in a Laravel application. Users can now upload images, and you can display them as needed. If you need any further assistance, you can reach out to Laravel Developers.

Happy Coding!