Do you know that you can create customer groups in Shopify and categorize different Shopify customers into different Shopify customer groups according to the tags assigned to them on the basis of their search criteria in Shopify?
Of course, YES. Don’t underestimate Shopify. Shopify allows you to do it all.
You can organize your Shopify customers into different Shopify customer groups.

By doing this, you can easily identify trends and compare them with certain customer groups in Shopify.
Filter Individual Customers
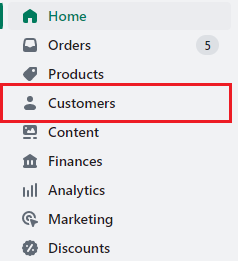
Step 1 – Go to Shopify Admin > Customers
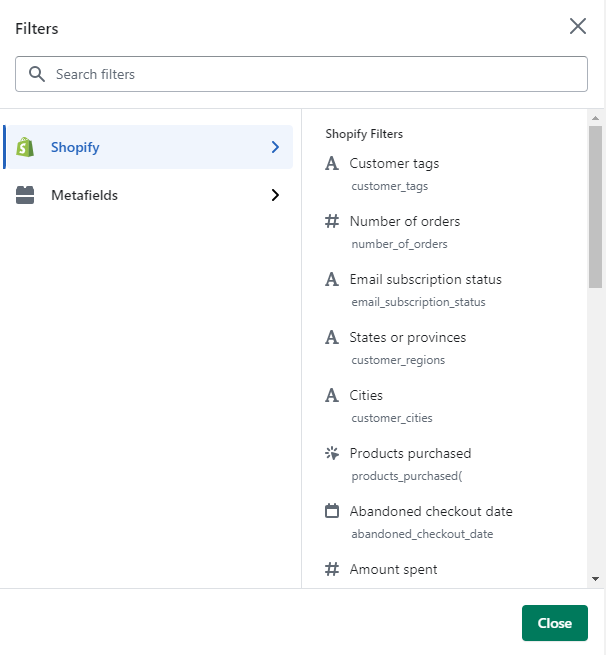
Step 2 – Select the filter option. You have two options from where you can select the filter option.
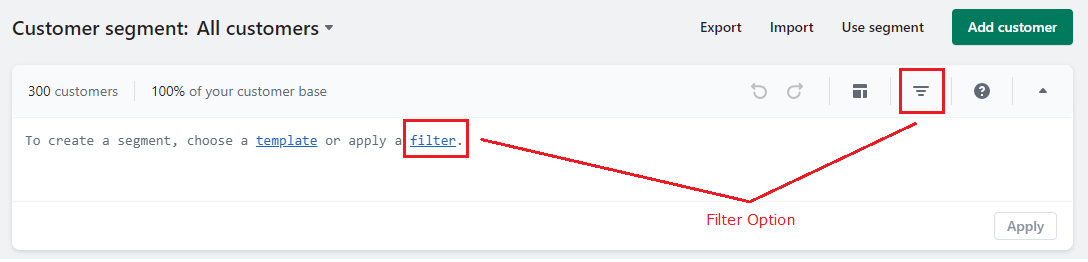
Step 3 – A drop-down menu will appear on the screen. Choose the tag type in which you want to filter your Shopify customer.
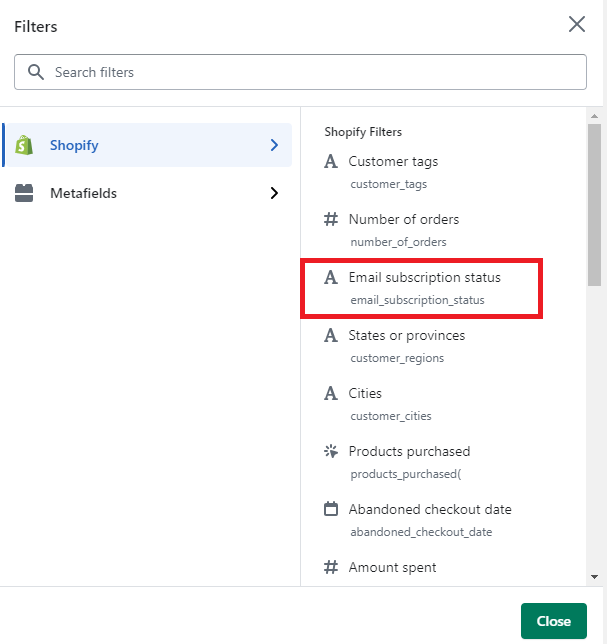
Step 4 – Suppose you have selected the filter Email Subscription Status.
Step 5 – After selecting this filter name. A code for the filter with a dropdown will be generated in Shopify’s customer segments.
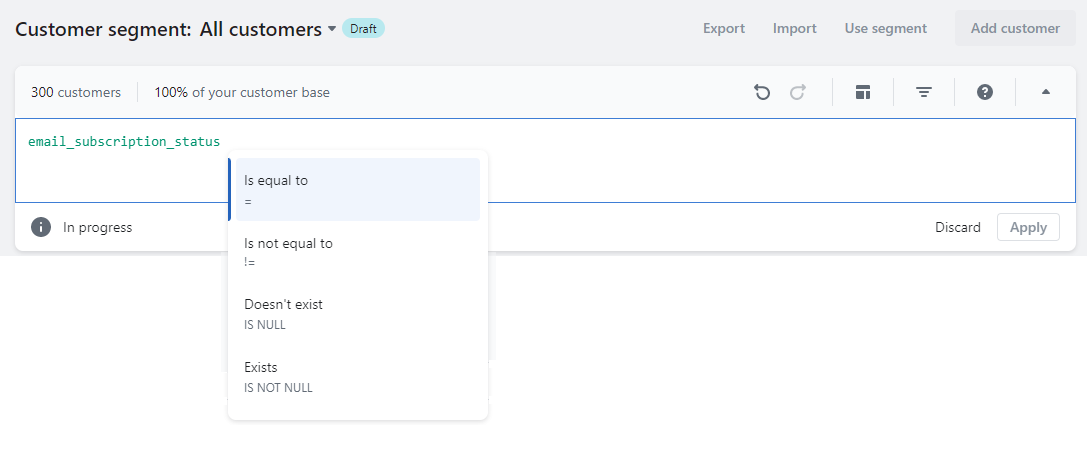
Step 6 – Select the is equal to option.
Step 7 – Now, you want to filter customers with SUBSCRIBED email subscription status. Select the ‘SUBSCRIBED’ option and apply the filter.
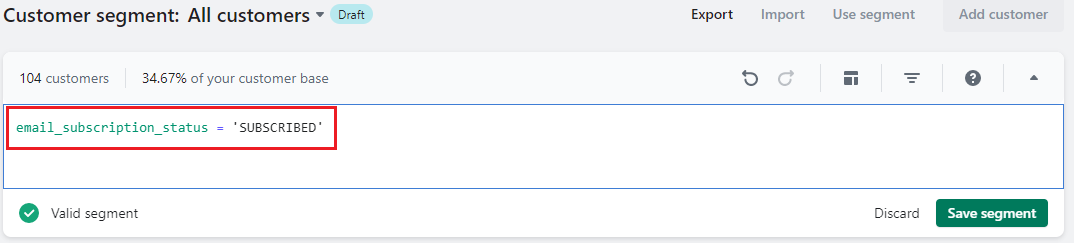
After applying the filter, a list of customer names who have subscribed to your email newsletter will appear on the screen.
If you want to save this filtered data in a new Shopify customer segment, you can do it by selecting the Save Segment option, which will save the segment.

Sort your Shopify Customers list
Your customers will be organized from newest to oldest.
You are allowed to sort your Shopify customers by clicking “Name,” “Location,” “Orders,” “Last order,” or “Total spent.” Clicking a second time will reverse the sort order.
Create Customer Groups
Now that you have performed a search for customers with certain bars, and now you can use this obtained data in your further branding and marketing services.
For instance, now you want to obtain data on customer groups in Shopify based on location.
Step 1 – Continue from the 7th step of the customer filtering process and add another filter of AND.

Step 2 – As you want to filter the Shopify customer segment according to the country names, select another filter name, Countries or regions.

Step 3 – Enter the value contains and then the country name, US.
Now the code will look something like this ?

Apply the filter and list all your US-based customers who have subscribed to your email newsletter will be appeared on the screen.
- If you want to save this customer group in Shopify, select the Save Segment, and your customer segment will be saved on Shopify.
- You can add as many filter codes as you want to get accurate results for the customer groups and create a customer segment for each Shopify customer list you filter out.
Filtering the tutorial
Congratulate yourself ?. You just learned an amazing feature!
Follow these simple steps, and you will achieve fruitful results, but if you face any hurdles in the process, try consulting a Shopify expert or hiring an experienced Shopify developer.
The capabilities of this Shopify feature for marketing are truly boundless. It allows for the focused targeting of particular customer groups and a detailed examination of their patterns of behavior and shopping with your business.
Happy Marketing! ?
—————————————————————————————————————————————–
Frequently Asked Questions
(1) How do I group customers on Shopify?
Answer:
- Step 1: Search or filter customer list. First, you can search for customers or you can filter your customer list by clicking Filters.
- Step 2: Select Save search.
- Step 3: Type the name for your search result.
- Step 4: Create customer groups.
- Step 5: Choose Save.
(2) Does Shopify have customer groups?
Answer: Shopify admin includes some default customer segments and templates that you can use as they are, change to suit your needs, or use as a starting point to create a new customer segment.
(3) How do I search for customers in Shopify?
Answer: To search for customers in Shopify, follow these steps:
- Log in to your Shopify admin panel.
- Click on the “Customers” tab in the left-hand sidebar.
- On the Customers page, you’ll find a search bar at the top. Enter the name, email, or any other relevant information related to the customer you want to find.
- As you type, the search results will automatically update below the search bar, displaying matching customers.

(4) Can I filter customers based on specific criteria in Shopify?
Answer: Yes, Shopify allows you to filter customers based on various criteria. Here’s how you can do it:
- Log in to your Shopify admin panel.
- Go to the “Customers” section.
- On the Customers page, you’ll find a “Filter” button on the right side.
- Click on the “Filter” button, and a dropdown menu will appear.
- In the dropdown menu, you can select various filter options, such as tags, location, order count, total spend, and more.
- Choose the desired filter criteria, and the customer list will update to display customers who meet the selected criteria.
(5) How can I group customers in Shopify?
Answer: In Shopify, you can use tags to group customers based on specific attributes or characteristics. Here’s how you can group customers using tags:
- Log in to your Shopify admin panel.
- Go to the “Customers” section.
- On the Customers page, you’ll see a list of customers.
- Select the customer(s) you want to group by checking the boxes next to their names.
- Once the customer(s) are selected, click on the “Actions” button at the top and choose “Add tags” from the dropdown menu.
- Enter a tag name in the text field or select an existing tag from the suggestions.
- Click “Save” to add the tag(s) to the selected customer(s).
- Now, you can easily filter or search for customers using these tags to view or manage specific customer groups.