
Hello Magento Friends,
In this Magento tutorial blog, I am going to illustrate How to make Sidebar Sticky in Magento 2.
Sticky Sidebar is the same as Sticky Header that will be displayed all-time on the display window. Check our previous article where I have discussed How to Add Sticky Header Component in Magento 2.
With a sticky sidebar, you can display important elements of the product including add to cart button, or product options. The customer can freely explore your Magento 2 store and add the product to the cart anytime they wish.
Let’s start with How to make Sidebar Sticky in Magento 2.
Steps to make Sidebar sticky in Magento 2:
Step 1: Create _extend.less file as given below path and add code.
app\design\frontend\Themes\Yourtheme\web\css\source\
.media-width(@extremum, @break) when (@extremum = 'min') and (@break = @screen__m)
{
    .box-tocart .action.tocart
    {
        width: 100%;
        margin-right: 0;
    }
    .sidebar
    {
        &.fixed
        {
            position: fixed;
        }
    }
}
Step 2: Create catalog_product_view.xml file as give below path and add code.
app\design\frontend\Themes\Yourtheme\Magento_Catalog\layout\
<?xml version="1.0"?>
<page layout="2columns-right" xmlns:xsi="http://www.w3.org/2001/XMLSchema-instance" xsi:noNamespaceSchemaLocation="urn:magento:framework:View/Layout/etc/page_configuration.xsd">
    <body>
        <referenceBlock remove="true" name="catalog.compare.sidebar" />
        <referenceBlock remove="true" name="wishlist_sidebar" />
        <move element="product.info" destination="sidebar.additional" />
        <referenceContainer name="sidebar.additional">
            <block class="Magento\Framework\View\Element\Template"
                   name="sidebar_sticky"
                   template="Magento_Catalog::product/view/sidebar_sticky.phtml"
                   after="-" />
        </referenceContainer>
	 </body>
</page>
Step 3: Create sidebar_sticky.phtml file as give below path and add code.
app\design\frontend\Themes\Yourtheme\Magento_Catalog\templates\product\view\
<script type="text/javascript" data-mage-init='{"sidebarstickyshow":{}}'>
</script>
Step 4: Create requirejs-config.js file as give below path and add code.
app\design\frontend\Themes\Yourtheme\
var config = {
    map: {
        "*": {
            sidebarstickyshow: "js/sticky-sidebar",
        }
    }
};
Step 5: Create a sticky-sidebar.js file as give below path and add code.
app\design\frontend\Themes\Yourtheme\web\js\
define(["jquery", "matchMedia", "domReady!"], function ($, mediaCheck)
{
"use strict";
var sidebar = {};
var product_form_class = $(".product-add-form");
var mobile_target_detect = $(".product-info-main > .price-box");
var page_main = $(".page-main");
var page_main_view_show;
var main = $(".main");
var main_view;
var header = $(".page-header");
var nav = $(".nav-sections");
var breadcrumbs = $(".breadcrumbs");
var product_addtocart_bottom = parseInt($("#product-addtocart-button").css("margin-bottom"));
var padding_bottom = parseInt(main.css("padding-bottom"));
var margin_bottom = parseInt($(".product.info.detailed").css("margin-bottom"));
sidebar.el = $(".sidebar");
sidebar.padding_ratio = parseFloat(sidebar.el.css("padding-left")) / page_main.width();
sidebar.horizontalview = function ()
{
if (sidebar.el.hasClass("fixed"))
{
page_main_view_show = parseFloat(page_main.width());
main_view = parseFloat(main.width());
sidebar.width = page_main_view_show - main_view;
sidebar.left = ($(window).width() - page_main_view_show) / 2 + main_view;
sidebar.p_left = parseInt(page_main_view_show * sidebar.padding_ratio);
sidebar.el.css({
"width": sidebar.width + "px",
"left": sidebar.left + "px",
"padding-left": sidebar.p_left + "px"
});
}
};
sidebar.desktopview = function ()
{
sidebar.height = sidebar.el.height();
var scrolled_from_top = $(window).scrollTop();
var header_h = header.outerHeight(true) || 0;
var nav_h = nav.outerHeight(true) || 0;
var breadcrumbs_h = breadcrumbs.outerHeight(true) || 0;
var content_h = main.outerHeight(true) || 0;
var sidebar_limit_top = header_h + nav_h + breadcrumbs_h;
var sidebar_limit_bottom = sidebar_limit_top + content_h;
var sidebar_limit_bottom_criteria = scrolled_from_top + sidebar.height + padding_bottom + product_addtocart_bottom - margin_bottom;
if (sidebar_limit_bottom < sidebar_limit_bottom_criteria)
{
sidebar.top = sidebar_limit_bottom - sidebar_limit_bottom_criteria;
sidebar.el.css({"top": sidebar.top + "px"});
}
else if (scrolled_from_top > sidebar_limit_top)
{
if (!sidebar.el.hasClass("fixed"))
{
sidebar.el.addClass("fixed");
sidebar.horizontalview();
}
sidebar.top = 0;
sidebar.el.css({"top": sidebar.top + "px"});
}
else
{
sidebar.el.removeClass("fixed").removeAttr("style");
}
};
var onResize = function ()
{
$(window).on("resize", function ()
{
sidebar.horizontalview();
});
}, onScroll = function ()
{
$(window).on("scroll", function ()
{
sidebar.desktopview();
});
}, onInit = function ()
{
mediaCheck({
media: "(min-width: 768px)",
entry: function ()
{
sidebar.el
.addClass("fixed")
.prepend(product_form_class.detach());
sidebar.horizontalview();
sidebar.desktopview();
onResize();
onScroll();
},
exit: function ()
{
product_form_class.detach().insertAfter(mobile_target_detect);
sidebar.el
.removeClass("fixed")
.removeAttr("style");
}
});
};
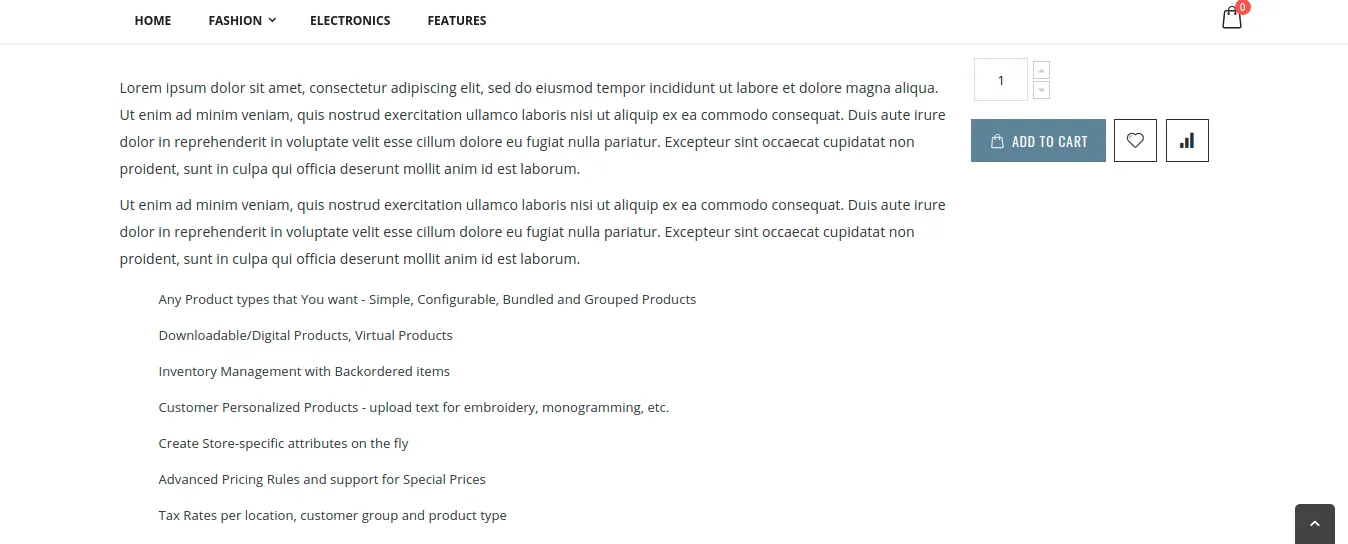
});Check final result as shown below:
Conclusion:
Hence, implementing the above steps will help you to make Sidebar Sticky in Magento 2. Also, check out Magento 2 Sticky Add To Cart extension for displaying an appealing sticky bar and Add to Cart button. In case you face any difficulty, leave a comment below. I will be right back to you. Also, do not forget to share the solution with your Magento co-workers. Stay tuned for more updates!
Happy Reading!