Hello Magento Friends,
In today’s blog, we will learn How to Add Custom Tab on Admin Dashboard in Magento 2.

Creating a custom tab on the admin dashboard in Magento 2 can be a useful way to display specific information or tools that are relevant to your business. Here’s a step-by-step guide on how to add a custom tab on the Magento 2 admin dashboard:
Steps to Add Custom Tab on Admin Dashboard in Magento 2:
Step 1: First, we need to create a “routes.xml” file inside the extension at the following path.
app\code\Vendor\Extension\etc\adminhtml\
Then add the code as follows
<?xml version="1.0"?>
<config xmlns:xsi="http://www.w3.org/2001/XMLSchema-instance" xsi:noNamespaceSchemaLocation="urn:magento:framework:App/etc/routes.xsd">
    <router id="admin">
        <route id="vendor" frontName="vendor">
            <module name="Vendor_Extension" before="Vendor_Extension" />
        </route>
    </router>
</config>
Step 2: After that, we need to create the “Bestvendors.php” file inside the extension at the following path.
app\code\Vendor\Extension\Controller\Adminhtml\Dashboard
And add the below-mentioned code
<?php
namespace Vendor\Extension\Controller\Adminhtml\Dashboard;

use Magento\Backend\App\Action\Context;
use Magento\Framework\View\Result\PageFactory;
use Magento\Backend\Controller\Adminhtml\Dashboard\AjaxBlock;
use Magento\Framework\Controller\Result\RawFactory;
use Magento\Framework\View\LayoutFactory;

class Bestvendors extends AjaxBlock
{
    protected $resultRawFactory;
    protected $layoutFactory;

    public function __construct(
        Context $context,
        RawFactory $resultRawFactory,
        LayoutFactory $layoutFactory,
        PageFactory $resultPageFactory
    ) {
        parent::__construct($context,$resultRawFactory,$layoutFactory);
        $this->_resultPageFactory = $resultPageFactory;
    }

    public function execute()
    {
        $resultPage = $this->_resultPageFactory->create();
        $resultPage->getConfig()->getTitle()->prepend(__('Add Custom Tab'));

        $block = $resultPage->getLayout()
                ->createBlock('Magento\Framework\View\Element\Template')
                ->setTemplate('Vendor_Extension::custom_file.phtml')
                ->toHtml();

        $this->getResponse()->setBody($block);
    }
}
Step 3: After that, we need to create a “custom_file.phtml” file inside the extension at the following path.
app\code\Vendor\Extension\view\adminhtml\templates
Now, add the following piece of code
<div>
     <?php echo __("Hello");?>
</div>
Step 4: After that, we need to create a “di.xml” file inside the extension at the following path.
app\code\Vendor\Extension\etc\adminhtml\
Now add the code as follows
<?xml version="1.0"?>
<config xmlns:xsi="http://www.w3.org/2001/XMLSchema-instance" xsi:noNamespaceSchemaLocation="../../../../../lib/internal/Magento/Framework/ObjectManager/etc/config.xsd">
    <preference for="Magento\Backend\Block\Dashboard\Grids" type="Vendor\Extension\Block\Dashboard\Grids"/>
</config>
Step 5: After that, we need to create a “Grids.php” file inside the extension at the following path.
app\code\Vendor\Extension\Block\Dashboard\
And include the below code snippet
<?php

namespace Vendor\Extension\Block\Dashboard;

class Grids extends \Magento\Backend\Block\Dashboard\Grids
{
    protected function _prepareLayout()
    {
        parent::_prepareLayout();
        $this->addTab(
            'best_vendors',
            [
                'label'     => __('Best Vendors'),
                'url'       => $this->getUrl('vendor/dashboard/bestvendors', ['_current' => true]),
                'class'     => 'ajax',
                'active'    => false
            ]
        );
    }
}
Step 6: Once all files are created in your Magento, you need to run Magento upgrade, compile and deploy commands as follows.
php bin/magento setup:upgrade
php bin/magento setup:static-content:deploy -f
php bin/magento setup:di:compile
php bin/magento cache:clean
php bin/magento cache:flush
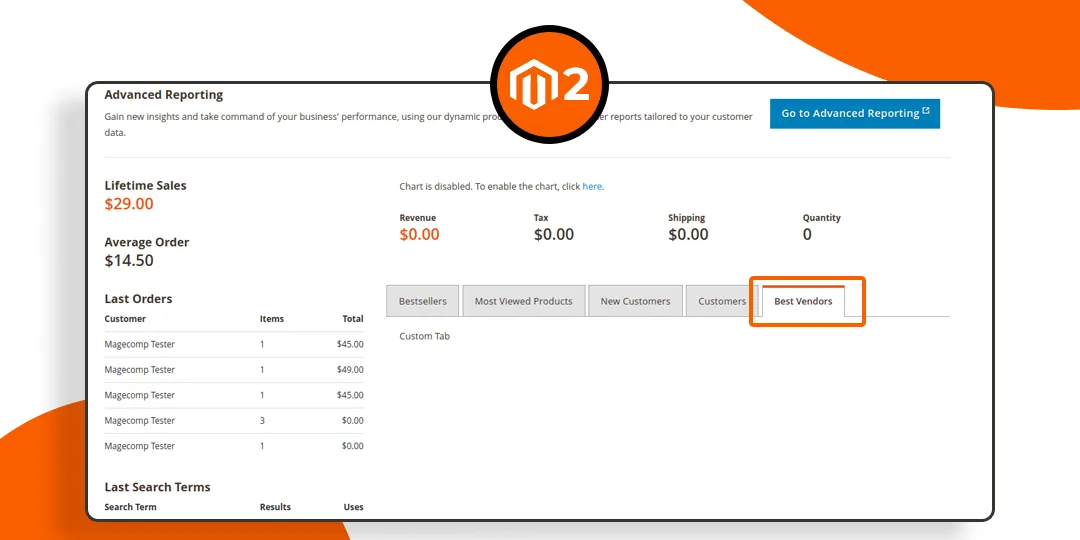
Output:
“Best Vendor” tab added in the Magento 2 Admin Dashboard.

Conclusion:
Hence, this way, you can add custom tabs in the admin dashboard of your Magento 2 store.

There are other areas of your Magento 2 store where you can add a custom tab:
If you have any doubts regarding the above steps, feel free to connect with me through the comment section. Share the tutorial with your friends if you found it useful. Stay in touch with us for more such Magento 2 tutorials.
Happy Coding!