Hello Magento Friends,
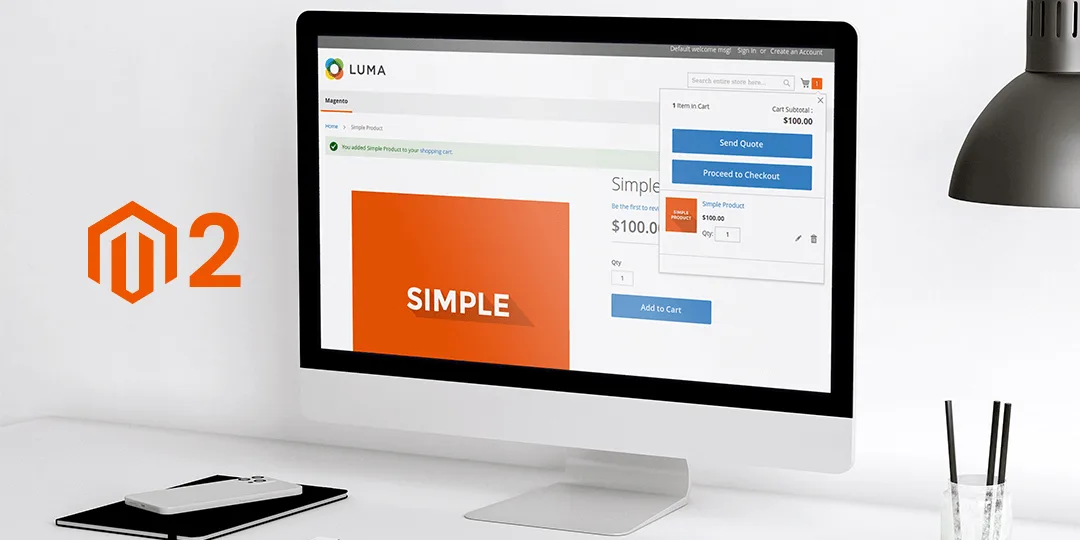
Today’s Magento solution is on Magento 2: How to Add Custom Button in Minicart.
A small cart icon on the top-right of the webpage is a mini cart that displays the summary of the products added to the cart. The customers can view their cart items without leaving the shopping process.
Although you can customize the mini cart according to your requirements in Magento 2. Sometimes the admin needs to add a custom button in the mini cart and perform some action on this button. Adding a custom button to the mini cart increases the user experience as the customers can perform actions without leaving their buying process.
Follow the below steps to Add a Custom Button in Minicart of your Magento 2 Store.
Steps to Add Custom Button in Minicart in Magento 2:
Step 1: First, we need to create a “default.xml” file inside the extension at the following path.
app\code\Vendor\Extension\view\frontend\layout\
Now add the below code
<?xml version="1.0"?>
<page xmlns:xsi="http://www.w3.org/2001/XMLSchema-instance" xsi:noNamespaceSchemaLocation="urn:magento:framework:View/Layout/etc/page_configuration.xsd">
    <body>
        <referenceContainer name="header-wrapper">
            <referenceBlock name="minicart">
                <arguments>
                    <argument name="jsLayout" xsi:type="array">
                        <item name="components" xsi:type="array">
                            <item name="minicart_content" xsi:type="array">
                                <item name="config" xsi:type="array">
                                    <item name="template" xsi:type="string">Vendor_Extension/minicart/content</item>
                                </item>
                            </item>
                        </item>
                    </argument>
                </arguments>
            </referenceBlock>
        </referenceContainer>
    </body>
</page>
Step 2: After that, we need to create a “requirejs-config.js” file inside the extension at the following path.
app\code\Vendor\Extension\view\frontend\
And add the code as mentioned below
var config = {
    config: {
        mixins: {
            'Magento_Checkout/js/view/minicart': {
                'Vendor_Extension/js/view/minicart-mixin': true
            }
        }
    }
};
Step 3: After that, we need to create a “minicart-mixin.js” file inside the below path
app\code\Vendor\Extension\view\frontend\web\js\view\
Then, add the below-mentioned code
define([
    'uiComponent',
    'Magento_Customer/js/customer-data',
    'jquery',
    'ko',
    'underscore',
    'sidebar',
    'mage/translate',
    'mage/dropdown'
], function (Component, customerData, $, ko, _) {
    'use strict';

    var mixin = {
        isButtonEnable: function () {
           /* you need to add your custom code here */
            return true;
        }
    };

    return function (target) {
        return target.extend(mixin);
    };
});
Step 4: After that, we need to create a “content.html” file inside the below path
app\code\Vendor\Extension\view\frontend\web\template\minicart\
After that, include the code as follows
<div class="block-title">
    <strong>
        <span class="text" translate="'My Cart'"/>
        <span
            class="qty empty"
            text="getCartParam('summary_count')"
            data-bind="css: { empty: !!getCartParam('summary_count') == false },
                       attr: { title: $t('Items in Cart') }">
        </span>
    </strong>
</div>

<div class="block-content">
    <button type="button"
            id="btn-minicart-close"
            class="action close"
            data-action="close"
            data-bind="attr: { title: $t('Close') }">
        <span translate="'Close'"/>
    </button>

    <if args="getCartParam('summary_count')">
        <div class="items-total">
            <span class="count" if="maxItemsToDisplay < getCartLineItemsCount()" text="maxItemsToDisplay"/>
            <translate args="'of'" if="maxItemsToDisplay < getCartLineItemsCount()"/>
            <span class="count" text="getCartParam('summary_count')"/>
                <!-- ko if: (getCartLineItemsCount() === 1) -->
                    <span translate="'Item in Cart'"/>
                <!--/ko-->
                <!-- ko if: (getCartLineItemsCount() > 1) -->
                    <span translate="'Items in Cart'"/>
                <!--/ko-->
        </div>

        <each args="getRegion('subtotalContainer')" render=""/>
        <each args="getRegion('extraInfo')" render=""/>
        <if args="isButtonEnable()">
		<div class="actions">
		    <div class="primary">
		        <button  type="button"
		                class="action primary checkout custombutton"
		                data-action="close"
		                translate="'Send Quote'"/>
		    </div>
		</div>
        </if>
		<div class="actions" if="getCartParam('possible_onepage_checkout')">
		    <div class="primary">
		        <button
		                id="top-cart-btn-checkout"
		                type="button"
		                class="action primary checkout"
		                data-action="close"
		                data-bind="
		                    attr: {
		                        title: $t('Proceed to Checkout')
		                    },
		                    click: closeMinicart()
		                "
		                translate="'Proceed to Checkout'"
		        />
		        <div data-bind="html: getCartParam('extra_actions')"></div>
		    </div>
		</div>
    </if>

    <if args="getCartParam('summary_count')">
        <strong class="subtitle" translate="'Recently added item(s)'"/>
        <div data-action="scroll" class="minicart-items-wrapper">
            <ol id="mini-cart" class="minicart-items" data-bind="foreach: { data: getCartItems(), as: 'item' }">
                <each args="$parent.getRegion($parent.getItemRenderer(item.product_type))"
                      render="{name: getTemplate(), data: item, afterRender: function() {$parents[1].initSidebar()}}"
                />
            </ol>
        </div>
    </if>

    <ifnot args="getCartParam('summary_count')">
        <strong class="subtitle empty"
                data-bind="visible: closeSidebar()"
                translate="'You have no items in your shopping cart.'"
        />
        <if args="getCartParam('cart_empty_message')">
            <p class="minicart empty text" text="getCartParam('cart_empty_message')"/>
            <div class="actions">
                <div class="secondary">
                    <a class="action viewcart" data-bind="attr: {href: shoppingCartUrl}">
                        <span translate="'View and Edit Cart'"/>
                    </a>
                </div>
            </div>
        </if>
    </ifnot>

    <div class="actions" if="getCartParam('summary_count')">
        <div class="secondary">
            <a class="action viewcart" data-bind="attr: {href: shoppingCartUrl}">
                <span translate="'View and Edit Cart'"/>
            </a>
        </div>
    </div>

    <div id="minicart-widgets" class="minicart-widgets" if="getRegion('promotion').length">
        <each args="getRegion('promotion')" render=""/>
    </div>
</div>
<each args="getRegion('sign-in-popup')" render=""/>
Step 5: Finally, after adding the code you need to run Magento upgrade and deploy commands.
Once you implement the above steps, your custom button is successfully added to the mini cart of your Magento 2 store.
Conclusion:
This way you can successfully Add Custom Button in Minicart in Magento 2. You can also implement other customizations with your mini cart in order to increase the customer experience.
- Magento 2: Show Count 0 on Mini Cart when No Product is in Cart
- How to Show Minicart in Custom Popup In Magento 2
Just in case you are stuck anywhere with the implementation of the above steps, let me know via the comment box. Share the article with your friends and stay in touch with us for more solutions.
Happy Coding!


Hey, I did exactly what you did here, but my mini cart doesn’t display now?
And I just want to add a button which is rendered using a javascript code, do I need to use mixins for this? I just want to show button, I don’t want it to perform anything
Confirm you create required file of the extension as well and extension is enabled.
Yes, you can added button using Mixin as well.