Hello Magento Friends,
In this blog, we will learn How to Add a Custom Button in the Backend Category Page Section in Magento 2.
Customization in Magento admin helps to ease the admin work. Sometimes you need a custom button on the backend category page to perform some action. A custom button on the category page will simplify admin work as the admin can perform actions easily.
Follow the below steps to add a custom button in the backend category page section in Magento 2.
Steps to Add Custom Button in Backend Category Page Section in Magento 2:
Step 1: First, we need to create a category form.xml file inside the extension at the following path.
app\code\Vendor\Extension\view\adminhtml\ui_component
Then add the code as follows
<?xml version="1.0" encoding="UTF-8"?>
<form xmlns:xsi="http://www.w3.org/2001/XMLSchema-instance" xsi:noNamespaceSchemaLocation="urn:magento:module:Magento_Ui:etc/ui_configuration.xsd">
    <fieldset name="search_engine_optimization" sortOrder="30">
        <container name="custom_button_container" sortOrder="135">
            <htmlContent name="html_content">
                <argument name="block" xsi:type="object">Vendor\Extension\Block\Adminhtml\Category\Edit\Categorybutton</argument>
            </htmlContent>
        </container>
    </fieldset>
</form>
Note – You can change the fieldset reference as per your requirement to add a button in the category section. Here, we have taken the Search Engine Optimization fieldset section named “search_engine_optimization”.
Step 2: After that, we need to create a Categorybutton.php file inside the extension at the following path.
app\code\Vendor\Extension\Block\Adminhtml\Category\Edit
Then add the following code
<?php
namespace Vendor\Extension\Block\Adminhtml\Category\Edit;

class Categorybutton extends \Magento\Backend\Block\Template
{
    protected $_template = 'Vendor_Extension::category/button.phtml';

    public function __construct(
        \Magento\Backend\Block\Template\Context $context,
        array $data = []
    ) {
        parent::__construct($context, $data);
    }
    public function getButtonHtml()
    {
        $button = $this->getLayout()->createBlock('Magento\Backend\Block\Widget\Button')->setData(['id' => 'custom_button', 'label' => __('Button Label'),'class'=>'action- scalable save primary']);
        return $button->toHtml();
    }
}
Step 3: After that, we need to create a button.phtml file inside the extension at the following path.
app\code\Vendor\Extension\view\adminhtml\templates\category
And add the following code-snippet
<div class="admin__field" data-bind="css: $data.additionalClasses, attr: {'data-index': index}, visible: visible">
    <div class="admin__field-control" style="text-align: center; padding: 5px 0px;">
        <?php
		 echo $block->getButtonHtml();
		?>
    </div>
</div>
Step 4: Once all files are created in your extension, you need to run Magento upgrade and deploy commands in your server.
Output:
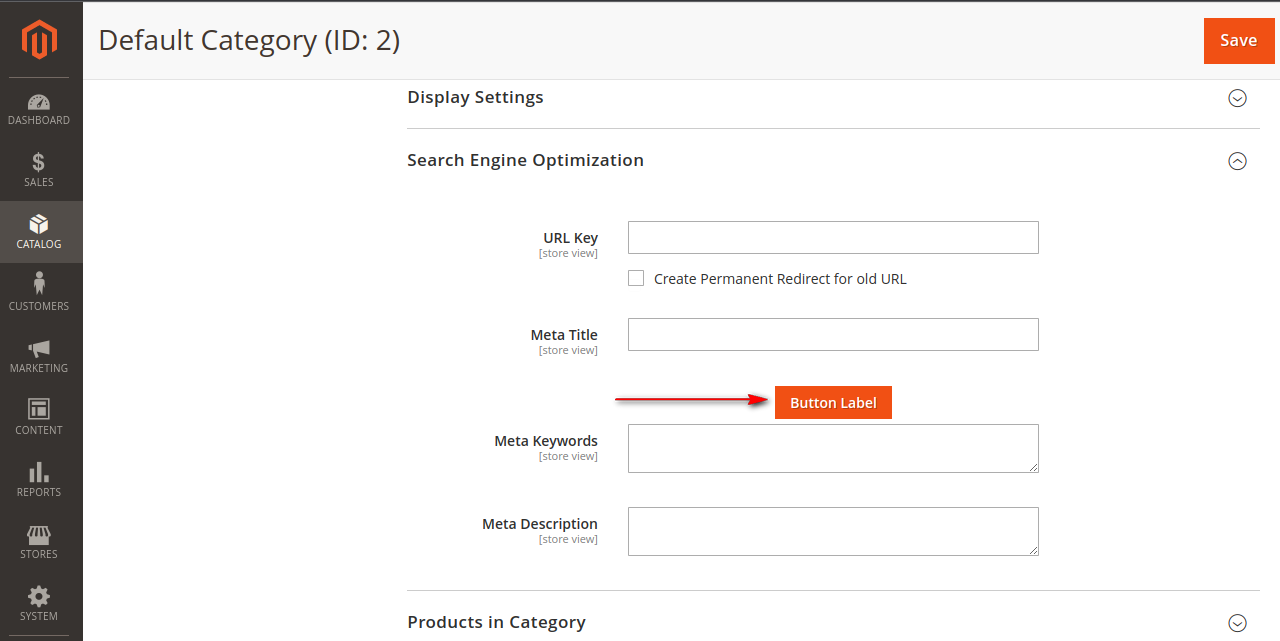
You can see that the custom button is added to your category page in Magento 2 backend.
Conclusion:
This way, you can add a custom button in the backend category page section in Magento 2. Alternatively, you can also Add Custom Button on Admin Sales Order View page in Magento 2.
Share the solution with your other Magento friends, and stay connected with us for more Magento 2 tutorials.
Happy Reading!


