In this Magento tutorial blog, I will illustrate Magento 2: Dynamically add fields in Custom Admin Form using the UI component.
Basically, we all know that in Magento 2 anyone can create a custom form on the admin side with the help of UI components as well as block files. Besides this in admin form, we can easily add multiple form elements such as label, drop-down, checkbox, etc. Therefore with this blog illustration, I will help you to learn how to create dynamic form elements in admin form using the UI components.
Let’s get started.
Steps to Add Dynamic Fields In Custom Admin Form Using UI Component:
Step 1: Firstly, add the below given code in your form file namely vendor_extension_data_form.xml in the app\code\Vendor\Extension\view\adminhtml\ui_component folder:
<fieldset name="dynamic_fieldset" class="Vendor\Extension\Ui\Component\Form\Fieldset">

    <argument name="data" xsi:type="array">

        <item name="config" xsi:type="array">

            <item name="label" xsi:type="string" translate="true">Dynamic Fields</item>

            <item name="sortOrder" xsi:type="number">1000</item>

        </item>

    </argument>

</fieldset>
Step 2: After the above step create Fieldset.php file in the app\code\Vendor\Extension\Ui\Component\Form folder and add the below given code:
<?php
namespace Vendor\Extension\Ui\Component\Form;
use Magento\Framework\View\Element\UiComponent\ContextInterface;
use Magento\Ui\Component\Form\FieldFactory;
class Fieldset extends \Magento\Ui\Component\Form\Fieldset
{
    protected $fieldFactory;
    public function __construct(
        ContextInterface $context,
        array $components = [],
        array $data = [],
        FieldFactory $fieldFactory)
    {
        parent::__construct($context, $components, $data);
        $this->fieldFactory = $fieldFactory;
    }
    public function getChildComponents()
    {
        $options = [
            0 => [
                'label' => 'Option 1',
                'value' => 1
            ],
            1  => [
                'label' => 'Option 2',
                'value' => 2
            ],
            2 => [
                'label' => 'Option 3',
                'value' => 3
            ],
        ];
        $fields = [
            [
                'label' => __('Label'),
                'value' => __('Label Value'),
                'formElement' => 'input',
            ],
            [
                'label' => __('Checkbox'),
                'value' => __('0'),
                'formElement' => 'checkbox',
            ],
            [
                'label' => __('Dropdown'),
                'options' => $options,
                'formElement' => 'select',
            ],
        ];
        foreach ($fields as $key => $field) {
            $fieldInstance = $this->fieldFactory->create();
            $name = 'custom_field_' . $key;
            $fieldInstance->setData(
                [
                    'config' => $field,
                    'name' => $name
                ]
            );
            $fieldInstance->prepare();
            $this->addComponent($name, $fieldInstance);
        }
        return parent::getChildComponents();
    }
}
Step 3: Lastly, after following the above steps clear cache.
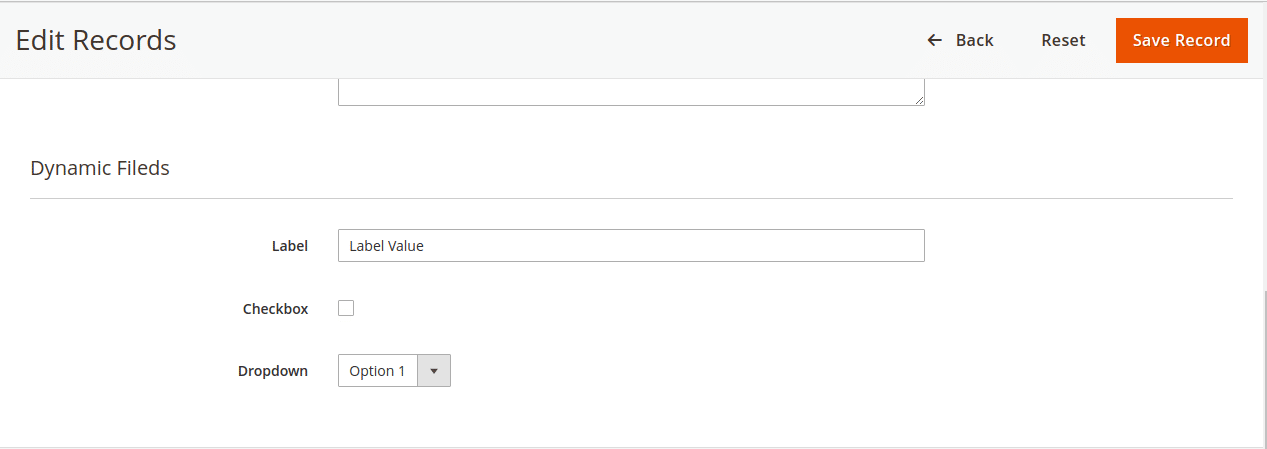
Hence Dynamic Fields will be added In Custom Admin Form Using UI Component as shown in the below screenshot.

That’s It.
Wrap Up:
Hopefully, all have implemented the above solution without any difficulties, and in case of any errors during the implementation then let me know in the comment section below. One can also utilize the hire Magento developer service for better optimization of your Magento 2 store.
Share the illustration with your Magento friends.
Happy Reading


Hi,
I am writing to you about your blog.
I tried to adding custom field on new shipment page so I followed your guite in this blog.
But I got issue.
main.ERROR: Deprecated Functionality: Optional parameter $components declared before required parameter $fieldFactory is implicitly treated as a required parameter in C:\xampp\htdocs\magento2\app\code\Compass\ShipmentAttachment\Ui\Component\Form\Fieldset.php on line 8 [] []
I am using Magento 2.4.4.
Could you please help me to add some fields on new shipment page?
Looking forward to hearing from you.
Best Regards,
Rolan
Error on admin page:
Call to a member function getRequestFieldName() on null.
It from:
vendor/magento/module-ui/Component/Form.php::getDataSourceData()
Kindly confirm your the path are proper.