Today to build a powerful Ecommerce store apart from choosing the right CMS, you also have to integrate and connect some third-party services like payment gateways and delivery partners. However, Magento comes with an interface that lets third-party applications read and write to a system using programming language constructs or statements. And, Magento supports and provides REST and SOAP. You can also create a dynamic REST API documentation set on your server with live data. By default, Magento uses Swagger to display REST APIs for all installed products and allows you to try out the APIs.
Many times it happens that you have to create your custom Rest API in your module to perform some action based on response. You still can use default API features Product API, Order API, Customer data API, etc. These all the APIs have multiple methods like GET, PUT, POST, etc. But if you want to create custom response apart from this you have no option left except creating custom API. So let’s learn how you can create your custom API in Magento 2.
But before we start first we need to generate Access Token for accessing Magento. To generate access token inside for your Magento 2 store simply navigate to System -> Extensions -> Integrations and generate it.
Now, we have to create a custom module by following the below steps.
Steps to Create Custom REST API in Magento 2:
Step 1: Firstly, we need to create a “registration.php” file inside our extension folder on this path.
app\code\Vendor\Extension app\code\Vendor\Extension\etc
<?php
\Magento\Framework\Component\ComponentRegistrar::register(
    \Magento\Framework\Component\ComponentRegistrar::MODULE,
    'Vendor_Extension',
    __DIR__
);
Step 2: After that, we need to create “Module.xml” file inside the extension etc folder
app\code\Vendor\Extension\etc
<?xml version="1.0"?>
<config xmlns:xsi="http://www.w3.org/2001/XMLSchema-instance" xsi:noNamespaceSchemaLocation="urn:magento:framework:Module/etc/module.xsd">
    <module name="Vendor_Extension" setup_version="1.0.0" schema_version="1.0.0">
    </module>
</config>
Step 3: Now, we have to create one more file “webapi.xml” inside the same etc folder.
app\code\Vendor\Extension\etc
<?xml version="1.0"?>
<routes xmlns:xsi="http://www.w3.org/2001/XMLSchema-instance" xsi:noNamespaceSchemaLocation="urn:magento:module:Magento_Webapi:etc/webapi.xsd">
    <route method="GET" url="/V1/vender-extension">
        <service class="Vendor\Extension\Api\PostManagementInterface" method="customGetMethod"/>
        <resources>
            <resource ref="anonymous"/>
        </resources>
    </route>

<!--POST API Start-->
    <route method="POST" url="/V1/vender-extension/post">
<service class="Vendor\Extension\Api\PostManagementInterface" method="customPostMethod"/>
        <resources>
            <resource ref="anonymous"/>
        </resources>
    </route>
</routes>
Step 4: And then, we need to create “di.xml” file in same etc folder of our extension.
app\code\Vendor\Extension\etc
<?xml version="1.0"?>
<config xmlns:xsi="http://www.w3.org/2001/XMLSchema-instance" xsi:noNamespaceSchemaLocation="urn:magento:framework:ObjectManager/etc/config.xsd">
    <preference for=" Vendor\Extension\Api\PostManagementInterface" type="Vendor\Extension\Model\PostManagement"/>
</config>
Step 5: Later, create “PostManagementInterface.php” file inside extensions’s API folder to serve a response.
app\code\Vendor\Extension\Api\
<?php
namespace Vendor\Extension\Api;
interface PostManagementInterface {


    /**
     * GET for Post api
     * @param string $storeid
     * @param string $name
     * @return string
     */

    public function customGetMethod($storeid,$name);

    /**
     * GET for Post api
     * @param string $storeid
     * @param string $name
     * @param string $city
     * @return string
     */

    public function customPostMethod($storeid,$name,$city);

}
Step 6 : Lastly, Create “PostManagement.php” file inside model folder of extension.
app\code\Vendor\Extension\Model
<?php
namespace Vendor\Extension\Model;
use Vendor\Extension\Api\PostManagementInterface;
class PostManagement implements PostManagementInterface
{
    /**
     * {@inheritdoc}
     */
    public function customGetMethod($storeid,$name)
    {
        try{
            $response = [
                    'storeid' => $storeid,
                    'name' =>$name
            ];
        }catch(\Exception $e) {
            $response=['error' => $e->getMessage()];
        }

        return json_encode($response);
    }

    /**
     * {@inheritdoc}
     */
    public function customPostMethod($storeid,$name,$city)
    {
        try{
            $response = [
                'storeid' => $storeid,
                'name' =>$name,
                'city'=>$city
            ];
        }catch(\Exception $e) {
            $response=['error' => $e->getMessage()];
        }
        return json_encode($response);
    }

}
Now, Go to Admin -> System -> Integrations and Get Access Token value and set authorization value into postman application.
Then, execute
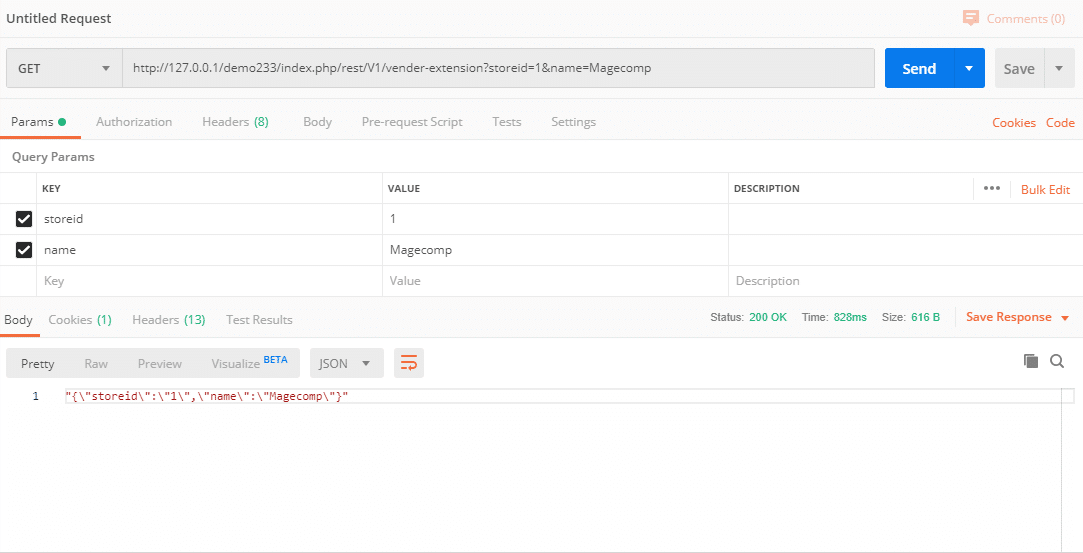
Get Api Url : {base_url}/rest/V1/vender-extension
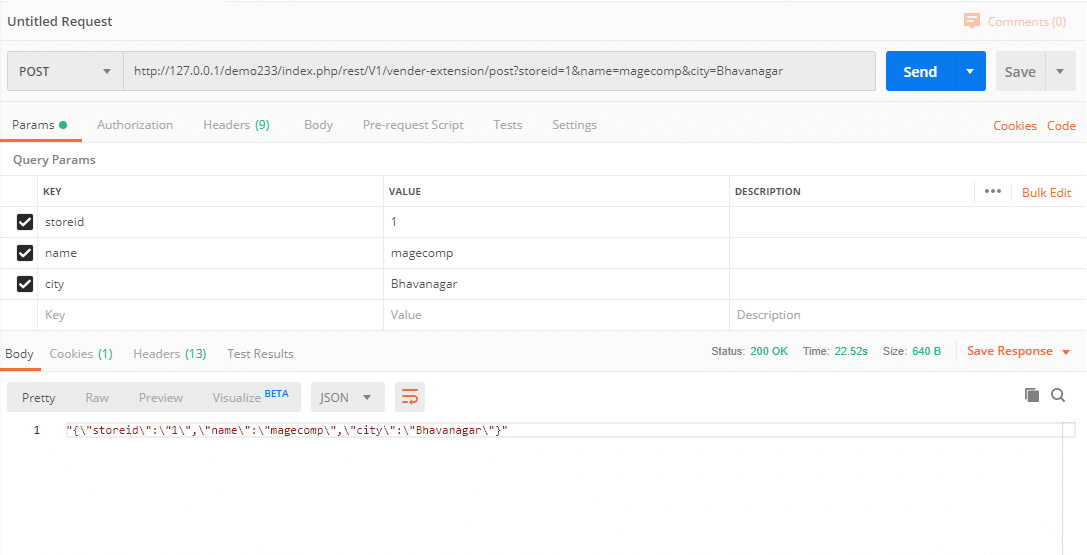
Post Api Url : {base_url}/rest/V1/vender-extension/post
this URL in postman.
And, you will able to fetch All the Parameter you want to set it.
Get API Response:

Post API Response:

That’s it for today! You have successfully Implemented Custom Rest API in Magento 2 and you are free to customize this code according to your need for fetching data using REST API. Furthermore, You can also refer to this article: Everything You Need to Know About Magento 2 API.
Lastly, if you found this blog helpful, don’t forget to share it with your colleagues and Magento Friends and Let us know if you are facing any issues while implementing this code.
Happy RESTing!


Hi how can we call external REST API in Magento 2.3.5?
If that is third party API then you can call it Using Curl.
Why in the response “\” is there if we don’t want then what should we do?
How to remove “\” in responce
Not working.I am getting this error.
Fatal error: Uncaught Error: Cannot instantiate interface Anees\Mod\Api\PostManagementInterface in E:\x\htdocs\aaa\vendor\magento\framework\ObjectManager\Factory\Dynamic\Developer.php: 50
Stack trace:
Debug which interface class you have created.
Hi,
Great tutorial! But when running the actual get or post in postman. I receive the message ‘An error has happened during application run. See exception log for details.’
Kindly check your Magento log file what error exactly and let us know