Hola, Shopify folks. ?
We meet again with a brand new Shopify tutorial by MageComp.
Today in this Shopify tutorial, we will learn about adding Facebook Pixel to Shopify store.

Let’s get started. ?
What is Shopify Facebook Pixel?
Shopify Facebook pixel is also known as Meta pixel. It is an analytical tool that generates a tracking code from your Facebook ads account and gets integrated into the header section of your Shopify eCommerce website.
The Facebook pixel for Shopify monitors your visitors’ performed actions and collects the data for you to help you refine your Facebook and other social media platforms’ advertising/marketing campaigns and maximize performance accordingly.
The data collected by Facebook pixel for Shopify can be used to display your ads to multiple audience groups based on their activities performed on your Shopify webstore.
How does the Shopify Facebook Pixel work?
As we discussed above, Facebook pixels for Shopify are snippet codes that are generated every time a visitor visits or views your landing page or website content. The Shopify Facebook pixel tracks all your visitors and matches your Facebook/Instagram users with your website users. The Facebook Pixel tracks:
1. HTTP headers: IP addresses, page location, web browser info., referrer, document, and the visitor using the website.
2. Pixel-specific data: Facebook Cookie and Pixel ID.
3. Button Click Data: Buttons clicked by your visitors, the pages a visitor opens by clicking the n
4. Optional Values: You have the option to utilize Custom Data events to track conversion value, page type, and other relevant metrics.
5. Form Field Names: Provide your customer’s personal information, such as your name, address, and quantity, when making a purchase.
How to Add Facebook Pixel to Shopify?
Step 1 – Create a Facebook account in the name of your store if you don’t have one.
Step 2 –
Create a Facebook Pixel code.
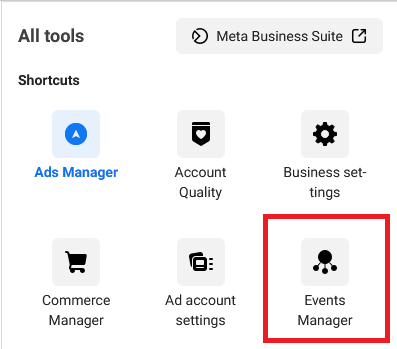
Once your Facebook account is set up,
Go to Settings > Events Manager.
Step 3 –
Copy the 16-digit Pixel number.![]()

Step 4 –
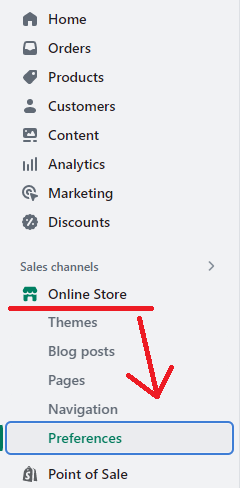
After copying the 16-digit Pixel code, navigate to your Shopify admin and follow this path.
Shopify admin > Online store > Preference
Step 5 –
Paste the copied code in the Facebook Pixel field and Save your changes.
How to Implement the Facebook Pixel to Shopify via Shopify Integration?
Step 1 –
Go to Event Manager on your Facebook Business account.
Step 2 –
Choose your Pixel.
Step 3 –
Choose Continue Pixel Setup > Use a Partner.
“Note: Connecting Facebook pixel to Shopify store is a breeze if you’ve already installed it on another website. Just head over to the Events Manager and select Partner Integrations from the menu on the left-hand side. “
Step 4 –
Simply choose Shopify from the list of partner integrations.
Step 5 –
Follow all the required instructions, and you’re good to go!
Wrapping Up
That was tricky!?
Shopify integrations can be tricky sometimes, but don’t you worry, we have a tutorial for each of your queries. If you are stuck in the middle of any of these steps, consult our Shopify experts or hire an experienced Shopify developer to make your Facebook integration done easily.
Happy Shopifying! ?
—————————————————————————————————————————————–
Frequently Asked Questions
(1) What is Facebook Pixel?
Answer: Facebook Pixel is a tracking code provided by Facebook that you can add to your website to collect data about user interactions. It helps you measure the effectiveness of your Facebook ads, track conversions, and optimize your advertising campaigns.
(2) Why should I add Facebook Pixel to my Shopify store?
Answer: Adding Facebook Pixel to your Shopify store allows you to track and measure various actions that users take on your website after interacting with your Facebook ads. It helps you understand your audience better, optimize your ads for better performance, and retarget users who have shown interest in your products.

(3) How do I add Facebook Pixel to my Shopify store?
Answer: To add Facebook Pixel to your Shopify store, follow these steps:
- Log in to your Shopify admin panel.
- From the sidebar, go to “Online Store” and select “Preferences.”
- Scroll down to the “Facebook Pixel” section.
- Open a new browser tab and log in to your Facebook Ads Manager.
- In Facebook Ads Manager, click on the “Menu” button and select “Pixels” under the “Measure & Report” section.
- Click on the “Set up Pixel” button and choose the “Manually install pixel code yourself” option.
- Copy the Facebook Pixel code that appears.
- Return to your Shopify admin panel and paste the Facebook Pixel code into the “Facebook Pixel ID” field.
- Click “Save” to apply the changes.
(4) Where can I find my Facebook Pixel ID?
Answer: To find your Facebook Pixel ID, follow these steps:
- Log in to your Facebook Ads Manager.
- Click on the “Menu” button and select “Pixels” under the “Measure & Report” section.
- You’ll find your Facebook Pixel ID listed under the name of your pixel.
(5) How can I test if the Facebook Pixel is properly installed?
Answer: After adding the Facebook Pixel to your Shopify store, you can use the Facebook Pixel Helper, a Chrome browser extension, to check if the pixel is working correctly. Install the extension, visit your Shopify store, and the Pixel Helper will analyze the page to verify if the pixel is installed and sending data.
(6) Can I use multiple Facebook Pixels on my Shopify store?
Answer: No, Shopify allows you to use only one Facebook Pixel at a time. If you have multiple pixels, you need to choose the primary pixel and use it on your store.
(7) How long does it take for Facebook Pixel data to start appearing in my Facebook Ads Manager?
Answer: Once you have added the Facebook Pixel to your Shopify store, it may take a few hours for the data to start appearing in your Facebook Ads Manager.