Hello Magento Friends,
Today’s Magento 2 Tutorial is on How to Add Shipping Address Details in Order Grid in Magento 2.
Admin Order Grid in Magento 2 helps store admin to view order details, manage orders and create new orders. With Magento 2, the admin is able to customize the order grid according to the requirements. Sometimes, the admin needs shipping address details like street, city, Pincode, phone column in the order grid. Go ahead with the article to fulfill these requirements. Also checkout Magento Development Services to customize your requirement.
Here are the steps for How to Add Shipping Address Details in Order Grid in Magento 2
Steps to Add Shipping Address Details in Order Grid in Magento 2:
Step 1: First, we need to create a sales_order_grid.xml file inside our extension at the following path
app\code\Vendor\Extension\view\adminhtml\ui_component\
And add the code as mentioned below
<?xml version="1.0" encoding="UTF-8"?>
<listing xmlns:xsi="http://www.w3.org/2001/XMLSchema-instance" xsi:noNamespaceSchemaLocation="urn:magento:module:Magento_Ui:etc/ui_configuration.xsd">
    <columns name="sales_order_columns">
        <settings>
            <childDefaults>
                <param name="fieldAction" xsi:type="array">
                    <item name="provider" xsi:type="string">false</item>
                </param>
            </childDefaults>
        </settings>
        <column name="street">
            <settings>
                <filter>text</filter>
                <label translate="true">Street</label>
                <bodyTmpl>ui/grid/cells/html</bodyTmpl>
                <visible>true</visible>
            </settings>
        </column>
        <column name="postcode">
            <settings>
                <filter>text</filter>
                <label translate="true">Zip</label>
                <bodyTmpl>ui/grid/cells/html</bodyTmpl>
                <visible>true</visible>
            </settings>
        </column>
        <column name="city">
            <settings>
                <filter>text</filter>
                <label translate="true">City</label>
                <bodyTmpl>ui/grid/cells/html</bodyTmpl>
                <visible>true</visible>
            </settings>
        </column>
        <column name="telephone">
            <settings>
                <filter>text</filter>
                <label translate="true">Phone</label>
                <bodyTmpl>ui/grid/cells/html</bodyTmpl>
                <visible>true</visible>
            </settings>
        </column>
    </columns>
</listing>
Step 2: After that, we need to create a di.xml file inside the extension folder at the below-given path:
app\code\Vendor\Extension\etc\
Now, add the below code
<?xml version="1.0"?>
<config xmlns:xsi="http://www.w3.org/2001/XMLSchema-instance"
        xsi:noNamespaceSchemaLocation="urn:magento:framework:ObjectManager/etc/config.xsd">
    <type name="Magento\Framework\View\Element\UiComponent\DataProvider\CollectionFactory">
        <plugin name="custom_orders_grid" type="Vendor\Extension\Plugin\OrdersGrid" sortOrder="10"/>
    </type>
</config>
Step 3: After that, we need to create the OrdersGrid.php file inside the below path folder to add the file to the module.
app\code\Vendor\Extension\Plugin\
Now, add the below code
<?php
namespace Vendor\Extension\Plugin;

class OrdersGrid
{
    public function afterGetReport($subject, $collection, $requestName)
    {
        if ($requestName !== 'sales_order_grid_data_source')
        {
            return $collection;
        }

        if ($collection->getMainTable() === $collection->getResource()->getTable('sales_order_grid'))
        {
            $orderAddressTable  = $collection->getResource()->getTable('sales_order_address');

            $collection->getSelect()->joinLeft(
                ['oat' => $orderAddressTable],
                'oat.parent_id = main_table.entity_id AND oat.address_type = \'shipping\'',
                ['telephone', 'city', 'postcode', 'street']
            );
        }

        return $collection;
    }
}
That’s it!
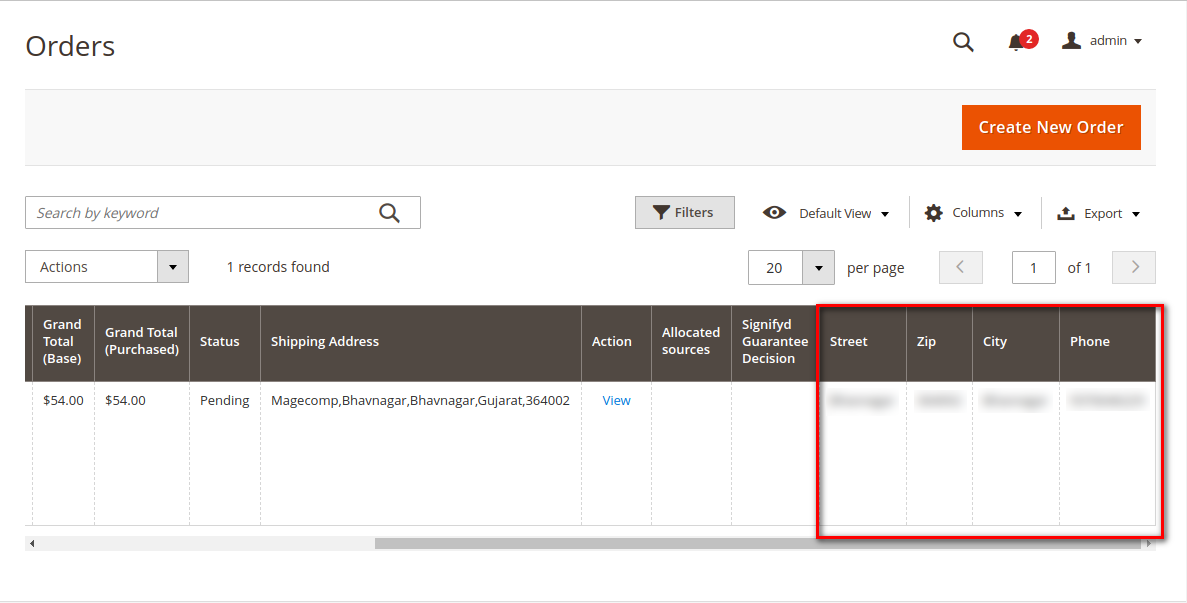
Once you have completed the above steps, check the results in the Magento 2 store backend. Shipping Address detail columns like Street, Zip code, City, Phone has been added in the order grid of Magento 2.
Conclusion:
Hence, this way you can Add Shipping Address Details in Order Grid in Magento 2. If you face any issues, mention them in the comment box. I will be quick to solve it. Do share the articles with your fellow Magento developers. Stay in touch with us for more tutorials.
Happy Coding!


what are the changes in JOIN if I want to add both billing and shipping telephone show in the sales order grid?