Hello, Magento Friends!
Here I am with another tutorial blog and this time the subject I have compiled is How to Enable Canonical Meta Tag in Magento 2.
Let’s get rolling!
What is a Canonical Meta Tag?
The canonical tag or rel canonical is used to tell the search engine that a particular URL is not copied which ultimately helps in ranking your page higher on search engines. From a practical point of view, the canonical tag helps in telling search engines which URL you wish to show up in the search results.
You can use various SEO tools to check canonical tags. For example, one such tool is the Canonical Checker by Sitechecker.
Code Example:
As given below, you can add rel=”canonical” inside the anchor. This indicates that the search engine should treat this as a specified URL.
Steps to Enable Canonical Meta Tag in Magento 2
Step 1: Log in to your Admin panel.
Step 2: Navigate to Stores > Settings > Configuration.
Step 3: Click on Catalog under the Catalog section in the panel positioned on the left side.
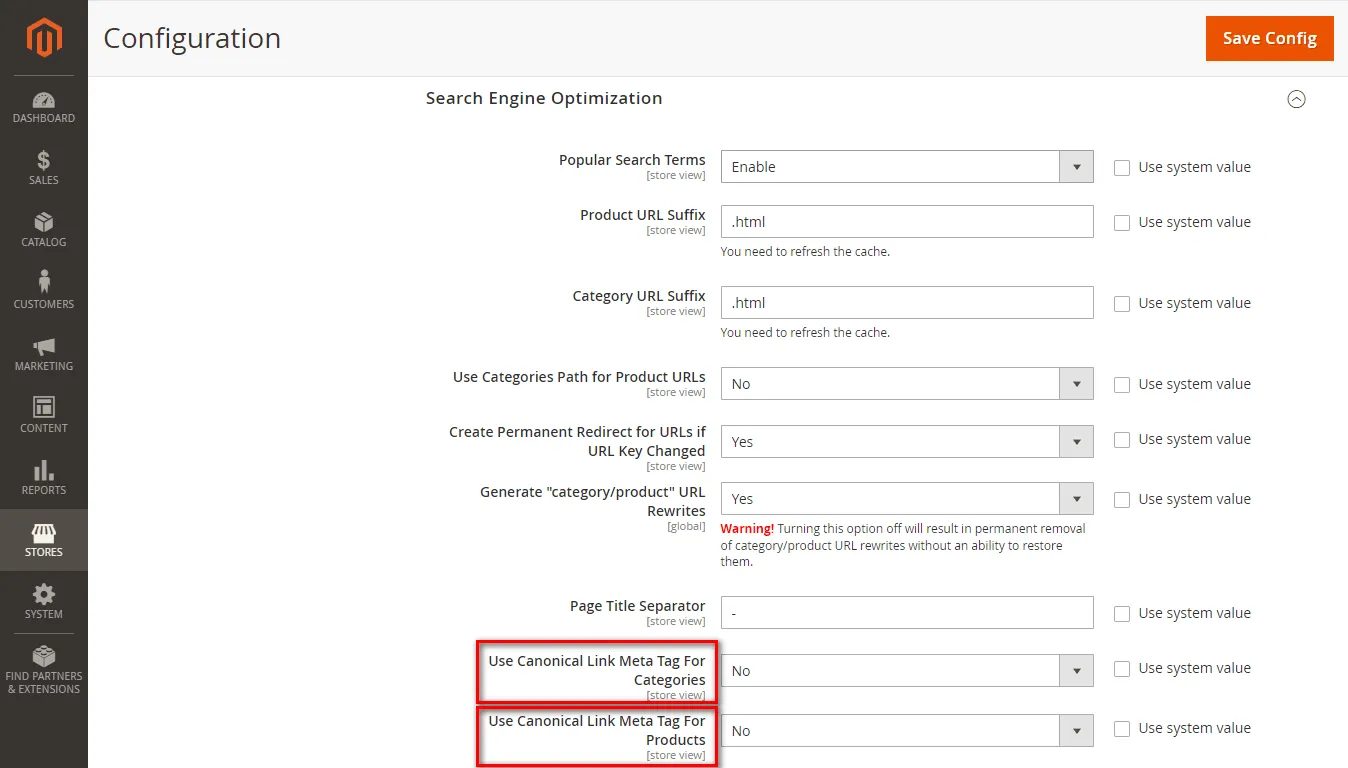
Step 4: Expand the Search Engine Optimization section and perform the following operations.
Now, have a glance at the last 2 fields and perform the operations as per your requirement from the below mentioned.
- Select the Yes option in the categories drop-down menu and no in the products drop-down menu if you want the search engine to record only the category page and not the product page.
- Select the No option in the categories drop-down menu and Yes in the products drop-down menu if you want the search engine to record only the product page and not the category page.
- If you want both the category and product page to be recorded in the search engine then select Yes in both of the fields.
Step 5: After finishing up with your desired choice, click on Save Config.
Closure:
Therefore, this was all about How to Enable Canonical Meta Tag in Magento 2. Perform all the steps carefully and you will successfully be able to enable the canonical tag for your category and product pages.
Send this blog article to your buddies and over social media platforms.
Happy Reading!


