
Hello Magento Friends,
In today’s blog, I will explain How to Create Custom Swatch Attribute Programmatically in Magento 2?

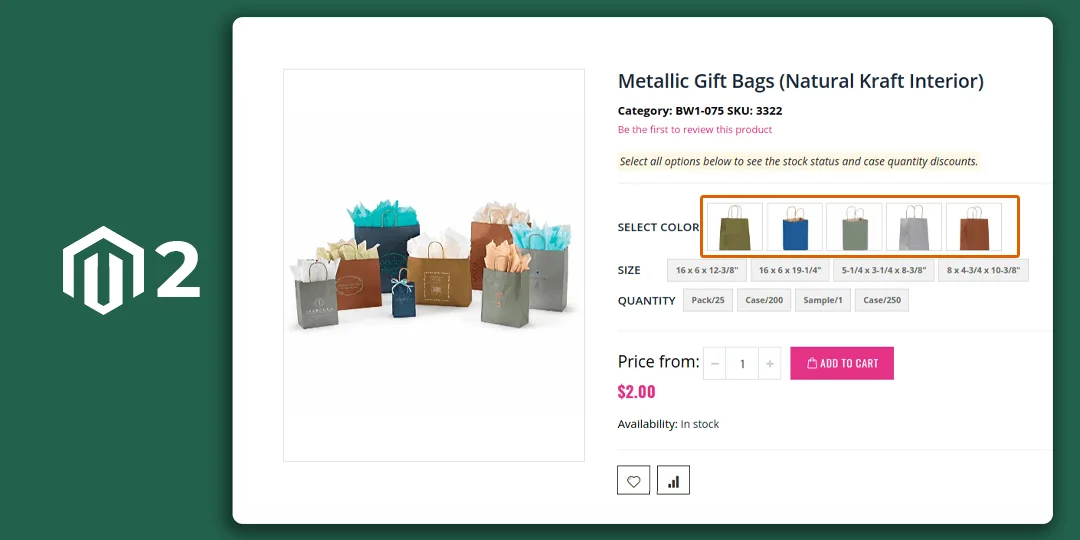
There are many types of attributes like price, text, swatch, drop-down, etc in Magento 2. Swatch attributes are used in the product page, product listings, and layered navigation. One can also create product-wise swatches in Magento 2. Swatches help to increase the shopping experience of customers by providing options to select from.
Here we will learn about Creating Custom Swatch Attribute Programmatically in Magento 2.
Steps to Create Custom Swatch Attribute Programmatically in Magento 2:
Place all images into the “magentoRoot\images” directory and follow the step below.
Step 1: We are getting data in the root script at the below path.
magento_root_directory\pub\Addswatchattribute.php
Now add the code as follows.
<?php

use Magento\Framework\App\Bootstrap;
require __DIR__ . '/app/bootstrap.php';

$bootstraps = Bootstrap::create(BP, $_SERVER);
$object_Manager = $bootstraps->getObjectManager();

$app_state = $object_Manager->get('\Magento\Framework\App\State');
$app_state->setAreaCode('frontend');

try
{
    $finalProductData = array(
        'BLKV' => array("label" => "Black", "url" => "p2.jpeg"),
        'BLKV1' => array("label" => "Black1", "url" => "p2.jpeg"),
    );

    $eavConfig = $object_Manager->get('\Magento\Eav\Model\Config');
    $attribute = $eavConfig->getAttribute('catalog_product', 'color');

    $data = generateOptions($finalProductData, 'visual');

    $filesystem = $object_Manager->create('\Magento\Framework\Filesystem');

    $mediaDirectory = $filesystem->getDirectoryRead(\Magento\Framework\App\Filesystem\DirectoryList::MEDIA);
    $productMediaConfig = $object_Manager->create('\Magento\Catalog\Model\Product\Media\Config');
    $tmpMediaPath = $productMediaConfig->getBaseTmpMediaPath();
    $fullTmpMediaPath = $mediaDirectory->getAbsolutePath($tmpMediaPath);

    $driverFile = $object_Manager->create('\Magento\Framework\Filesystem\Driver\File');
    $driverFile->createDirectory($fullTmpMediaPath);
    $swatchHelper = $object_Manager->create('\Magento\Swatches\Helper\Media');

    foreach ($data as $key => $attributeOptionsData)
    {
        if ($key == "swatchvisual")
        {
            $swatchVisualFiles = isset($attributeOptionsData['value'])
            ? $attributeOptionsData['value']
            : [];

            foreach ($swatchVisualFiles as $index => $swatchVisualFile)
            {
                if (!empty($swatchVisualFile))
                {
                    if (file_exists(__DIR__ . DIRECTORY_SEPARATOR . 'images' . DIRECTORY_SEPARATOR . $swatchVisualFile))
                    {
                        $driverFile->copy(
                            __DIR__ . DIRECTORY_SEPARATOR . 'images' . DIRECTORY_SEPARATOR . $swatchVisualFile,
                            $fullTmpMediaPath . '/' . $swatchVisualFile
                        );

                        $newFile = $swatchHelper->moveImageFromTmp($swatchVisualFile);
                        if (substr($newFile, 0, 1) == '.')
                        {
                            $newFile = substr($newFile, 1);
                        }
                        $swatchHelper->generateSwatchVariations($newFile);
                        $data[$key]['value'][$index] = $newFile;
                    }
                    else
                    {
                        $data[$key]['value'][$index] = "";
                    }
                }
            }
        }
    }

    function generateOptions($values, $swatchType = 'visual')
    {
        $i = 0;
        foreach ($values as $key => $value)
        {
            $order["option_{$i}"] = $i;
            $optionsStore["option_{$i}"] = array(
                0 => $key, // admin
                1 => $value['label'],
            );
            $textSwatch["option_{$i}"] = array(
                1 => $value['label'],
            );
            $visualSwatch["option_{$i}"] = $value['url'];
            $delete["option_{$i}"] = '';
            $i++;
        }

        switch ($swatchType)
        {
            case 'text':
                return [
                    'optiontext' => [
                        'order' => $order,
                        'value' => $optionsStore,
                        'delete' => $delete,
                    ],
                    'swatchtext' => [
                        'value' => $textSwatch,
                    ],
                ];
                break;
            case 'visual':
                return [
                    'optionvisual' => [
                        'order' => $order,
                        'value' => $optionsStore,
                        'delete' => $delete,
                    ],
                    'swatchvisual' => [
                        'value' => $visualSwatch,
                    ],
                ];
                break;
            default:
                return [
                    'option' => [
                        'order' => $order,
                        'value' => $optionsStore,
                        'delete' => $delete,
                    ],
                ];
        }
    }
    $attribute->addData($data)->save();
}
catch(\Exception $e)
{
    print_r($e->getMessage());
}
Conclusion:
This way, you can create custom swatch attributes programmatically in Magento 2. Share your doubts with me through the comment box and stay in touch with us for more.

Happy Coding!


This code not working when we use s3 remote storage. Do you have any thoughts on it
To make that compatibility with S3, you need to modify the code accordingly
Hi,
This color swatch image upload functionality is working fine but I need to upload swatch images like example.com/media/attribute/swatch/d/e/demo.jpg
for example, image name is demo.jpg then it will create directories like d then inside d directory create e directory then upload image.
Thanks
For that you need to do custom code according to your requirements.