Hello Magento Friends,
Today’s blog will teach us about creating a custom indexer in Magento 2.
Magento 2 utilizes indexing to improve the performance of data retrieval operations. There are many default indexes provided by Magento 2. If you have custom data structures or additional attributes that are not covered by the default Magento 2 indexes, a custom indexer allows you to create indexes tailored to your specific needs.
Let’s learn How to Create a Custom Indexer in Magento 2.
Steps to Create Custom Indexer in Magento 2:
Step 1: First, we need to create an “indexer.xml” file inside the extension at the following path.
app\code\Vendor\Extension\etc\
Now, add the code as follows
<?xml version="1.0"?>
<config xmlns:xsi="http://www.w3.org/2001/XMLSchema-instance" xsi:noNamespaceSchemaLocation="urn:magento:framework:Indexer/etc/indexer.xsd">
    <indexer id="vendor_extension_indexer" view_id="vendor_extension_indexer" class="Vendor\Extension\Model\Indexer" shared_index="vendor_extension_indexer">
        <title translate="true">Custom Indexer Title</title>
        <description translate="true">Custom Indexer Description</description>
    </indexer>
</config>
Let us see in detail all attributes of the indexer.xml file:
- id: unique indexer id.
- view_id: id of the view element, which is defined in mview.xml file
- class: Add a class of indexer method.
- shared_index: To improve performance if your indexer is related to another indexer.
- title: Add title of indexer.
- description: Add description of indexer.
Step 2: After that, we need to create the “mview.xml” file inside the extension at the following path.
app\code\Vendor\Extension\etc\
Then add the below code
<?xml version="1.0" encoding="UTF-8"?>
<config xmlns:xsi="http://www.w3.org/2001/XMLSchema-instance" xsi:noNamespaceSchemaLocation="urn:magento:framework:Mview/etc/mview.xsd">
    <view id="vendor_extension_indexer" class="Vendor\Extension\Model\Indexer" group="indexer">
        <subscriptions>
            <table name="phonebook" entity_column="phonebook_id" />
        </subscriptions>
    </view>
</config>
Step 3: After that, we need to create an “Indexer.php” file inside the extension at the following path.
app\code\Vendor\Extension\Model\
And add the below-mentioned code snippet
<?php
namespace Vendor\Extension\Model;

use Magento\Framework\Indexer\ActionInterface as IndexerInterface;
use Magento\Framework\Mview\ActionInterface as MviewInterface;

class Indexer implements IndexerInterface, MviewInterface
{
    /**
     * It's used by mview. It will execute when process indexer in "Update on schedule" Mode.
     */
    public function execute($ids)
    {
        $writer = new \Zend_Log_Writer_Stream(BP . '/var/log/vendor-test.log');
        $logger = new \Zend_Log();
        $logger->addWriter($writer);
        $logger->info('Execute Method Call When Update on Schedule');
    }
    /**
     * Add code here for execute full indexation
     */
    public function executeFull()
    {
        $writer = new \Zend_Log_Writer_Stream(BP . '/var/log/vendor-test.log');
        $logger = new \Zend_Log();
        $logger->addWriter($writer);
        $logger->info('Execute Full Method Call When Re index using command line');
    }
    /**
     * Add code here for execute partial indexation by ID list
     */
    public function executeList(array $ids)
    {
        $writer = new \Zend_Log_Writer_Stream(BP . '/var/log/vendor-test.log');
        $logger = new \Zend_Log();
        $logger->addWriter($writer);
        $logger->info('Execute List Method Call When partial indextion by id list');
    }
    /**
     * Add code here for execute partial indexation by ID
     */
    public function executeRow($id)
    {
        $writer = new \Zend_Log_Writer_Stream(BP . '/var/log/vendor-test.log');
        $logger = new \Zend_Log();
        $logger->addWriter($writer);
        $logger->info('Execute Row Method Call When partial indextion by specific id');
    }
}
Once all files are created in your Magento, you need to run Magento upgrade, compile and deploy commands.
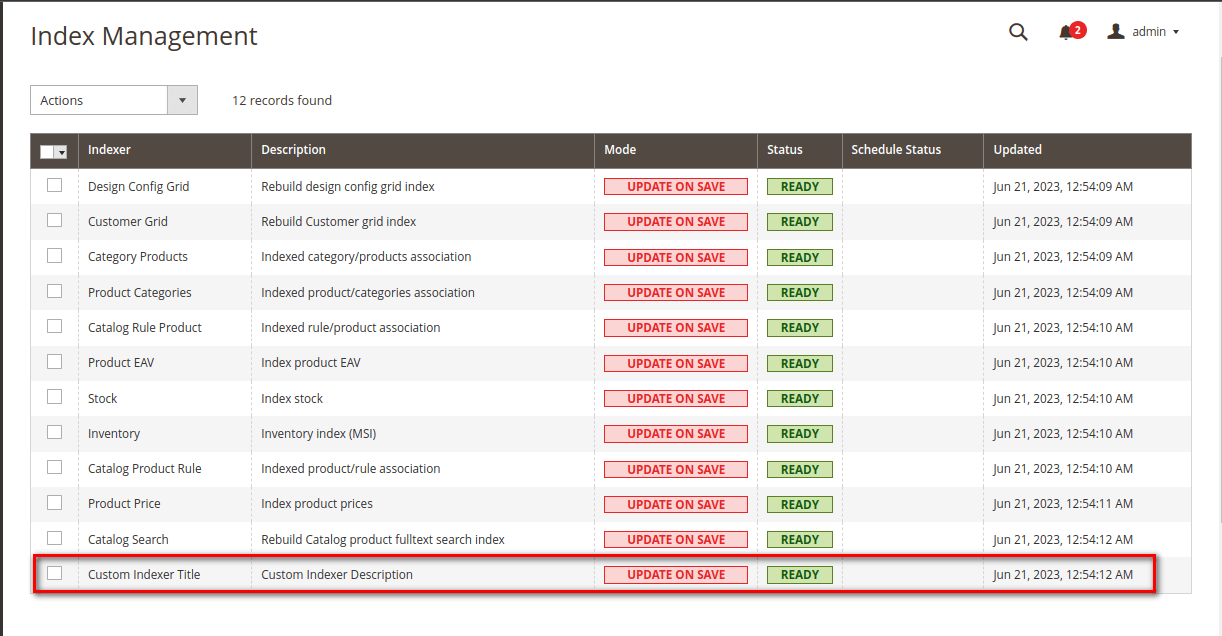
Output:

Conclusion:
Using the above steps, you can create a custom indexer in Magento 2. If you have any doubts regarding this, you can share them with me through the comment box, and I will quickly provide you with the solution. For any customization requirements for your store, Hire Magento Developer.
Share the tutorial with your friends, and stay updated with our latest Magento solutions.
Happy Coding!


