
Hello Magento Friends,
In Magento 2, the ability to add hyperlinks in the comments of store configuration fields is a great way of enriching user interactions and giving precise overviews. Embedding links directly into the comments gives you a chance to provide an easy link to relevant documentation, guides, or even external resources that can clear up what a particular configuration option is or why it’s used.

Not only does this make the information critical to the user readily available, but it also eliminates any confusion the user may have when trying to configure and streamlines the configuration process for the user as well.
This time I will describe detailed instruction on how to link comments to the field store configuration in Magento 2. That’s why I’ve created this guide so you can implement this feature, so users have the knowledge and tools to make the best decisions possible when configuring their store settings.
Here’s a step-by-step guide on how to add a link to a comment in store configuration fields in Magento 2:
Steps to Add Link on Store Configuration Fields Comment in Magento 2:
Step 1: First, create a system.xml file at the below path
{{magento_root}}/app/code/Vendor/Module/etc/adminhtml
Then add the code as follows
<?xml version="1.0"?>
<config xmlns:xsi="http://www.w3.org/2001/XMLSchema-instance" xsi:noNamespaceSchemaLocation="urn:magento:module:Magento_Config:etc/system_file.xsd">
<system>
<section id="general" translate="label" sortOrder="10" showInDefault="1" showInWebsite="1" showInStore="1">
<group id="my_group" translate="label" type="text" sortOrder="10" showInDefault="1" showInWebsite="1" showInStore="1">
<field id="my_field" translate="label" type="text" sortOrder="10" showInDefault="1" showInWebsite="1" showInStore="1">
<label>My Custom Field</label>
<frontend_model>Vendor\Module\Block\Adminhtml\System\Config\Link</frontend_model>
<comment>This is a custom field. Click <a href="https://www.magecomp.com" target="_blank">here</a> for more information.</comment>
</field>
</group>
</section>
</system>
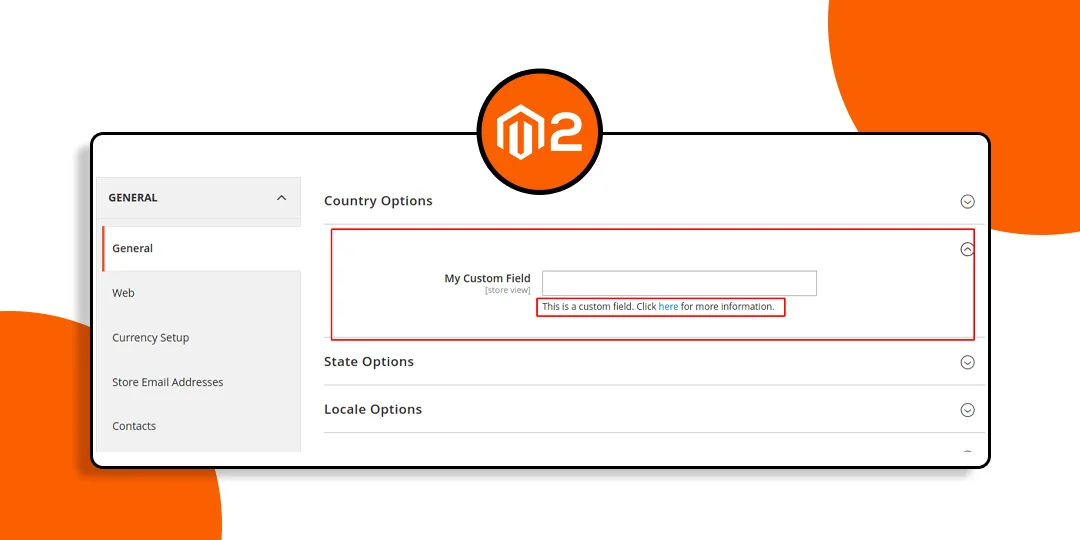
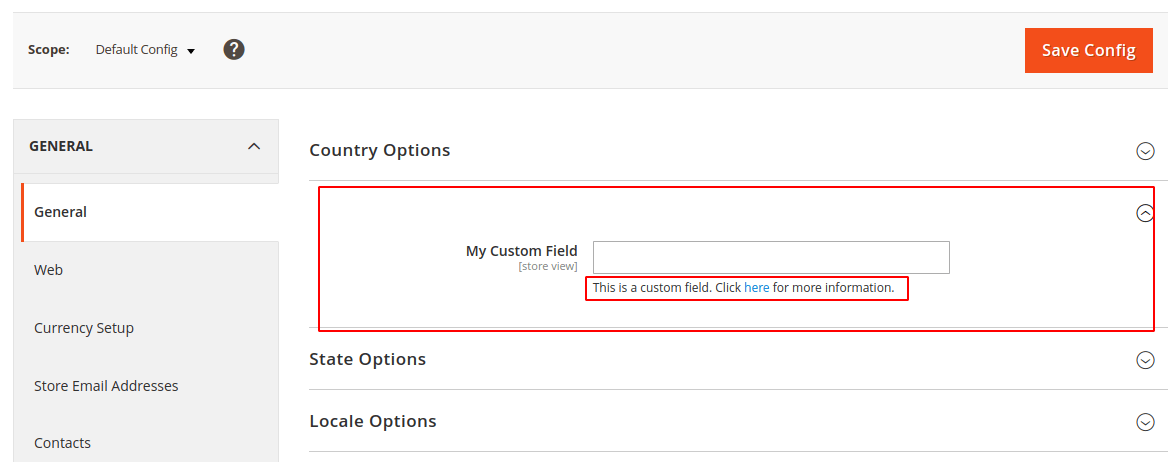
</config>System configuration field with the frontend_model attributes. The frontend_model points to a custom block where we’ll define the field’s behavior.

Step 2: Now create a Block file called Link.php file at the below-mentioned path
{{magento_root}}/app/code/Vendor/Module/Block/Adminhtml/System/Config
Create a custom block for the frontend model:
Create a custom block to handle the frontend rendering and behavior of your field.
<?php
namespace Vendor\Module\Block\Adminhtml\System\Config;

use Magento\Config\Block\System\Config\Form\Field;
use Magento\Framework\Data\Form\Element\AbstractElement;

class Link extends Field
{
    /**
     * Render the element and add a custom link to the comment field.
     *
     * @param AbstractElement $element
     * @return string
     */
    protected function _getElementHtml(AbstractElement $element)
    {
        $element->setComment(
            'This is a custom field. Click <a href="https://www.magecomp.com" target="_blank">here</a> for more information.'
        );

        return parent::_getElementHtml($element);
    }
}
Output SS:
Conclusion:
With these steps you can easily include the link within the comment parts of the store configuration fields of Magento 2 also. This enhancement brings a substantial boost to administrative experience by clearcutting the method for people to aid one to get to gainful uses and effectively use the stage to settle more on educated choices.
Also, Check out,
If you have any doubts about performing the above steps, please connect with me through the comment section. Share the article with your friends and stay updated with us.

Happy Coding!


This is a custom field. Click here for more information.
This is Required or Not.
That is example text, you can modify that according to your requirements.