Hello Magento Friends,
In today’s blog, we will learn about how to add an image chooser in the Magento 2 widget.
Magento 2 offers a robust platform for creating custom widgets. Enhancing these widgets with image chooser functionality empowers store owners to visually enrich their content. This guide will walk you through the steps to integrate an image chooser into your Magento 2 widget.

Steps to Add Image Chooser in Magento 2 Widget:
Step 1: Create a widget.xml file in the path given below.
{{magento_root}}\app\code\Vendor\Extension\etc\widget.xml
Now include the below-mentioned code
<?xml version="1.0" encoding="UTF-8"?>
<widgets xmlns:xsi="http://www.w3.org/2001/XMLSchema-instance"
    xsi:noNamespaceSchemaLocation="urn:magento:module:Magento_Widget:etc/widget.xsd">
    <widget id="custom_widget" class="Vendor\Extension\Block\Widget\PageWidget">
        <label>Custom Widget</label>
        <description>Widget Description</description>
        <parameters>
            <parameter name="title" xsi:type="text" visible="true" required="true">
                <label translate="true">Title</label>
            </parameter>
            <!-- Image Uploader -->
            <parameter name="image" xsi:type="block" visible="true" required="false">
                <label translate="true">Image Uploader</label>
                <block class="Vendor\Extension\Block\Adminhtml\Widget\ImageChooser">
                    <data>
                        <item name="button" xsi:type="array">
                            <item name="open" xsi:type="string">Choose Image...</item>
                        </item>
                    </data>
                </block>
            </parameter>
        </parameters>
   </widget>
</widgets>
Step 2: Create PageWidget.php file in path given below.
{{magento_root}}\app\code\Vendor\Extension\Block\Widget\PageWidget.php
Then add the code as follows
<?php

namespace Vendor\Extension\Block\Widget;

use Magento\Framework\View\Element\Template;
use Magento\Widget\Block\BlockInterface;

class PageWidget extends Template implements BlockInterface
{
   protected $_template = "Vendor_Extension::widget/page_widget.phtml";
}
Step 3: Create page_widget.phtml file in path given below.
{{magento_root}}\app\code\Vendor\Extension\view\frontend\templates\widget\page_widget.phtml
Now add the code given below
<div class="maincontent">
    <div class="title">
        <span class="widget-title"><?php echo __("Widget Title : "); ?></span>
        <span class="widget-title-val"><?php echo $block->getData('title'); ?></span>
    </div>
</div>
Step 4: Create ImageChooser.php file in path given below.
{{magento_root}}\app\code\Vendor\Extension\Block\Adminhtml\Widget\ImageChooser.php
Then add the following code
<?php
namespace Vendor\Extension\Block\Adminhtml\Widget;

use Magento\Framework\Data\Form\Element\AbstractElement;

class ImageChooser extends \Magento\Backend\Block\Template
{
    /**
     * @var \Magento\Framework\Data\Form\Element\Factory
     */
    protected $elementFactory;

    /**
     * @param \Magento\Backend\Block\Template\Context $context
     * @param \Magento\Framework\Data\Form\Element\Factory $elementFactory
     * @param array $data
     */
    public function __construct(
        \Magento\Backend\Block\Template\Context $context,
        \Magento\Framework\Data\Form\Element\Factory $elementFactory,
        array $data = []
    ) {
        $this->elementFactory = $elementFactory;
        parent::__construct($context, $data);
    }

    public function prepareElementHtml(AbstractElement $element)
    {
        $config = $this->_getData('config');
        $sourceUrl = $this->getUrl('cms/wysiwyg_images/index',
            ['target_element_id' => $element->getId(), 'type' => 'file']);

        /** @var \Magento\Backend\Block\Widget\Button $chooser */
        $chooser = $this->getLayout()->createBlock(\Magento\Backend\Block\Widget\Button::class)
            ->setType('button')
            ->setClass('btn-chooser')
            ->setLabel($config['button']['open'])
            ->setOnClick('MediabrowserUtility.openDialog(\'' . $sourceUrl . '\', 0, 0, "MediaBrowser", {})')
            ->setDisabled($element->getReadonly());

        /** @var \Magento\Framework\Data\Form\Element\Text $input */
        $input = $this->elementFactory->create("text", ['data' => $element->getData()]);
        $input->setId($element->getId());
        $input->setForm($element->getForm());
        $input->setClass("widget-option input-text admin__control-text");
        if ($element->getRequired()) {
            $input->addClass('required-entry');
        }

        $element->setData('after_element_html', $input->getElementHtml() . $chooser->toHtml()
            . "<script>require(['mage/adminhtml/browser']);</script>");

        return $element;
    }
}
Step 5: Create a di.xml in path given below.
{{magento_root}}\app\code\Vendor\Extension\etc\di.xml
Then include the following code
<?xml version="1.0"?>
<config xmlns:xsi="http://www.w3.org/2001/XMLSchema-instance"
        xsi:noNamespaceSchemaLocation="urn:magento:framework:ObjectManager/etc/config.xsd">
    <type name="Magento\Widget\Model\Widget">
        <plugin name="image_uploader_solve" type="Vendor\Extension\Plugin\Widget" sortOrder="1"/>
    </type>
</config>
Step 6: Create a Widget.php in path given below.
{{magento_root}}\app\code\Vendor\Extension\Plugin\Widget.php
Then after, add the below piece of code
<?php
namespace Vendor\Extension\Plugin;
class Widget
{
/**
* @var \Magento\Backend\Helper\Data
*/
protected $backendData;
/**
* Widget constructor.
*
* @param \Magento\Backend\Helper\Data $backendData
*/
public function __construct(
\Magento\Backend\Helper\Data $backendData
) {
$this->backendData = $backendData;
}
public function beforeGetWidgetDeclaration(
\Magento\Widget\Model\Widget $subject,
$type,
$params = [],
$asIs = true
) {
foreach ($params as $name => $value) {
if (preg_match('/(___directive\/)([a-zA-Z0-9,_-]+)/', $value, $matches)) {
$directive = base64_decode(strtr($matches[2], '-_,', '+/='));
$params[$name] = str_replace(['{{media url="', '"}}'], ['', ''], $directive);
}
}
return [$type, $params, $asIs];
}
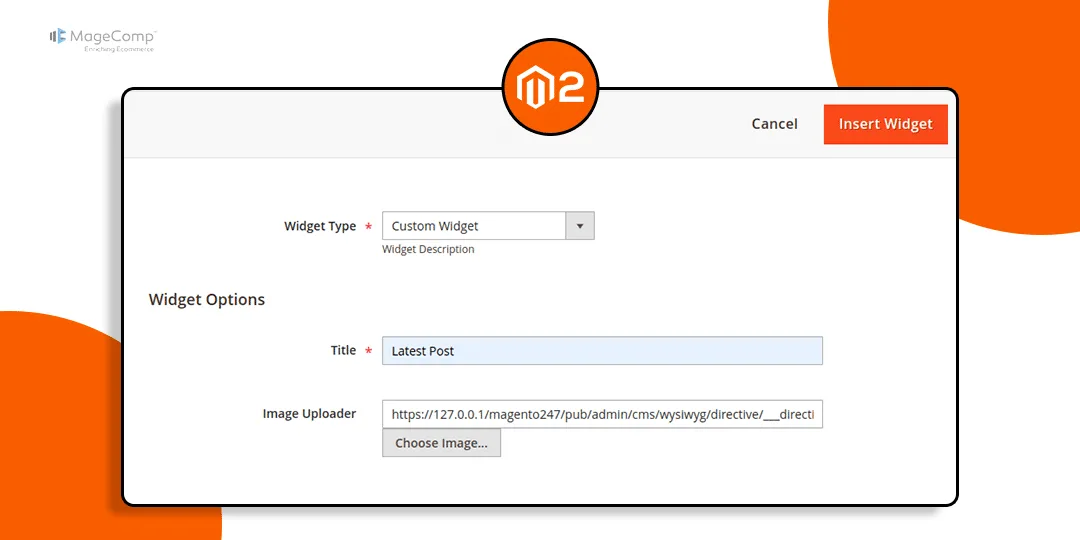
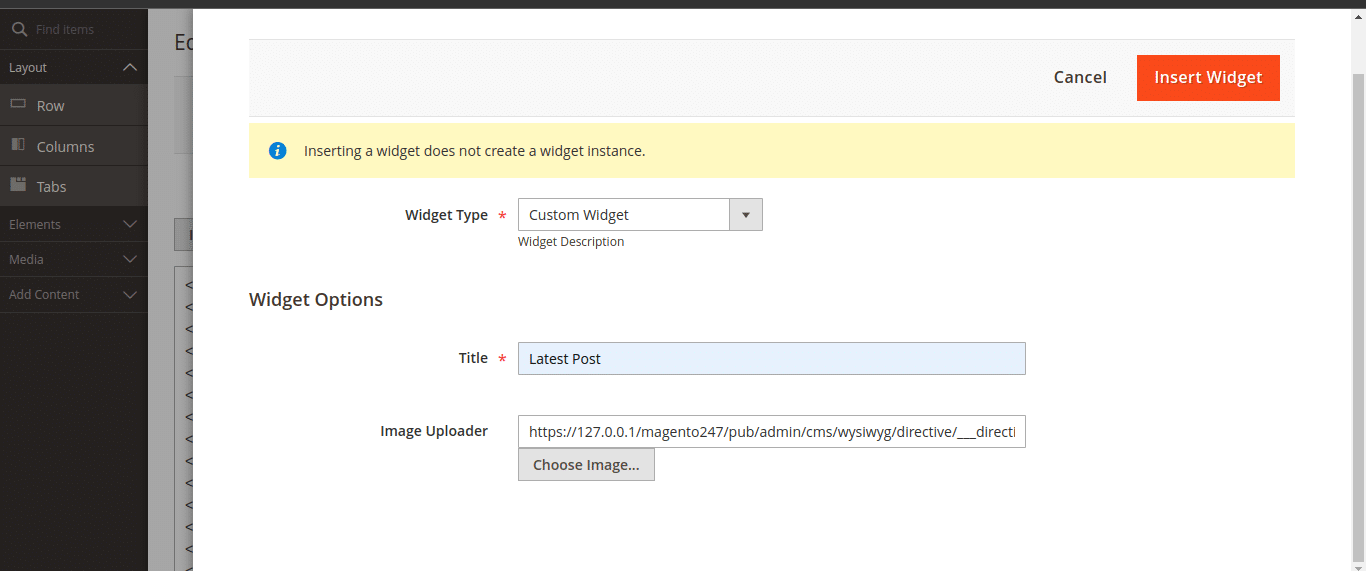
}Output:
Conclusion:
Adding an image chooser to a custom Magento 2 widget is a straightforward process that enhances the flexibility and functionality of your widgets. By following the steps outlined in this guide, you can create a more dynamic and user-friendly interface for your Magento 2 store.

Feel free to customize the widget further to meet your specific needs!
Happy Coding!