Hello Magento Friends ?,
Hereby we wrap up the Episode series for configuring various comments in Magento 2 with the Finale Episode on How to Configure Credit Memo Comments in Magento 2.
Check out the previous episodes
- How to Configure Order Comments in Magento 2 – Episode 1
- How to Configure Shipment Comments in Magento 2 – Episode 2
- How to Configure Invoice Comments in Magento 2 – Episode 3
So, let’s begin ?
Introduction:
When the customer returns a product and asks for a refund, at that time credit memo is issued by the store merchants to the customers. The amount can be refunded or exchanged with other product purchases.
The Magento 2 admin can create a credit memo and print a credit memo via backend configuration. The admin can even add comments to the credit memo mentioning the reason for the refund. These credit memo comments can be forwarded to the customers via email. The admin can even notify the person engaged with the refund process of the store.
Let us look at the steps to Configure Credit Memo Comments in Magento 2.
Steps to Configure Credit Memo Comments in Magento 2:
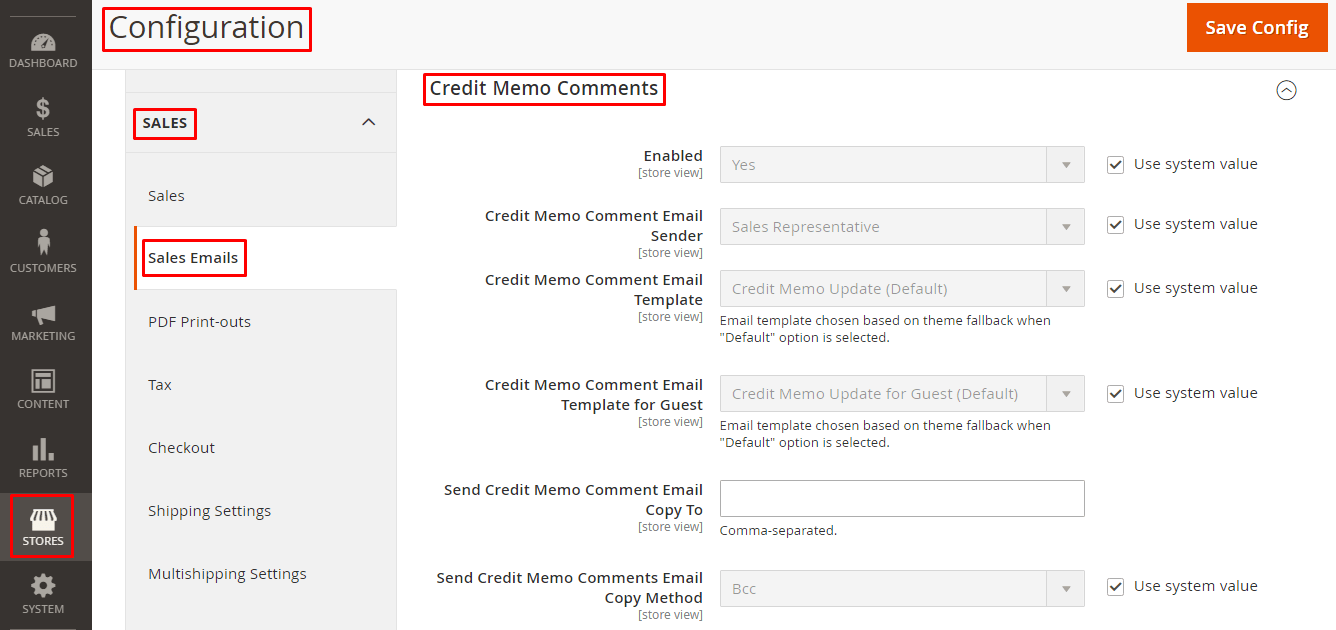
Step 1: From the Admin Dashboard, go to Stores > Settings > Configuration.
Step 2: From the left panel, extend the Sales option and click on Sales Emails.

Step 3: Expand the Credit Memo Comments option.
Enabled – To send Credit Memo Comment email to customers, select Yes.
Credit Memo Comment Email Sender – The person responsible to send the email of Credit Memo Comment.
Credit Memo Comment Email Template – To send the Credit Memo Comment, pick up the email template.
Credit Memo Comment Email Template for Guest – For the non registered customers of your store, choose a template of the Credit Memo Comment email.
Send Credit Memo Comment Email Copy To – Here, you need to enter the Email address of the person/s that will receive the Credit Memo Comment email. Separate the Email addresses with a comma.
Send Credit Memo Comments Email Copy Method – In this field, you have a choice to send Credit Memo Comment email as BCC or as a separate Email.
Step 4: Click Save Config to complete.
Conclusion:
Therefore, with the help of the above steps, everyone is able to Configure Credit Memo Comments in Magento 2. If you face any difficulty while performing the steps, let me know in the comment section below. Do share the article with your Magento friends.
Stay connected!
Happy Reading ?


![Best Resources to Learn Magento 2 [2020 Update]](https://magecomp.com/blog/wp-content/uploads/2020/11/Best-Resources-to-Learn-Magento-2-2020-Update-400x225.webp)