Hello, Magento Folks,
Last time we learned about how you can check the version of Magento 2 store. Today, I am going to explain to you how you can enable default Captcha in Magento 2.
Magento has added support for Captcha In Magento 2. Captcha ensures that humans are interacting with computers and the internet, not robots. Full-Form of Captcha is a Completely Automated Public Turing test to tell Computers and Humans Apart. When the Captcha is enabled on your site, it can differentiate between robots and humans, and prevents your website from spam and robot attacks.
Now, In Magento 2, you can enable the Captcha for both admin and customer login. If you are unable to read what’s in Captcha, you have the option to reload the Captcha. You can set Captcha to appear every time or after several failed attempts.
So let’s look at how to set up Captcha for customer account login?
The Captcha can appear when customers are trying to login to their account each time, or it will appear after several failed attempts of login. Also, you set forms like Forgot Password, checkout as a guest, contact us, etc. to be filled when a customer is unable to login.
Storefront Captcha configuration steps:
- Login to your admin panel and from the sidebar, go to stores>settings>configuration.
- From the left panel, select Customer Configuration from Customers.
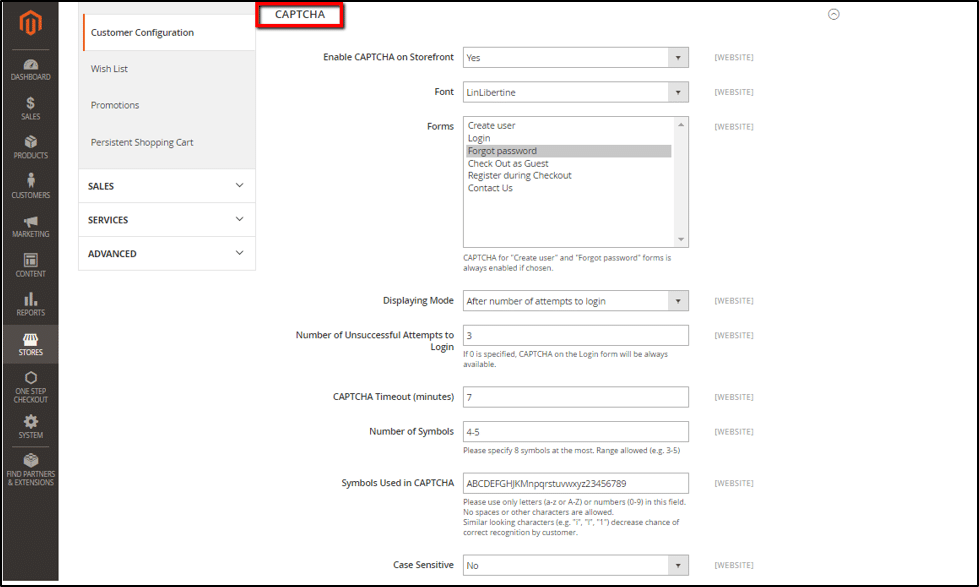
- Click on the Captcha to configure the settings.
- You will get the following options to configure the Captcha,

- Enable CAPTCHA on Storefront: Set this as Yes to Enable the Captcha for use.
- Font: Select the font that you want to use to show the symbol of Captcha to customers. You can add your own fonts but make sure that they are in the same directory as Magneto Installation and should be declared in the xml for the Captcha.
- Forms: Select the forms from the following list of forms, where the Captcha will appear. To select multiple forms press CTRL key(Windows) or Command key(Mac).
- Apply Coupon Code
- Create User
- Login
- Forgot Password
- Contact Us
- Change Password
- PayFlow Pro
- Send to Friend Form
- Share Wishlist Form
- Display Mode: In this, you will get two options to select the displaying mode of the Captcha. The first option is Always. This will require to fill Captcha each time a user tries to log in. The second option is After a Number of Attempts to log in. Here you can set a number for login attempts before the Captcha appears.
- Number of Unsuccessful Attempts to Log in: You can set the number for unsuccessful login attempts before Captch appears. Enter 0(ZERO) to always use Captcha.
- CAPTCHA Timeout (minutes): Set the timer in minutes after which the Captcha will expire. After the Captcha expires, the customer’s need to reload the page for the new Captcha to appear.
- Number of Symbols: Here, you need to enter how many symbols you want to show in the Captcha Image. You can enter upto 8 symbols. You can set the range of symbols like 5-7 to have a varying number of symbols.
- Symbols Used in CAPTCHA: In this field, enter letters from a-z, A-Z or 0-9 to show up randomly in the Captcha. Do not use ‘i’, ‘I’ and ‘1’ for the best result.
- Case Sensitive: Set this to yes if you want your customers to enter the Captcha symbols as it appears.
Once all the configurations are complete click on the Save Config button.
Now, let’s look at how to configure Captcha for Admin?
To take the security of your admin signin process to the next level you can enable the Captcha to your Admin Login and Forgot Password Page. You can reload the Captcha any number of times.
Admin Captcha configuration steps:
- Login to your admin panel and from the sidebar, go to stores>settings>configuration.
- From the left panel, select Admin from Advanced option.
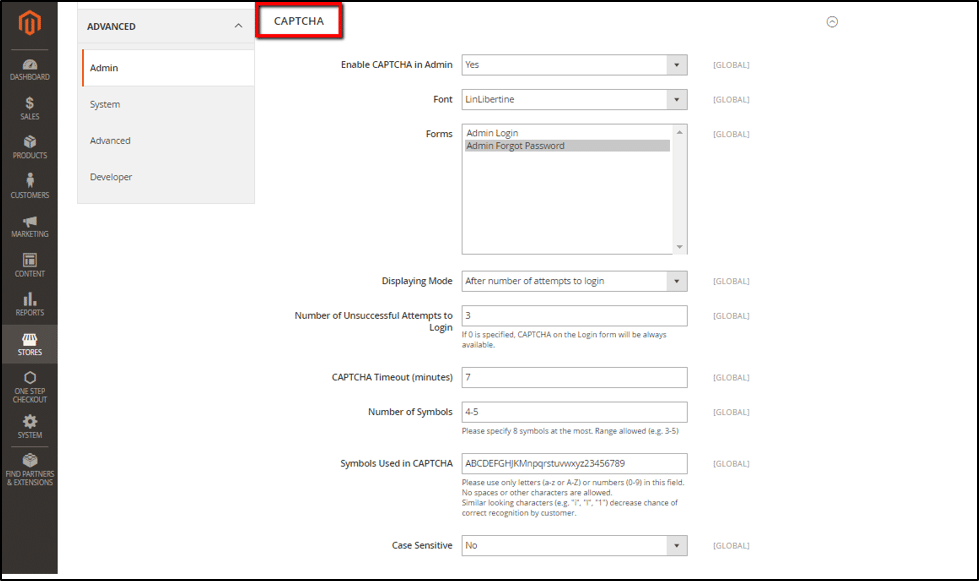
- Set the default store view from the top right corner and then click on the Captcha to configure the settings.
- You will get the following options to configure the Captcha,

- Enable CAPTCHA on Storefront: Set this as Yes to Enable the Captcha for use.
- Font: Select the font that you want to use to show the symbol of Captcha to customers. You can add your own fonts but make sure that they are in the same directory as Magneto Installation and should be declared in the xml for the Captcha.
- Forms: Select the forms from the following list of forms, where the Captcha will appear. To select multiple forms press CTRL key(Windows) or Command key(Mac).
- Admin login
- Forgot Password
- Display Mode: In this, you will get two options to select the displaying mode of the Captcha. The first option is Always. This will require to fill Captcha each time a user tries to log in. The second option is After a number of attempts to log in. Here you can set several login attempts before the Captcha appears.
When Captcha is enabled, the maximum number of login attempts are allowed upto 1000 from the same IP address.
- Number of Unsuccessful Attempts to Log in: You can set the number for unsuccessful login attempts before Captch appears. Enter 0(ZERO) to always use Captcha.
- CAPTCHA Timeout (minutes): Set the timer in minutes after which the Captcha will expire. After the Captcha expires, the customer’s need to reload the page for the new Captcha to appear.
- Number of Symbols: Here, you need to enter how many symbols you want to show in the Captcha Image. You can enter upto 8 symbols. You can set the range of symbols like 5-7 to have a varying number of symbols.
- Symbols Used in CAPTCHA: In this field, enter letters from a-z, A-Z or 0-9 to show up randomly in the Captcha. Do not use ‘i’, ‘I’ and ‘1’ for the best result.
- Case Sensitive: Set this to yes if you want your customers to enter the Captcha symbols as it appears.
Once all the configurations are complete click on the Save Config button.
So, this was all for the day. Now you can enable the Captcha from the Magento 2 itself for customers storefront and admin login both. Now, there is no need to purchase an extension for this functionality.
If you found this article helpful, then share this with your Magento colleagues and partners. Also, let us know in the comments below. If you had any problem while doing so, then contact our support team for help. We will be happy to help you.
Happy Reading!
Don’t forget to check Magento 2 Google reCAPTCHA – Latest Google reCAPTCHA V3 by MageComp?


