A long checkout process is one of the fastest ways to lose a sale. Your shopper found the product, picked a size and clicked the checkout button. Then they redirect onto the cart page, a separate billing form, move on to shipping and finally reach the payment section of the checkout page.
These extra steps and long checkout processes are a major reason why cart abandonment remains so high. According to the Baymard Institute, the average cart abandonment rate across ecommerce is 70.19%. That’s exactly where a WooCommerce one-page checkout changes the game. It consolidates product selection, billing, shipping, and payment on a single page.
Let’s walk you through how to set up a one-page checkout in WooCommerce without code.
What Is a WooCommerce One Page Checkout?
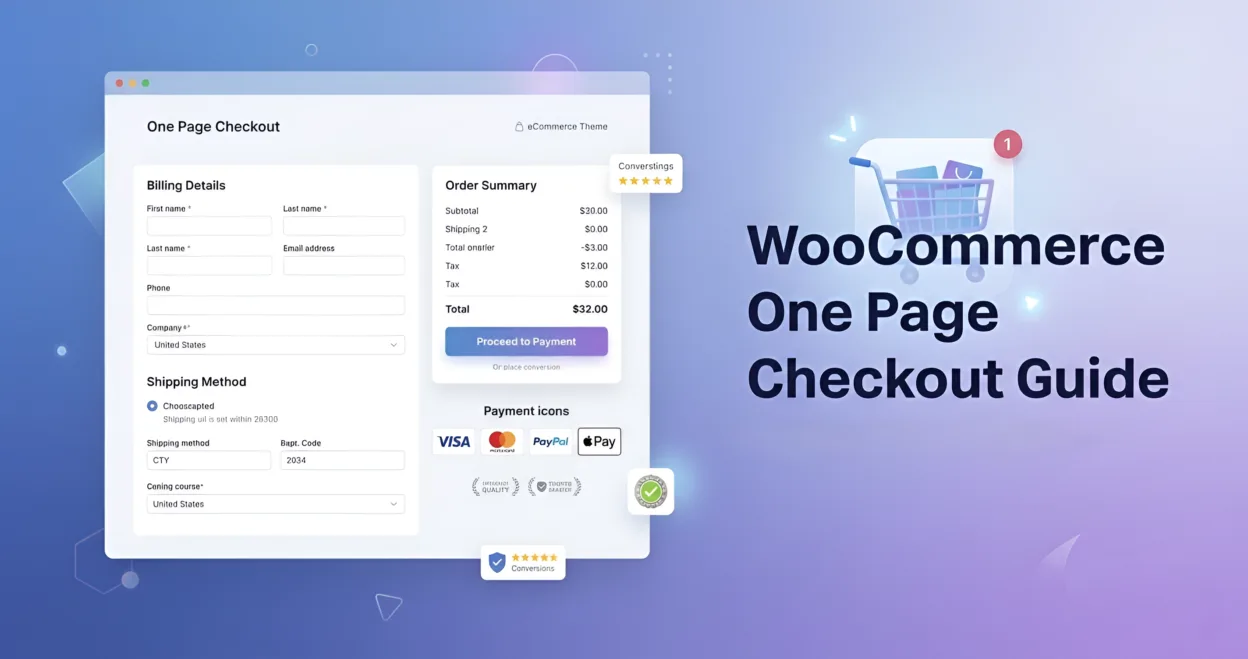
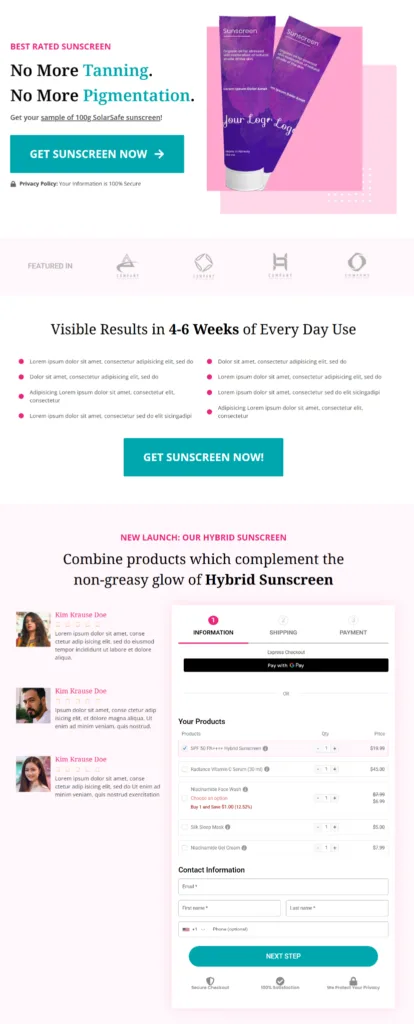
A one page checkout simplifies the entire buying process on a single page. Here, shoppers can check the product details, enter their information along with billing/shipping details, select a payment method and place an order. No cart page redirect, no multi-step form wizard, no navigating away.
The default WooCommerce checkout also keeps everything on one page, but it still includes redundant cart steps and frustratingly limited customization options. A dedicated one-page checkout fixes this problem by letting store owners embed product selectors, apply coupons, add upsells and display trust signals in one place.
This approach is especially relevant given WooCommerce’s dominance as a platform. As covered in MageComp’s statistics roundup, WooCommerce holds a 38.76% market share in ecommerce, powering over 6 million active stores. With that many merchants competing for conversions, checkout optimization is no longer optional.
Choose the Right One Page Checkout Plugin
Several WordPress plugins can replace the default WooCommerce checkout with a single-page flow. Here are three reliable options:
- FunnelKit Funnel Builder: Rated 5.0/5 stars on WordPress.org with 40,000+ active installations. Offers drag-and-drop checkout customization, express payment integration, order bumps, one-click upsells, and built-in A/B testing. Works with Elementor, Divi, Bricks, Oxygen, and the Gutenberg block editor.
- Direct Checkout for WooCommerce: 4.8/5 stars, 80,000+ active installs. It skips the cart page and strips unnecessary fields. Good for stores that need a quick setup without the full funnel-building overhead.
- WooCommerce One Page Checkout: Official WooCommerce Marketplace extension. Shortcode-based product embedding for custom landing pages and promotions. Noted as premium-only with no free tier, which serves as a natural qualifier.
Setting Up One Page Checkout in WooCommerce
To set up a one-page checkout, we’ll use FunnelKit Funnel Builder. It transforms your default WooCommerce checkout into a conversion-optimized layout featuring a simple form, express checkout, and built-in social proof.
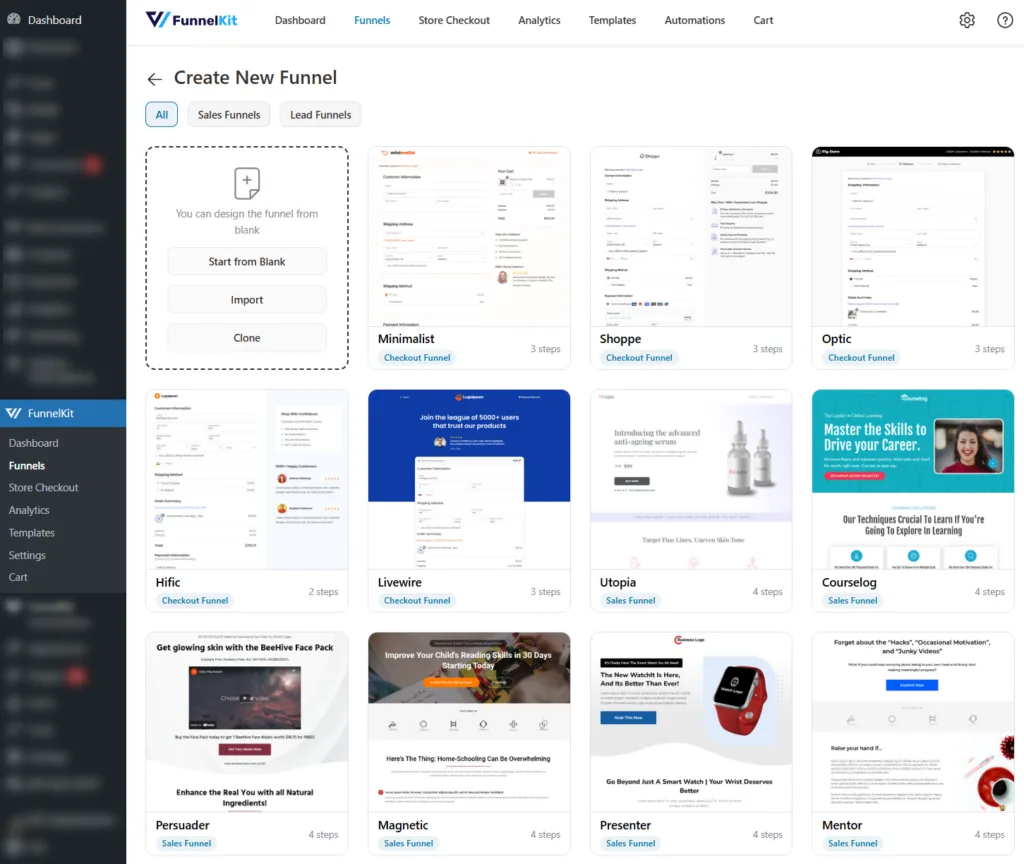
Importing a checkout template
After installing and activating the plugin, navigate to FunnelKit ⇨ Funnels, and create a new funnel. You will see a library of pre-designed checkout templates. Pick one that fits your brand, select the number of steps, and import it.
Assign products to your checkout and offer compelling discounts. Next, customize the layout and add or reorder form fields using simple drag-and-drop.
Editing the form fields
Position your email field at the top of the checkout form, as capturing the email address early helps you trigger abandoned cart recovery emails even if shoppers leave midway.
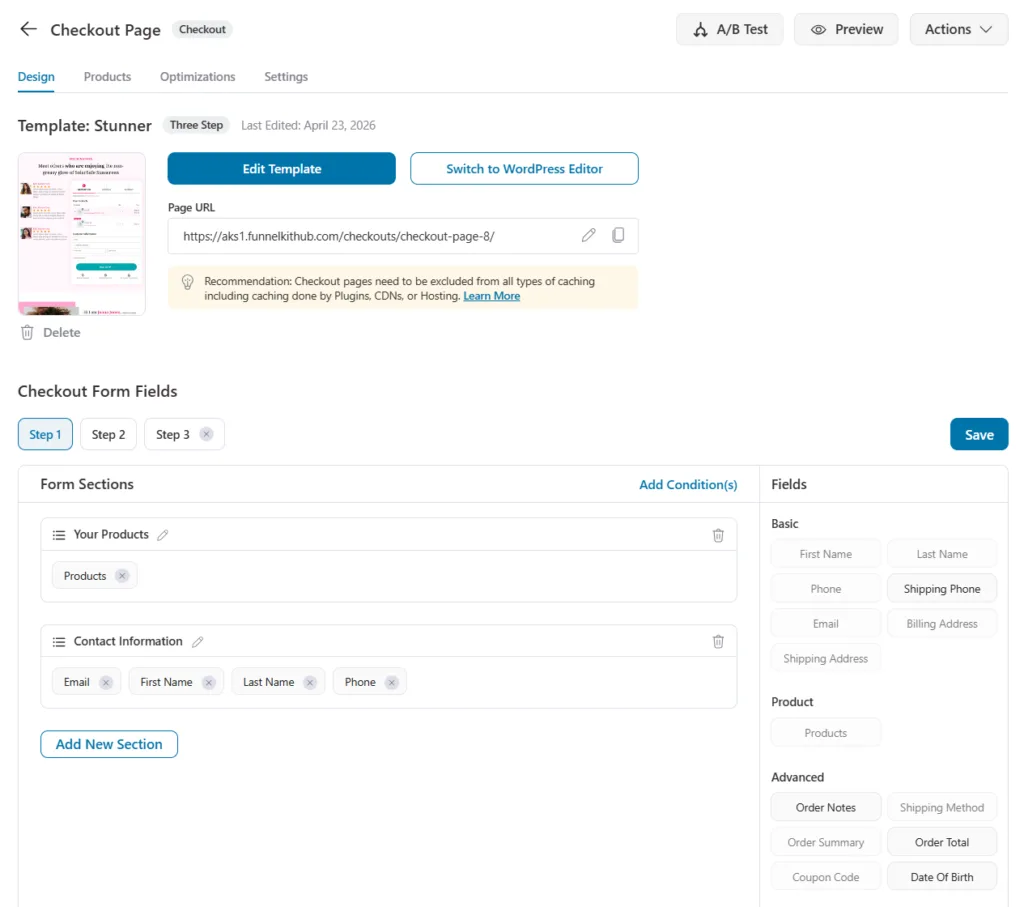
Additionally, remove any unnecessary fields to keep the checkout form short. If you sell digital products, delete the shipping fields. Also, if the billing and shipping addresses are the same, add a simple collapsible field to enter a separate shipping address.
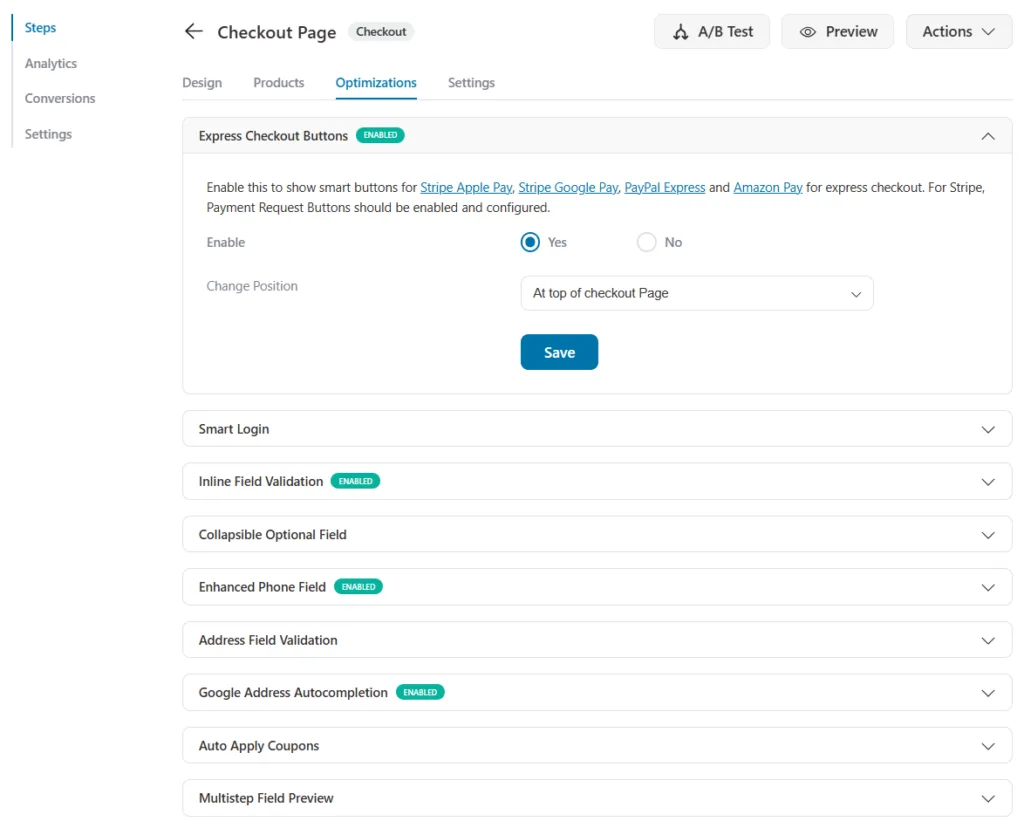
Optimizing the checkout page
You can enable express payment options, including Apple Pay, Google Pay, and PayPal Express, directly on the checkout page. You can also enable Google address autocomplete to allow auto-fill of the shipping address when typing is slow and error-prone.
For a detailed walkthrough on configuring these layouts and every element, the one page checkout guide on FunnelKit covers the process step by step.
Add Order Bumps and Upsells Without Overloading the Page
A one page checkout opens the door to increasing average order value. The idea is to present a relevant offer at the right moment.
So you can start with order bumps, a small add-on offer displayed near the payment button. These are impulse buys, such as a phone case and a pack of batteries for a flashlight. The shopper checks the bump box and the item gets added to the order.
One-click upsells work differently. They appear right after the payment goes through. It allows customers to accept an additional offer without re-entering their card details. This captures customers at the highest moment of trust immediately after a completed purchase.
But the crucial thing is to keep your upsell offers relevant and limited. Start with one order bump and one post-purchase upsell. Make sure to match the offer to the product the buyer already chose using the smart display conditions.
Optimize the Checkout for Mobile Shoppers
More than half of ecommerce traffic comes from mobile devices. Therefore, it’s essential to ensure your one page checkout works smoothly on phones.
Test your checkout on mobile devices, tap through every field, and make sure the keyboard switches to the numeric pad and card number inputs. Configure your template to enable a collapsible order summary and a sticky checkout button.
Speed destroys beautifully designed pages. A three-second load time on a 5G connection is simply too slow. Compress the product thumbnails and strip heavy background scripts. Choose a good hosting provider that can handle traffic spikes during promotions.
Build Trust Right on the Checkout Page
The goal of your one page checkout is to build trust and remove any uncertainty. Place security badges, SSL indicators and payment logos in the payment section. Show a clear return policy or money-back guarantee close to the order button.
If you have customer reviews or ratings, display a short snippet alongside the product summary. Adding them is quite easy with FunnelKit. Just add the testimonials widget and customize it from any page builder, such as Elementor, Divi, Bricks, Oxygen, or the Gutenberg block editor.
Clearly displaying shipping charges, taxes, and any fees on the checkout page builds transparency and fosters the confidence needed to drive conversions.
Test and Refine Your Checkout Over Time
Track key metrics, including conversion rate, upsell revenue, cart abandonment rate, average order value, orders placed, and revenue generated. When these stats drift, you’ll be able to identify the real cause of losing revenue.
Run A/B tests on your headline copy, place order button colors, field order, and even the number of payment options. Split the traffic among these variations and measure which one converts better. This allows you to make data-backed decisions.
Frequently Asked Questions
1) Is one page checkout better than multi-step checkout?
It depends on what you sell. For stores with a focused product range such as a single course, a subscription box, a flagship product with variants, a one page checkout typically converts higher because it reduces clicks. For stores that require extensive billing, shipping, and gifting details, a well-designed multi-step checkout with progress indicators can feel less overwhelming. The best approach is to A/B test both layouts with your actual traffic.
2) Does one page checkout work with WooCommerce Subscriptions?
Yes. Most major one-page checkout plugins, including FunnelKit and Direct Checkout, are compatible with the official WooCommerce Subscriptions plugin. You can add subscription products to the checkout, apply order bumps, and offer upsells just like you would with standard products.
3) Will a one page checkout plugin slow down my store?
A well-built checkout plugin is designed for performance since speed directly impacts its value proposition. The biggest risks to page speed are usually uncompressed images, too many active plugins, or inadequate hosting. Test with tools like Google PageSpeed Insights after installation to confirm there’s no meaningful slowdown.
4) Can I use a one page checkout without forcing account creation?
Absolutely, and you should. Mandatory account registration adds friction at the worst possible moment. Offer guest checkout as the default and present account creation as an optional step after the purchase is complete. Most checkout plugins support this configuration out of the box.
Conclusion: Take Advantage of One Page Checkouts
A WooCommerce one page checkout is one of the most practical upgrades you can implement in your store in 2026. It reduces friction, reduces cart abandonment and keeps the buyer focused. Even if you sell physical goods, digital products, or subscriptions, consolidating everything into a single, well-designed page makes the entire buying journey faster and easier.
Pick a plugin that matches your needs, optimize for mobile, add trust signals where they matter most, and test your layout against real performance data. Your checkout page is where revenue is either captured or lost. Make every element on it earn its place.