Hello Magento Friends,
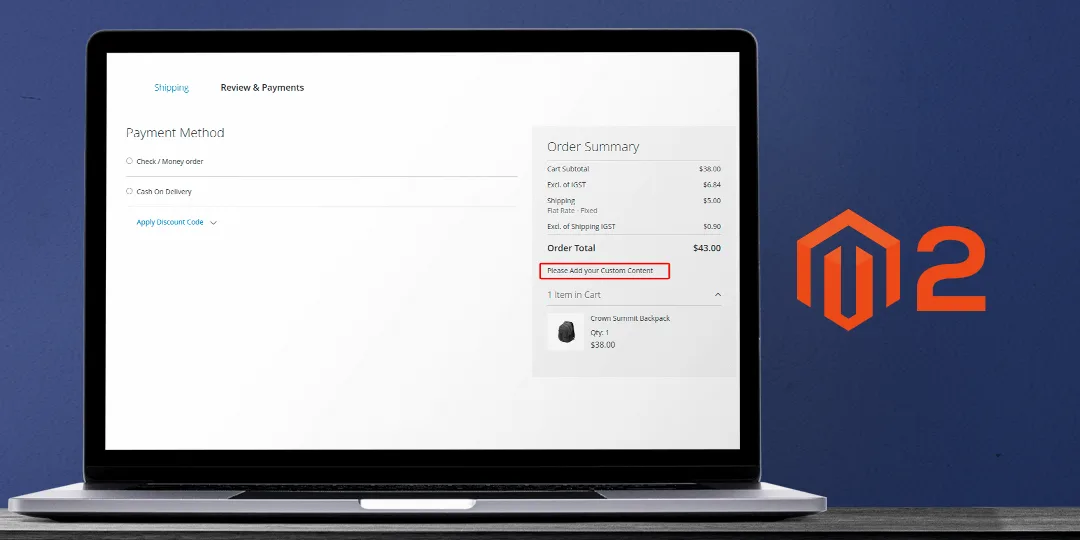
Today I am going to explain Magento 2: Customize Checkout Order Summary by Adding Custom Content.
The checkout page in Magento 2 shows the order details and payment information. This is the area where Magento store owners can encourage customers to buy more by offering free shipping or discount on minimum purchase amounts and increasing sales. Sometimes store owners may need to show some information to the customers for their orders and delivery. You may also need to alert customers about the products they are ordering. For all this, Magento store merchants need to add custom text on the checkout order summary.
Let’s learn how you can customize the checkout order summary in Magento 2.
Steps to Customize Checkout Order Summary by Adding Custom Content in Magento 2:
Step 1: Navigate to the below path
app\code\Vendor\Extension\view\frontend\layout\checkout_index_index.xml
Then add the below code
<?xml version="1.0"?>
<page xmlns:xsi="http://www.w3.org/2001/XMLSchema-instance"
      xsi:noNamespaceSchemaLocation="urn:magento:framework:View/Layout/etc/page_configuration.xsd">
    <body>
        <referenceContainer name="content">
            <block class="Magento\Framework\View\Element\Template" name="custom_checkout_order_summary"
                   template="Vendor_Extension::checkout/custom_content.phtml"/>
        </referenceContainer>
    </body>
</page>
Step 2: Now go to the following path
app\code\Vendor\Extension\view\frontend\templates\checkout\custom_content.phtml
Then add the code as mentioned below
<script type="text/javascript">
    window.customContent = '<?php echo __('Please add your Custom Content'); ?>';
</script>
Step 3: Now move to the below file path
app\design\Themes\Yourtheme\Magento_Tax\view\frontend\web\template\checkout\summary\grand-total.html
Then add the code as follows
<!-- ko if: isTaxDisplayedInGrandTotal && isDisplayed() -->
<tr class="grand totals incl">
    <th class="mark" scope="row">
        <strong data-bind="i18n: inclTaxLabel"></strong>
    </th>
    <td data-bind="attr: {'data-th': inclTaxLabel}" class="amount">
        <strong><span class="price" data-bind="text: getValue()"></span></strong>
    </td>
</tr>
<tr class="grand totals excl">
    <th class="mark" scope="row">
        <strong data-bind="i18n: exclTaxLabel"></strong>
    </th>
    <td data-bind="attr: {'data-th': exclTaxLabel}" class="amount">
        <strong><span class="price" data-bind="text: getGrandTotalExclTax()"></span></strong>
    </td>
</tr>
<!-- /ko -->
<!-- ko if: !isTaxDisplayedInGrandTotal && isDisplayed() -->
<tr class="grand totals">
    <th class="mark" scope="row">
        <strong data-bind="i18n: title"></strong>
    </th>
    <td data-bind="attr: {'data-th': title}" class="amount">
        <strong><span class="price" data-bind="text: getValue()"></span></strong>
    </td>
</tr>
<!-- /ko -->
<!-- ko if: isBaseGrandTotalDisplayNeeded() && isDisplayed() -->
<tr class="totals charge">
    <th class="mark" data-bind="i18n: basicCurrencyMessage" scope="row"></th>
    <td class="amount">
        <span class="price" data-bind="text: getBaseValue(), attr: {'data-th': basicCurrencyMessage}"></span>
    </td>
</tr>
<!-- /ko -->
<!-- Custom Content -->
<tr class="grand totals">
    <td class="myClass" colspan="2">
        <span data-bind="html: customContent"></span>
    </td>
</tr>
Step 4: Once the above files are created and changes are done, kindly run the below command
sudo php bin/magento setup:upgrade
sudo php bin/magento setup:static-content:deploy -f
sudo php bin/magento cache:flush
After executing the above steps, your custom content is added to the order summary at checkout.
Conclusion:
Hence, this way you can add any custom text on the checkout order summary in Magento 2. Apart from this, customize the checkout order summary by adding a discount component and increment decrement functionality.
If you have any queries with the implementation of the above steps, reach me via the comment section. Share the article with your friends and stay in the loop with us.
Happy Coding!


