Hello Magento Fellas ?,
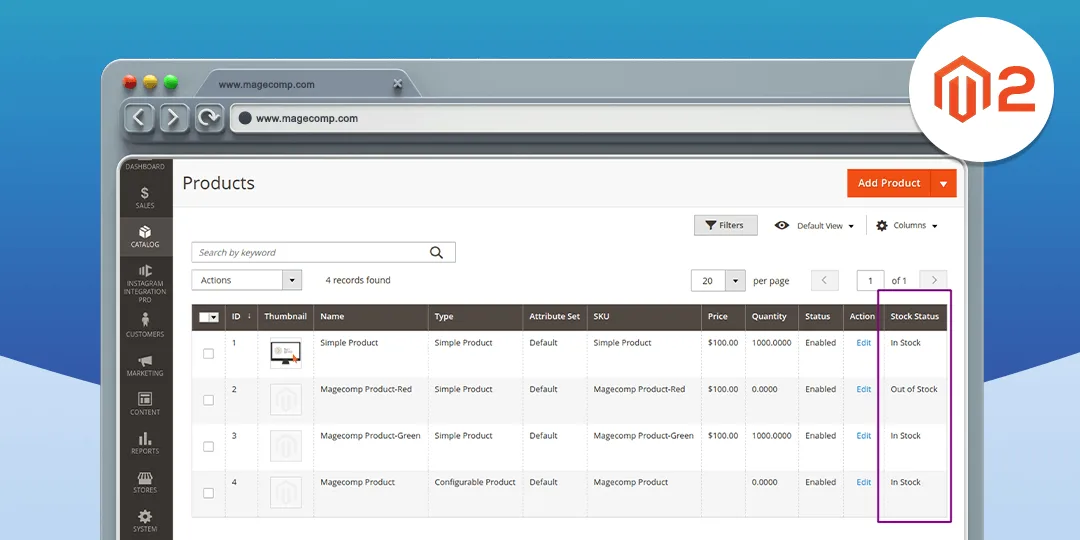
The present-day subject matter is How to add Stock Status column in Admin Product Grid Magento 2 which is the loop article of How to add a Custom Column to the Products Grid of Magento 2.
In any case, you left out to go through our last article, here it is. How to change default Magento 2 Logo in Admin Panel. Let’s start with today’s topic ?
Managing stock helps to reduce the bounce rate. Notifying customers about the different stock statuses of products results in enhanced user experience. Magento 2 is a well-known E-commerce platform as it provides advanced features. And one such feature is adding a stock status column in the Admin Product grid. Let’s see How to add Stock Status column in Admin Product Grid Magento 2.
Steps to add Stock Status column in Admin Product Grid Magento 2:
Step 1: First, we need to create a “di.xml” file inside our extension on the following path:
app\code\Vendor\Extension\etc
Now, add the below code:
<?xml version="1.0"?>
<config xmlns:xsi="http://www.w3.org/2001/XMLSchema-instance" xsi:noNamespaceSchemaLocation="urn:magento:framework:ObjectManager/etc/config.xsd">
     <type name="Magento\Catalog\Ui\DataProvider\Product\ProductDataProvider">
        <plugin name="join_product_grid_with_stock_status" type="Vender\Extension\Plugin\Ui\DataProvider\Product\ProductDataProvider" sortOrder="100" />
    </type>
</config>
Step 2: After that, we need to create a “ProductDataProvider.php” file inside the below folder path of extension:
app\code\Vendor\Extension\Plugin\Ui\DataProvider\Product
Then add the below code:
<?php
namespace Vender\Extension\Plugin\Ui\DataProvider\Product;

class ProductDataProvider
{
    /**
     * @param \Magento\Catalog\Ui\DataProvider\Product\ProductDataProvider $subject
     * @param \Magento\Framework\Model\ResourceModel\Db\Collection\AbstractCollection $collection
     * @return mixed
     */
    public function afterGetCollection(
        \Magento\Catalog\Ui\DataProvider\Product\ProductDataProvider $subject,
        $collection)
    {
        $columns = $collection->getSelect()->getPart(\Zend_Db_Select::COLUMNS);
        if (!$collection->isLoaded() && !$this->checkJoin($columns))
        {
            $collection->joinTable(
                'cataloginventory_stock_status',
                'product_id=entity_id',
                ["stock_status" => "stock_status"],
                null ,
                'left'
            )->addAttributeToSelect('stock_status');
        }

        return $collection;
    }

    /**
     * @param array $columns
     * @return bool
     */
    private function checkJoin($columns)
    {
        foreach ($columns as $column)
        {
            if(is_array($column))
            {
                if(in_array('stock_status', $column))
                {
                    return true;
                }
            }
        }

        return false;
    }
}
Step 3: After that, we need to create a “product_listing.xml” file inside the below folder path of extension:
app\code\Vendor\Extension\view\adminhtml\ui_component
After that add the code as shown below:
<?xml version="1.0" encoding="UTF-8"?>
<listing xmlns:xsi="http://www.w3.org/2001/XMLSchema-instance" xsi:noNamespaceSchemaLocation="urn:magento:module:Magento_Ui:etc/ui_configuration.xsd">
    <listingToolbar name="listing_top">
        <filters name="listing_filters">
            <filterSelect name="stock_status" provider="${ $.parentName }">
                <settings>
                    <options class="Vender\Extension\Ui\Component\Listing\Columns\StockStatus\Options"/>
                    <label translate="true">Stock Status</label>
                    <dataScope>stock_status</dataScope>
                </settings>
            </filterSelect>
        </filters>
    </listingToolbar>
    <columns name="product_columns">
        <column name="stock_status" class="Vender\Extension\Ui\Component\Listing\Columns\StockStatus" sortOrder="900">
            <settings>
                <addField>true</addField>
                <filter>select</filter>
                <options class="Vender\Extension\Ui\Component\Listing\Columns\StockStatus\Options"/>
                <label translate="true">Stock Status</label>
                <dataType>select</dataType>
            </settings>
        </column>
    </columns>
</listing>
Step 4: After that, we need to create a “StockStatus.php” file inside the below folder path of extension:
app\code\Vendor\Extension\Ui\Component\Listing\Columns
Next, add the following code:
<?php
namespace Vender\Extension\Ui\Component\Listing\Columns;

class StockStatus extends \Magento\Ui\Component\Listing\Columns\Column
{
    /**
     * Column name
     */
    const NAME = 'column.stock_status';

    /**
     * Prepare Data Source
     *
     * @param array $dataSource
     * @return array
     */
    public function prepareDataSource(array $dataSource)
    {
        if (isset($dataSource['data']['items']))
        {
            $fieldName = $this->getData('name');
            foreach ($dataSource['data']['items'] as & $item)
            {
                if (isset($item[$fieldName]))
                {
                    $item[$fieldName] = $this->getStatus($item[$fieldName]);
                }
            }
        }

        return $dataSource;
    }

    /**
     * @param $status
     * @return \Magento\Framework\Phrase
     */
    private function getStatus($status)
    {
        if($status == 1)
        {
            return __('In Stock');
        }
        else
        {
            return __('Out of Stock');
        }
    }
}
Step 5: At last, we need to create the “Options.php” file inside the below folder path of extension:
app\code\Vendor\Extension\Ui\Component\Listing\Columns\StockStatus
And finally, add the code as mentioned below:
<?php
namespace Vender\Extension\Ui\Component\Listing\Columns\StockStatus;

use Magento\Framework\Data\OptionSourceInterface;

class Options implements OptionSourceInterface
{
    /**
     * @var array
     */
    protected $options;

    /**
     * Get options
     *
     * @return array
     */
    public function toOptionArray()
    {
        if ($this->options !== null)
        {
            return $this->options;
        }

        $this->options = [
            [
                'label' => __('In Stock'),
                'value' => 1
            ],
            [
                'label' => __('Out of Stock'),
                'value' => 0
            ]
        ];

        return $this->options;
    }
}
That’s all.
Final Words:
Accordingly, everyone has successfully carried out the steps to add Stock Status column in Admin Product Grid Magento 2. Besides this, display a custom message on the store frontend about product stock status with Custom Stock Status Extension for Magento 2.
For any hurdles, while implementing the code, let me know by mentioning in the comment part. Share the article with your fellow Magento friends. Keep in touch and keep developing!
Happy Coding ?


