Oh, you’ve got a new visitor, and they are looking to pay a visit to your physical store too, but they are unable to find the exact location of your store. And… they left your store. ?
A situation like this is no less than a nightmare. But don’t worry. We have a cure for this problem. Magento 2 Store Locator Extension.
This feature-rich Magento 2 extension leverages Google Maps and GPS system, which helps your visitors to locate your brick-and-mortar shops easily from any corner of the world. Additionally, this Magento 2 extension shows the visitors their location too.
If you have multiple store branches, check this Magento 2 Store Locator Google Maps extension. It helps your store visitors locate your nearest store branch to their location. Furthermore, the Store Locator extension for Magento 2 is a highly responsive Magento 2 module that is compatible with all devices, whether it is desktop, mobile or tablet.
Magento 2 Store Locator Features
1. Display multiple store branches in one place
Store Finder Extension for Magento 2 allows you to create and display all your store branch locations on a convenient map. Also, you can show all your store information (name, address, business time, etc.) on the map. Furthermore, the extension automatically adds all your store information to the map.
2. Easily Integrate Google Maps with your Magento 2 stores
M2 Store Locator Extension lets you easily integrate your Magento 2 stores with Google Maps. Through this, the customers can approach all your store branches effortlessly. These amazing features of Google Maps integration will provide your customers with a seamless navigation experience.
3. Locate the nearest store branch on the map
By leveraging the power of Google Maps integration, Magento 2 Store Locator Google Maps extension allows your valued customers to pinpoint the closest physical store to their location effortlessly. All they need to do is visit the store locator page and input their preferred search radius to streamline their search process for maximum convenience.
4. Add a Map for the M2 Store Locator extension on any website page
The M2 Store Locator extension enables you to add the store locator to any website page. You can also adjust the map in a widget as per your requirement. You can either access the full list of shops or customize the filters to display specific points of sale.
5. Preview, display, and edit the shop’s coordinates
With MageComp’s Store Locator Google Maps for Magento 2, you can effortlessly display the precise GPS coordinates of your store by converting its address. Moreover, in case of relocation, you can conveniently update its coordinates and place a marker on Google Maps to pinpoint the exact location. Preview all changes from the admin backend before applying them to ensure accuracy.
Configuration of Magento 2 Store Locator Extension
To carry out the configuration steps of the extension, you need first to install the M2 Store Locator Google Maps extension and then start with the following steps.
1. General Configuration
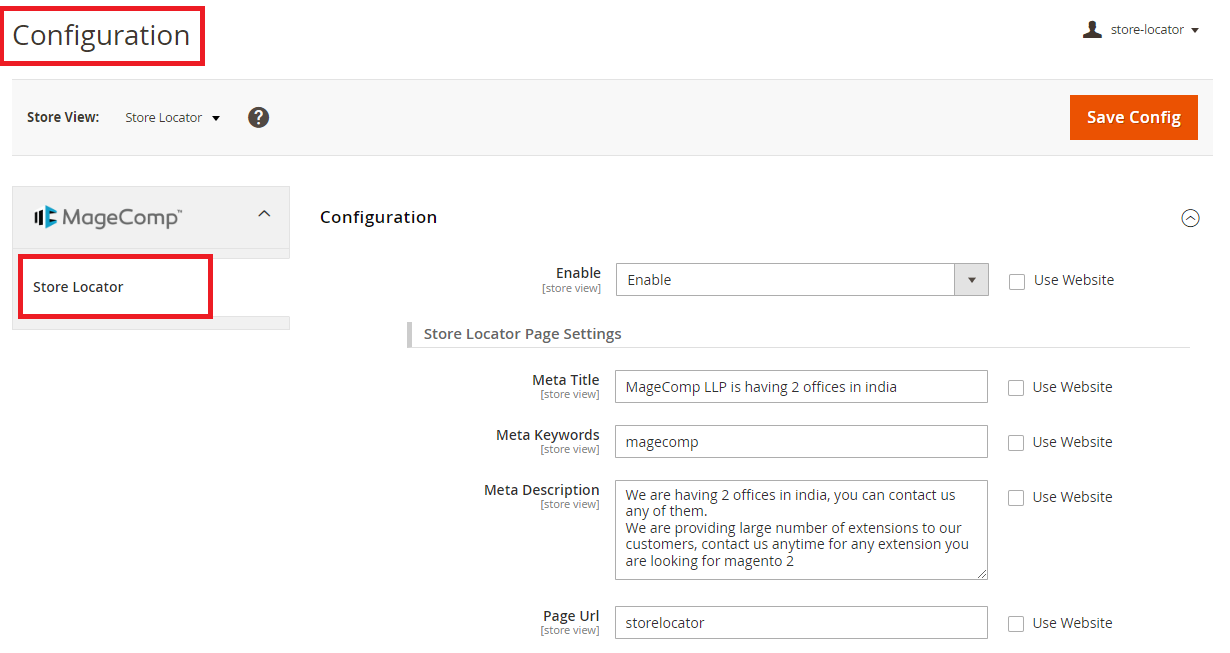
Go to Store > Configuration.
On this configuration page, you will find multiple extension settings.
- Enable: Choice to enable and disable the extension.
Store Locator Page Settings
- Meta Title: Provide SEO meta title for store locator page’s frontend.
- Meta Keywords: Provide SEO keywords for the store locator page’s frontend.
- Meta Description: Provide SEO meta description for your store locator page’s frontend.
- Page URL: Option to customize the URL of the store locator page.
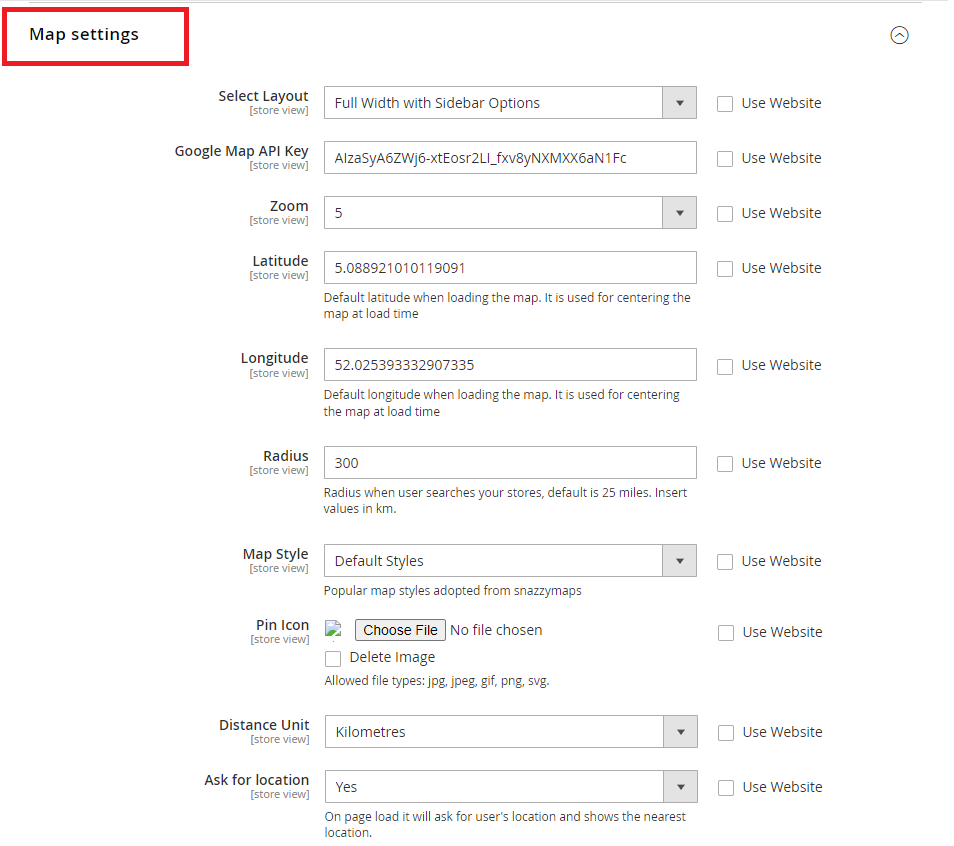
2. Map Configuration (Map Settings)
- Select Layout: You can choose the frontend store locator page layout here.
- Google Map API Key: Enter your Map API key by Google here.
- Zoom: Adjust the zooming level by setting a default level for the store locator page.
- Latitude: Set default map latitude.
- Longitude: Set default map longitude.
- Radius: Set default map radius.
- Map Style: Style your map from available layout templates.
- Pin Icon: Customize the pin icon of the frontend store locator page (optional).
- Distance Unit: Change the store distance unit in km or meters as per your requirements.
- Ask for Location: Ask your users’ permission to share locations to save time with accurate store data from its server.
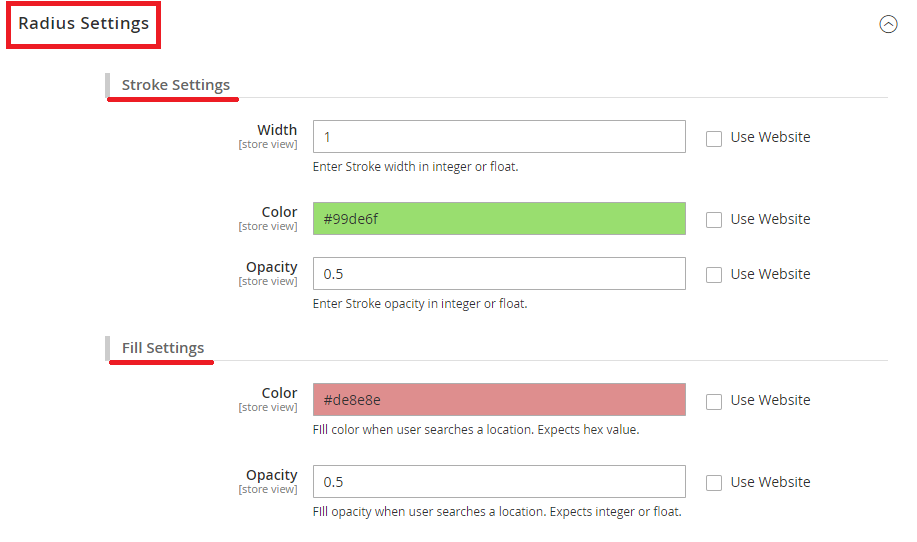
3. Radius Configuration (Radius Settings)
Stroke Settings
- Width: Set the width of the radius stroke.
- Color: Set the color of the radius stroke.
- Opacity: Set the width of the frontend Map stroke.
Fill Settings
- Color: Set the fill color of the radius.
- Opacity: Set the fill opacity of the frontend Map stroke.
4. Individual Store Configurations (Individual Store Settings)
- Zoom on Store details: Set the default zoom level of your store.
- Other Stores: You can enable or disable other store lists in the frontend.
- Stores Slider: You can enable or disable the store slider in the frontend.
5. Add or Edit Store Information Configuration
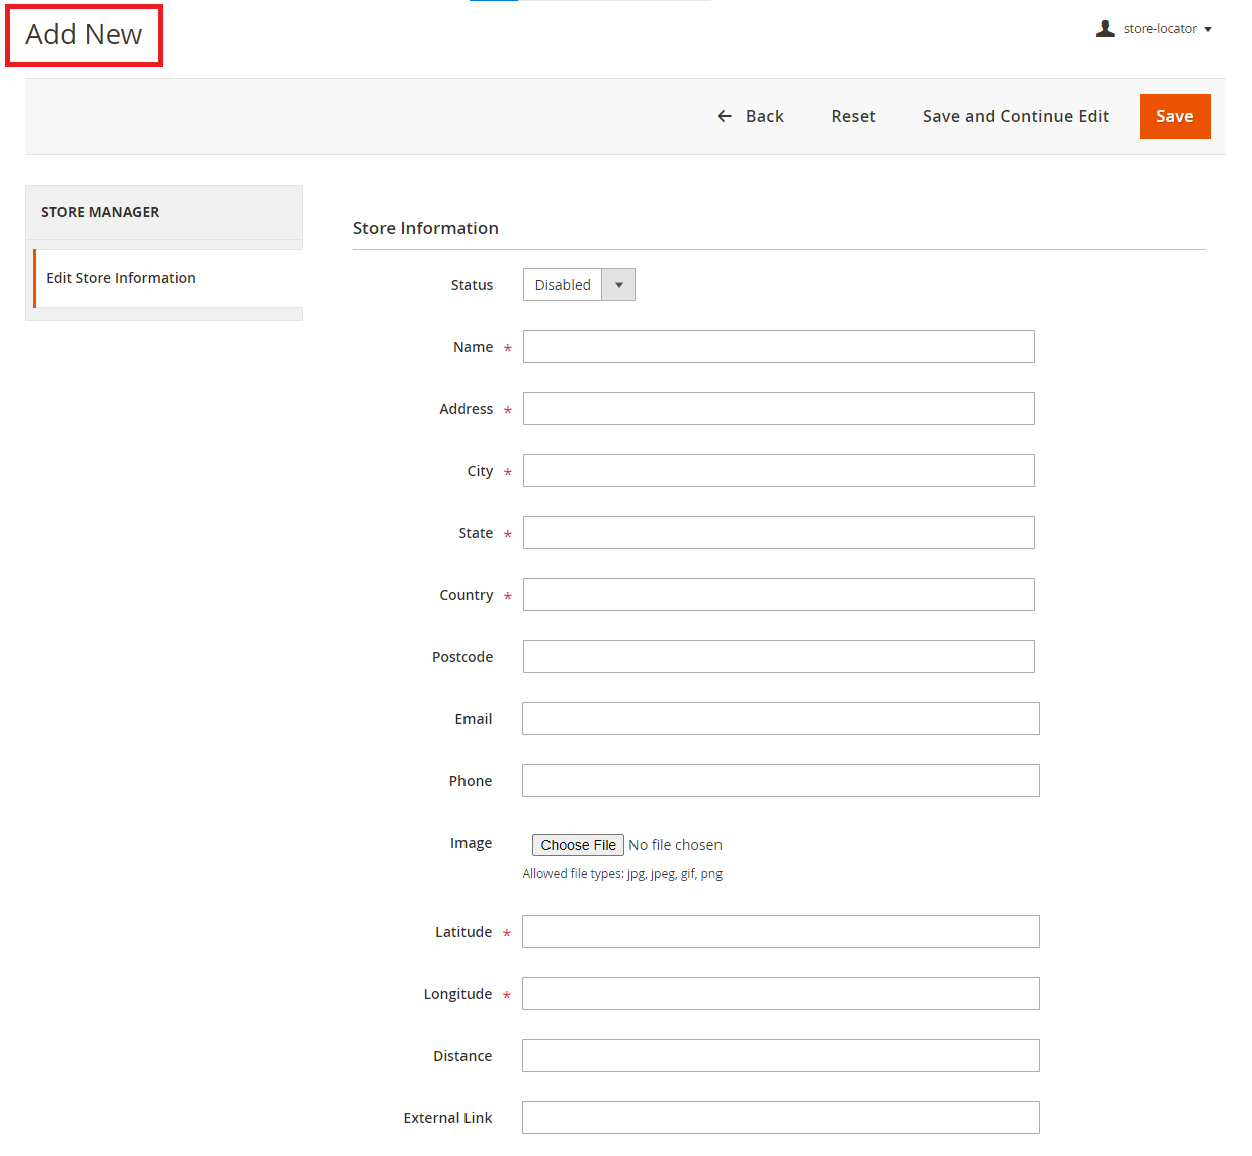
On the main store locator page, select the Add Store button. From this page, you can easily add new store information or edit your existing store information.
- Status: Set your Warehouse status (enable or disable)
- Name: Enter your Store name.
- Address: Enter your Magento store address.
- City: Enter your store’s city name.
- State: Enter your store’s state name.
- Country: Enter the country name.
- Postcode: Enter the PIN code number.
- Email: Enter your store’s email address.
- Phone: Enter your store’s contact number.
- Image: Select the store logo to display on the frontend.
- Latitude: Enter the default latitude for the map.
- Longitude: Enter the default longitude for the map.
- Distance: Enter the distance from the default store. (optional)
- External Link: Enter the external store link. (optional)
Conclusion
If you want to show all your store branches in one place with accurate store locations, then Magento 2 Store Locator Google Maps extension is the right choice for you. You can increase online and offline store traffic by displaying all your store locations.
We hope this configuration guide was helpful to you. To get more configuration tutorials like this, stay updated with us, and if you have any queries regarding any Magento service, you can now reach us via our official Facebook group.


