Hello Magento Friends,
In Magento 2, customizing the frontend order view page can greatly improve the user experience by allowing store owners to display additional information. Adding a custom tab is one of the ways to achieve this, where you can include custom content such as order notes, shipping information, or other customer-related details.
In this blog, we’ll walk through the steps to add a custom tab to the frontend order view page in Magento 2. This customization can be useful for various purposes, especially in B2B eCommerce stores where additional information is often needed.
Steps to Add a Custom Tab to the Frontend Order View Page in Magento 2:
Step 1: Create a “routes.xml” file inside our extension at the following path.
app\code\Vendor\Extension\etc\frontend\routes.xml
Now add the code as follows
<?xml version="1.0"?>
<config xmlns:xsi="http://www.w3.org/2001/XMLSchema-instance" xsi:noNamespaceSchemaLocation="urn:magento:framework:App/etc/routes.xsd">
    <router id="standard">
        <route id="taborderview" frontName="taborderview">
            <module name="Vendor_Extension" />
        </route>
    </router>
</config>
Step 2: Create a “Mytab.php” file inside our extension at the following path.
app\code\Vendor\Extension\Controller\Order\Mytab.php
Now add the following code
<?php

namespace Vendor\Extension\Controller\Order;

use Magento\Framework\App\Action\HttpGetActionInterface as HttpGetActionInterface;
use Magento\Sales\Controller\OrderInterface;

class Mytab extends \Magento\Sales\Controller\AbstractController\View implements OrderInterface, HttpGetActionInterface
{

}
Step 3: We need to create a sales_order_info_links.xml file inside our extension at the following path.
app\code\Vendor\Extension\view\frontend\layout\sales_order_info_links.xml
Then add the below-mentioned code
<?xml version="1.0"?>
<page xmlns:xsi="http://www.w3.org/2001/XMLSchema-instance" xsi:noNamespaceSchemaLocation="urn:magento:framework:View/Layout/etc/page_configuration.xsd">
    <body>
        <referenceBlock name="sales.order.info.links">
            <block class="Magento\Sales\Block\Order\Link" name="my.tab">
                    <arguments>
                        <argument name="path" xsi:type="string"><!-- route/controller/path -->taborderview/order/mytab</argument>
                        <argument name="label" xsi:type="string" translate="true">My Tab</argument>
                        <argument name="key" xsi:type="string">my_tab</argument>
                    </arguments>
                </block>
        </referenceBlock>
    </body>
</page>
Step 4: Then, we need to create a taborderview_order_mytab.xml file inside our extension at the following path
app\code\Vendor\Extension\view\frontend\layout\taborderview_order_mytab.xml
Then after add the below code snippet
<?xml version="1.0"?>
<page xmlns:xsi="http://www.w3.org/2001/XMLSchema-instance" xsi:noNamespaceSchemaLocation="urn:magento:framework:View/Layout/etc/page_configuration.xsd">
    <update handle="customer_account"/>
    <update handle="sales_order_info_links"/>
    <body>
        <referenceContainer name="page.main.title">
            <block class="Magento\Sales\Block\Order\Info" name="order.status" template="Magento_Sales::order/order_status.phtml"/>
            <block class="Magento\Sales\Block\Order\Info" name="order.date" template="Magento_Sales::order/order_date.phtml"/>
            <container name="order.actions.container" htmlTag="div" htmlClass="actions-toolbar order-actions-toolbar">
                <block class="Magento\Sales\Block\Order\Info\Buttons" as="buttons" name="sales.order.info.buttons" cacheable="false"/>
            </container>
        </referenceContainer>
        <referenceBlock name="content">
            <block class="Magento\Framework\View\Element\Template" name="custom.tab" template="Vendor_Extension::custom_tab.phtml" />
        </referenceBlock>
    </body>
</page>
Step 5: Then, we need to create a custom_tab.phtml file inside our extension at the following path
app\code\Vendor\Extension\view\frontend\templates\custom_tab.phtml
Finally, add the following code
<div class="order-details-items custom-tab">
  <div class="table-wrapper order-items">
    <?= __("Great news! Your order is being processed smoothly. Stay tuned for updates.") ?>
  </div>
</div>
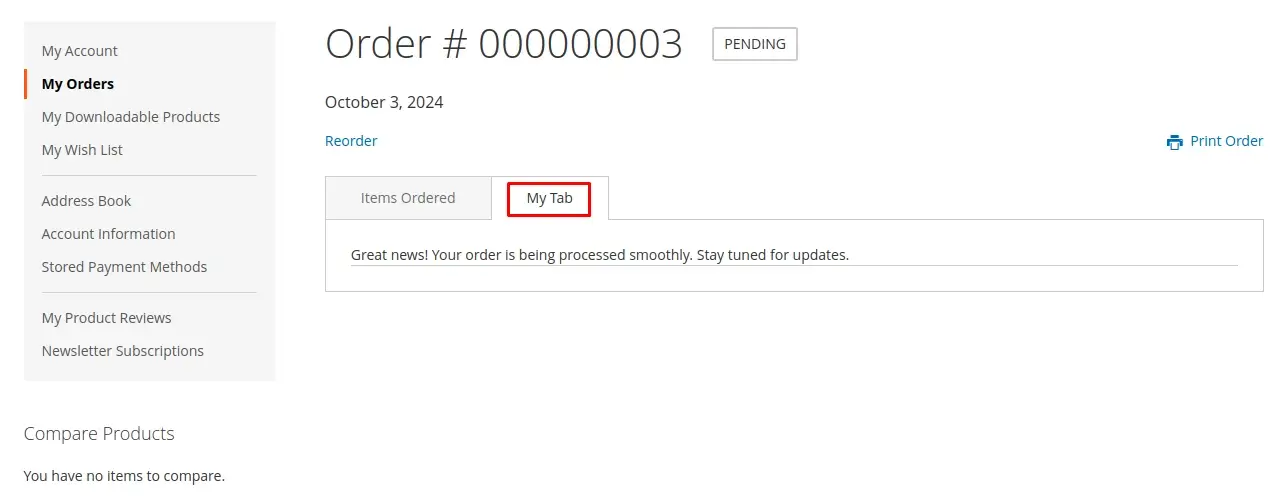
Output:

Conclusion:
Adding a custom tab to the frontend order view page in Magento 2 is a straightforward process that enhances the order page’s functionality. Whether you need to display custom order notes, additional shipping details, or any other data, this customization offers flexibility and improves the user experience. By following this guide, you can easily add and modify custom tabs to meet your store’s unique needs.
Related Tutorial –
How to add a Custom tab in Admin Sales Order view Magento 2
Happy Coding!


