Hello Magento Friends,
Magento 2 allows store owners to categorize customers into different customer groups, enabling customized pricing, promotions, and tax rules.
Learn – How to Create Customer Groups Programmatically in Magento 2?
However, by default, Magento 2 does not provide an option for customers to select a customer group at registration. This feature can be beneficial for B2B and B2C businesses that want to differentiate between different types of customers right from the registration stage.

In this blog, we will guide you through the process of allowing customers to select a customer group during registration in Magento 2.
Steps to Select Customer Group at Registration in Magento 2:
Step 1: Create the “customer_account_create.xml” file inside our extension at the following path.
app\code\Vendor\Extension\view\frontend\layout\customer_account_create.xml
Then add the code as follows
<page xmlns:xsi="http://www.w3.org/2001/XMLSchema-instance" layout="1column" xsi:noNamespaceSchemaLocation="urn:magento:framework:View/Layout/etc/page_configuration.xsd">
    <body>
        <referenceContainer name="form.additional.info">
            <block class="Vendor\Extension\Block\Customergroups" name="customer_groups_additional_info_customer" template="Vendor_Extension::addcustomergroup.phtml"/>
        </referenceContainer>
    </body>
</page>
Step 2: Create the “addcustomergroup.phtml” file inside our extension at the following path.
app\code\Vendor\Extension\view\frontend\templates\addcustomergroup.phtml
Now include the below piece of code
<?php $groups = $block->getCustomerGroup(); ?>
<div class="field group_id required">
    <label for="group_id" class="label"><span><?php /* @escapeNotVerified */ echo __('I want to register as') ?></span></label>
    <div class="control">
        <select name="group_id">
            <?php foreach ($groups as $key => $data) { ?>
            <option value="<?php echo $data['value'] ?>"><?php echo $data['label'] ?></option>
            <?php } ?>
        </select>
    </div>
</div>
Step 3: We need to create a “Customergroups.php” file inside our extension at the following path
app\code\Vendor\Extension\Block\Customergroups.php
After that, add the below-mentioned code
<?php

namespace Vendor\Extension\Block;

use Magento\Framework\View\Element\Template;
use Magento\Customer\Model\ResourceModel\Group\Collection as CustomerGroup;

Class Customergroups extends Template {

    public $_customerGroup;
    public function __construct(
            CustomerGroup $customerGroup
    ) {
        $this->_customerGroup = $customerGroup;
    }

    public function getCustomerGroup() {
        $groups = $this->_customerGroup->toOptionArray();
        return $groups;
    }
}
Step 4: Then, we need to create an “events.xml” file inside our extension at the following path
app\code\Vendor\Extension\etc\frontend\events.xml
And include the below code snippet
<?xml version="1.0"?>
<config xmlns:xsi="http://www.w3.org/2001/XMLSchema-instance" xsi:noNamespaceSchemaLocation="urn:magento:framework:Event/etc/events.xsd">
    <event name="customer_register_success">
        <observer name="save_customer_group" instance="Vendor\Extension\Observer\SavecustomergroupId" />
    </event>
</config>
Step 5: Then, we need to create a “SavecustomergroupId.php” file inside our extension at the following path
app\code\Vendor\Extension\Observer\SavecustomergroupId.php
Then after add the following code
<?php
namespace Vendor\Extension\Observer;
use Magento\Framework\Event\ObserverInterface;
use Magento\Customer\Api\CustomerRepositoryInterface;
use Magento\Framework\Message\ManagerInterface;
Class SavecustomergroupId implements ObserverInterface {
public $_customerRepositoryInterface;
public $_messageManager;
public function __construct(
CustomerRepositoryInterface $customerRepositoryInterface,
ManagerInterface $messageManager
) {
$this->_customerRepositoryInterface = $customerRepositoryInterface;
$this->_messageManager = $messageManager;
}
public function execute(\Magento\Framework\Event\Observer $observer) {
$accountController = $observer->getAccountController();
$request = $accountController->getRequest();
$group_id = $request->getParam('group_id');
try {
$customerId = $observer->getCustomer()->getId();
$customer = $this->_customerRepositoryInterface->getById($customerId);
$customer->setGroupId($group_id);
$this->_customerRepositoryInterface->save($customer);
} catch (Exception $e){
$this->_messageManager->addErrorMessage(__('Something went wrong! Please try again.'));
}
}
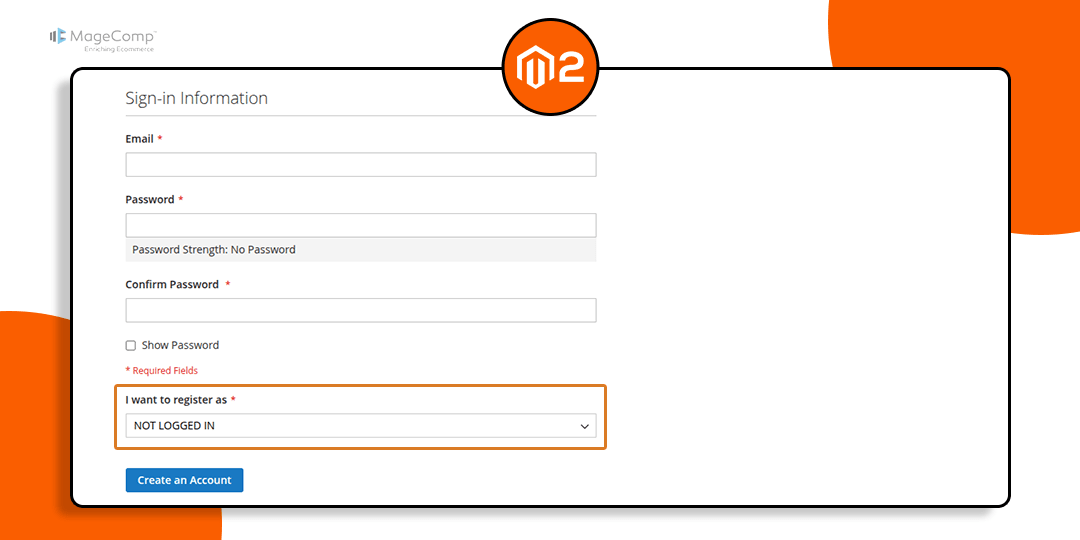
}Output:

Conclusion:
Allowing customers to select their customer group at registration in Magento 2 enhances customer segmentation and allows businesses to provide a more personalized shopping experience. With the above steps, you can implement this feature smoothly in your Magento 2 store.
Also Learn – How to Manage Customers and Customers Group in Magento 2?
Happy Coding!