Hello Magento Friends,
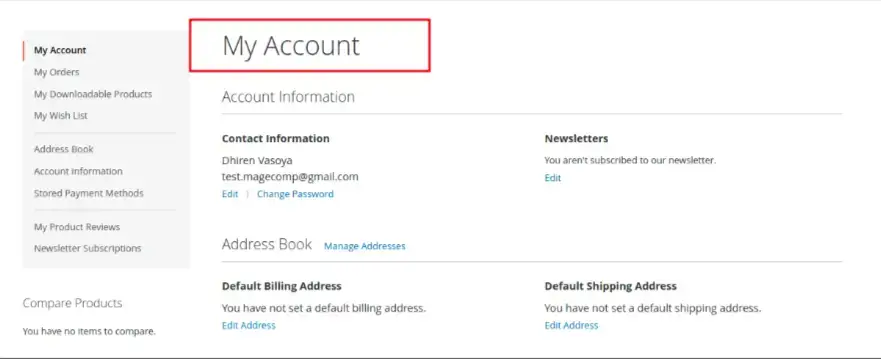
The My account page of the customer interface in Magento 2 is a critical part of the customer experience. The default page title is a bit dull – just “My Account”.
Wouldn’t it be much better to do something like dynamically adding the customers name into the page title?
For example, it could read “Dhiren Vasoya’s Account” instead of just “My Account”!
In this blog, I will show you how to change the My Account page title dynamically with the customer’s name in Magento 2.

Why Personalize the Account Page Title?
- Enhances customer experience by being personal.
- Adds professionalism to your store.
- Creates trust and engagement with customers.
Steps to Set My Account Page Title with Customer Name in Magento 2:
Step 1: Create a di.xml file at the given path
app/code/Vendor/Extension/etc/frontend/di.xml
Now add the code as follows:
<?xml version="1.0"?>

<config xmlns:xsi="http://www.w3.org/2001/XMLSchema-instance" xsi:noNamespaceSchemaLocation="urn:magento:framework:ObjectManager/etc/config.xsd">
    <type name="Magento\Customer\Controller\Account\Index">
        <plugin name="Vendor_Extension::my_account" type="Vendor\Extension\Plugin\Customer\Controller\Account\Index" sortOrder="10"/>
    </type>
</config>
Step 2: Create a customer_account_index.xml file at the given path
app/code/Vendor/Extension/view/frontend/layout/customer_account_index.xml
Now add the code as follows:
<page xmlns:xsi="http://www.w3.org/2001/XMLSchema-instance" layout="2columns-left" xsi:noNamespaceSchemaLocation="urn:magento:framework:View/Layout/etc/page_configuration.xsd">
  <body>
    <referenceBlock name="page.main.title">
      <action method="setPageTitle">
        <argument translate="true" name="title" xsi:type="string"> </argument>
      </action>
    </referenceBlock>
  </body>
</page>
Step 3: Create an Index.php file at the given path
app/code/Vendor/Extension/Plugin/Customer/Controller/Account/Index.php
Now add the code as follows:
<?php

namespace Vendor\Extension\Plugin\Customer\Controller\Account;
class Index
{
    /**
     * @var \Magento\Customer\Model\Session
     */
    protected $customerSession;
    /**
     * @param \Magento\Customer\Model\Session $sessionSession
     */
    public function __construct(
        \Magento\Customer\Model\Session $sessionSession
    ) {
        $this->customerSession = $sessionSession;
    }
    public function afterExecute(
        \Magento\Customer\Controller\Account\Index $subject,
        $resultPage
    ) {
        $resultPage->getConfig()->getTitle()->set(__('Welcome back %1', $this->customerSession->getCustomer()->getName()));
        return $resultPage;
    }
}
Output:
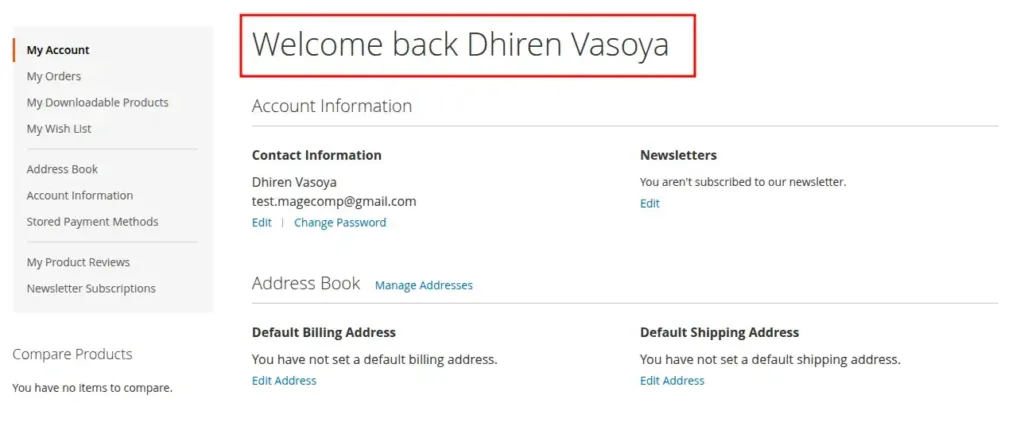
Now, when a logged-in customer goes to check out the My Account page (customer/account/index), they will see the personalized page title:
Welcome back Dhiren Vasoya
Instead of the dull “My Account.”
Conclusion:
Personalizing small things, like the My Account page title, makes a considerable difference in the way users experience your Magento 2 store. This not only adds a level of professionalism to your store but can also help increase customer satisfaction subtly and increase loyalty.

Relevant Read – How to Change My Account Navigation Links Title Dynamically in Magento 2?