Hello Magento Friends,
Welcome to Magento Tutorials by MageComp. In this article, I will explain to you all about How to Configure US Tax in Magento 2.
The Magento store admin can create different tax rates to calculate taxes based on countries. The tax rates are displayed in the order summary. The admin can even apply tax rules for the tax rates created. Learn How to Setup Tax Rules for Magento 2.
To correctly apply tax rates and rules for US-based stores, follow the steps ahead.
Let’s find out How to Configure US Tax in Magento 2.
Steps to Configure US Tax in Magento 2:
Step 1: From the Admin panel, go to Stores > Settings > Configuration.
Step 2: From the left panel, expand the Sales tab and select Tax.
Step 3: Now, enlarge the Tax Classes section,
- Tax Class for Shipping – Set this field to none.
- Default Tax Class for Product – There is no need to change this field unless you want a specific class as the default one.
- Default Tax Class for Customer – There is no need to change this field unless you want a specific class as the default one.

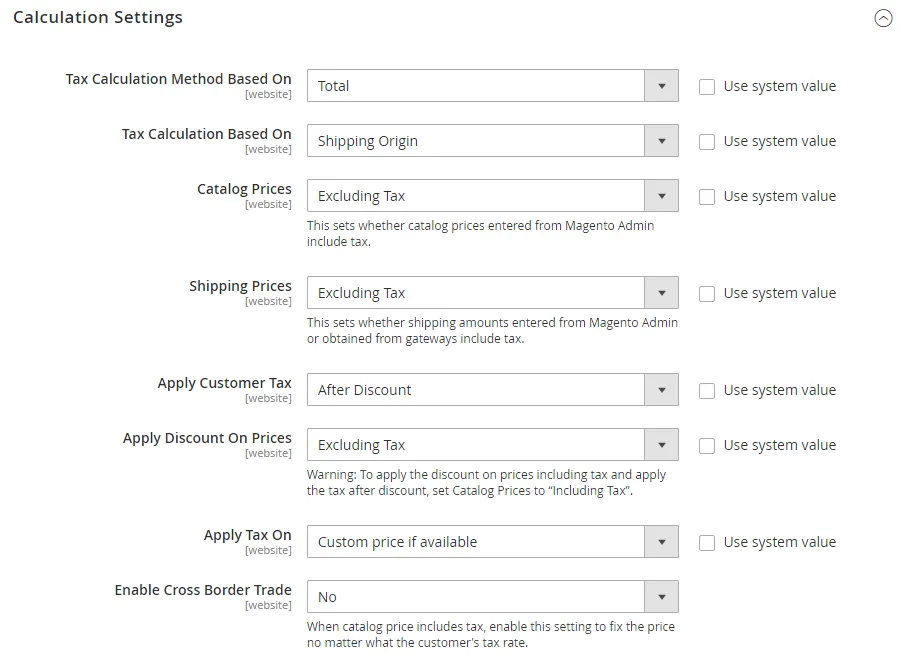
Step 4: Now, enlarge the Calculation Settings section,
- Tax Calculation Method Based On – Select the appropriate option – Unit Price, Row Total, Total to calculate the taxes.
- Tax Calculation Based On – Select the option to determine on what basis the tax will be calculated.
- Catalog Prices – For US Tax setup keep this field as Excluding Tax.
- Shipping Prices – For US Tax setup keep this field as Excluding Tax.
- Apply Customer Tax – Determine whether the tax are shown before or after the discount coupon is applied to the product.
- Apply Discount On Prices – Determine whether the discount should be applied to the product price including or excluding tax.
- Apply Tax On – The tax should be applied to the original price or custom price.
- Enable Cross Border Trade – For US-based merchants this setting is usually No.

Step 5: Next, enlarge the Default Tax Destination Calculation section,
- Default Country – Set it to the United States.
- Default State – Set the business location.
- Default Post Code – Set postcode according to the state.

Step 6: Enlarge Price Display Settings section,
- Display Product Prices In Catalog – Determine how the product prices are displayed, including tax, excluding tax, or both.
- Display Shipping Prices – Determine how the shipping prices are displayed, including tax, excluding tax, or both.

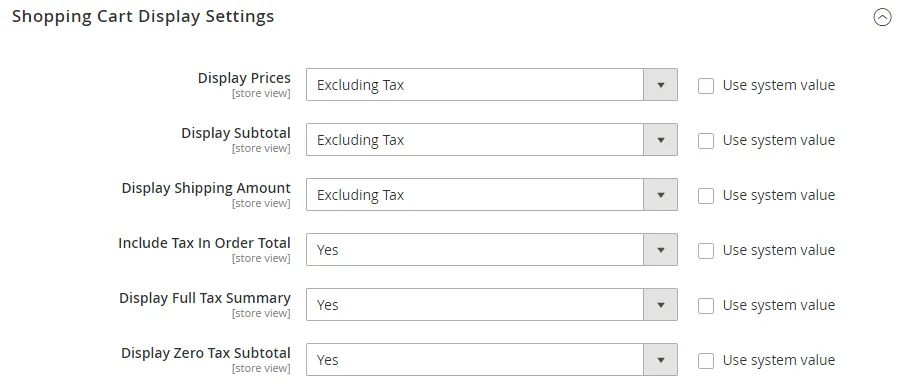
Step 7: Next, enlarge the Shopping Cart Display Settings section to determine how the taxes will be displayed in the shopping cart of the customers,
- Display Prices – Set it to Excluding Tax.
- Display Subtotal – Set it to Excluding Tax.
- Display Shipping Amount – Set it to Excluding Tax.
- Include Tax In Order Total – Set it to Yes.
- Display Full Tax Summary – Set it to Yes.
- Display Zero Tax Subtotal – Set it to Yes.

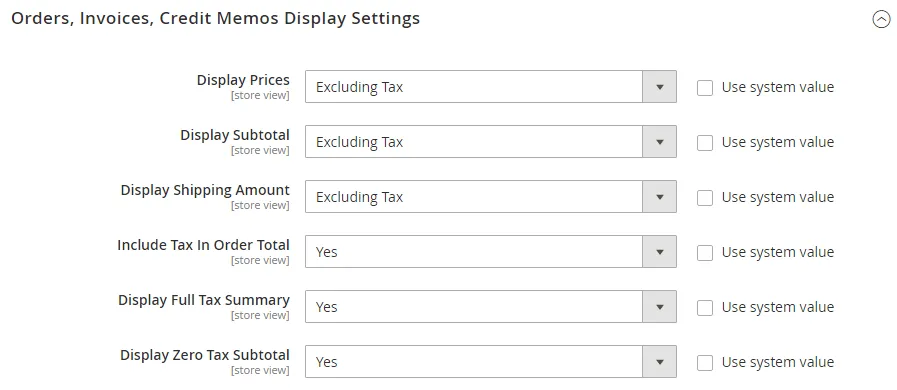
Step 8: Next, enlarge the Orders, Invoices, Credit Memos Display Settings section to determine how the taxes will be displayed in different order documents,
- Display Prices – Set it to Excluding Tax.
- Display Subtotal – Set it to Excluding Tax.
- Display Shipping Amount – Set it to Excluding Tax.
- Include Tax In Order Total – Set it to Yes.
- Display Full Tax Summary – Set it to Yes.
- Display Zero Tax Subtotal – Set it to Yes.

Step 9: Lastly, enlarge the Fixed Product Taxes section,
- Enable FPT – Set it to No, to approve Us Tax configuration.

When completed, Save Config.
Final Words:
Consequently, with the help of the above steps, you can Configure US Tax in Magento 2. Hire Certified Magento Developer to automate these settings while you focus on other important tasks of your Magento 2 store. In case of any problems, do let me know in the comment part. Share the article and Stay connected!
Happy Reading!


