Magento Tutorials

How to Setup Customer Account Options in Magento 2

Hello Magento Friends,

In this blog, we will learn how to set up Customer Account Options in Magento 2.

The customer’s journey in your Magento 2 store must be optimized from registration to after-sales service. Using customer account configuration, store admin can manage customers easily. Magento 2 provides various customer configuration options for customer management.

Let’s see the steps to Setup Customer Account Options in Magento 2.

Steps to Setup Customer Account Options in Magento 2:

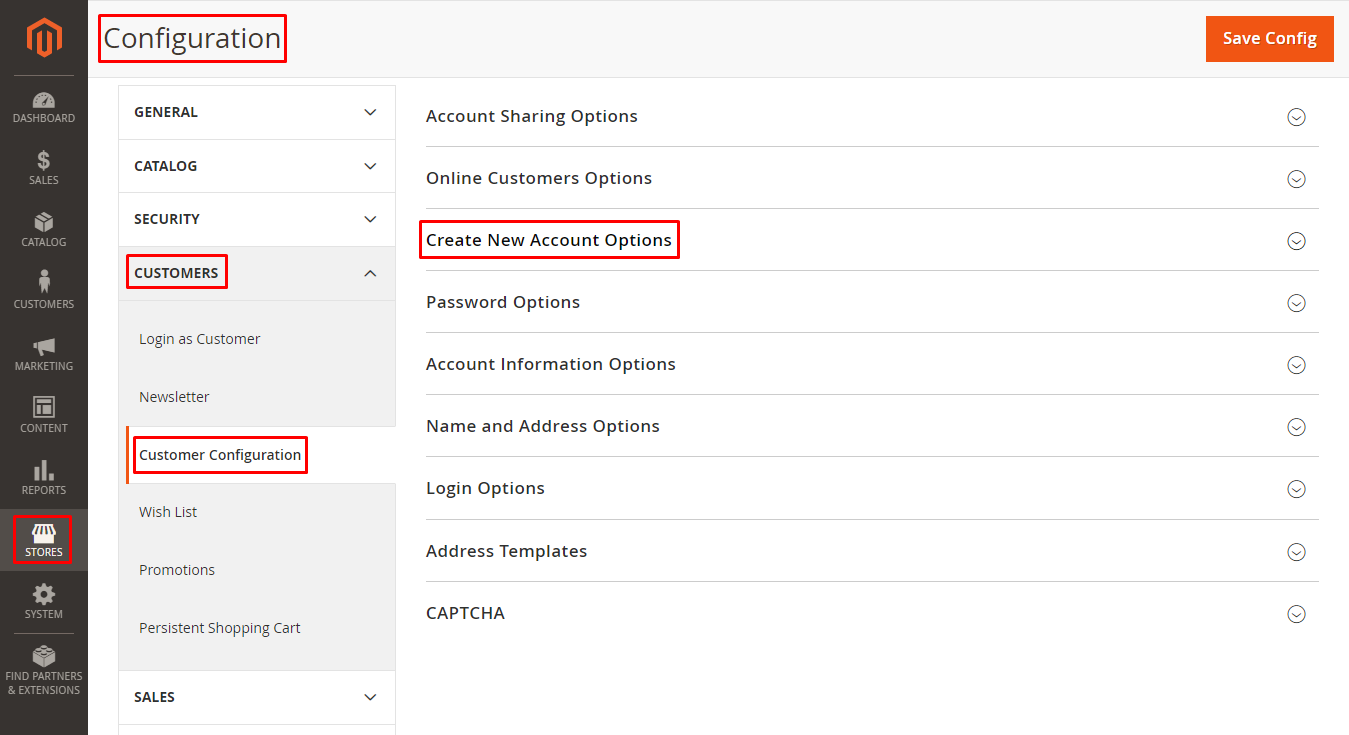
Step 1: From the Admin Dashboard. Go to Stores > Settings > Configuration.

Step 2: Now expand the CUSTOMERS tab from the left panel and select Customer Configuration.

Step 3: Now enlarge the Create New Account Options.

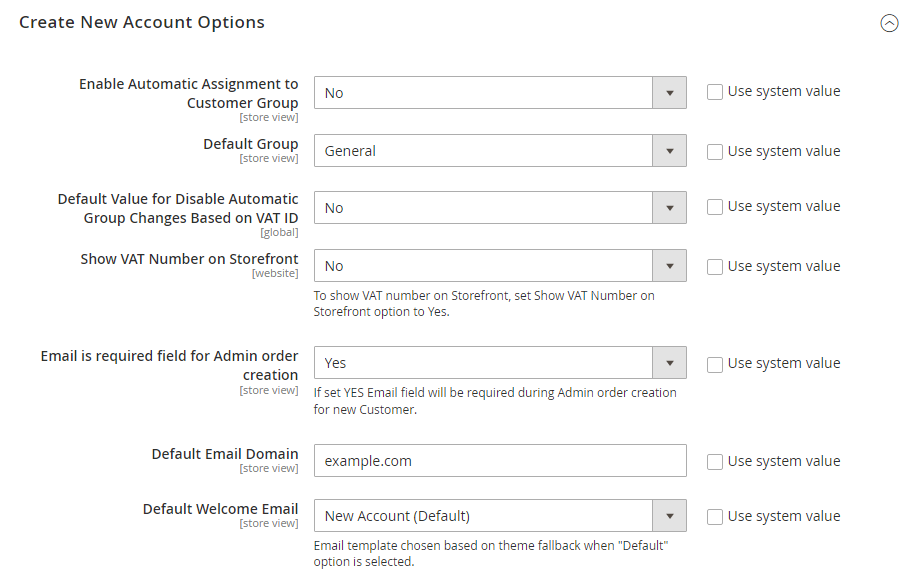
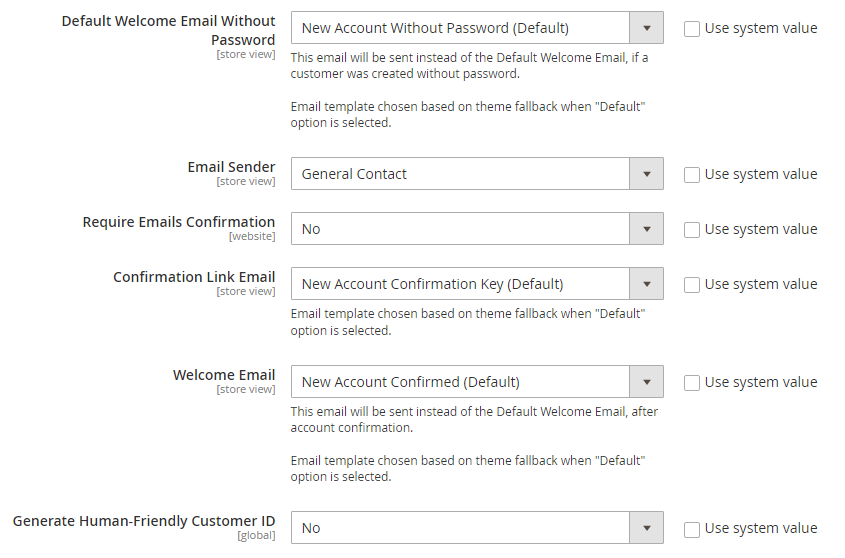
Step 4: Now apply the settings as required.

  • Enable Automatic Assignment to Customer Group: Determines whether the customer is assigned to the default customer group.
  • Default Group: Set the default group of customers. Learn more about How to Set Default Group for New Customer Account in Magento 2.
  • Default Value for Disable Automatic Group Changes Based on VAT ID: Choose whether the customer group changes automatically based on VAT ID.
  • Show VAT Number on Storefront: Set whether the VAT number is visible to customers in front.
  • Email is required field for Admin order creation: Determine whether an email is required at the time of admin order creation for new customers.
  • Default Email Domain: Set the default email domain.
  • Default Welcome Email: Email template used for default welcome email.

  • Default Welcome Email Without Password: Default welcome email template used for customer created without password.
  • Email Sender: Select the sender email from here.
  • Require Emails Confirmation: Determine whether confirmation is required to create an account.
  • Confirmation Link Email: Email template used for the confirmation email.
  • Welcome Email: After account confirmation, an email template used for the welcome message.
  • Generate Human-Friendly Customer ID: Whether the field used to enter and store VAT ID is visible from the storefront or not.

At last, click Save Config.

Final Words:

Hence, this way, you can Setup Customer Account Options in Magento 2. Share the tutorial with your friends and stay in touch with us.

Happy Reading!

Click to rate this post!
[Total: 5 Average: 5]
Gaurav Jain

Gaurav Jain is Co-Founder and Adobe Certified Expert-Magento Commerce Business Practitioner. Being Computer Engineer👨‍💻 and possessing Extensive Marketing skills he handles all kinds of customer Queries and his Happy😀 & Helping🙏 Nature makes customer's day Delightful. When he isn’t working, you’ll find Gaurav Reading on Books📖 or Traveling🚗. Also, he is Speaker at Magento Meetups.

Recent Posts

Five Essential Payroll Compliance Tips for eCommerce Startups

Are you setting up a payroll system for your eCommerce startup? Ensuring compliance with myriad…

2 hours ago

Optimizing Laravel Blade: Unlocking Advanced Fetcher Techniques

In the expansive universe of Laravel development, Blade serves as the stellar templating engine, propelling…

3 hours ago

Magento 2: Add Quantity Increment and Decrement on Category Page

Hello Magento Friends, In this blog, we will discuss about adding quantity increment and decrement…

2 days ago

How to Integrate ChatGPT with Laravel Application?

In this guide, we'll explore how to integrate ChatGPT, an AI-powered chatbot, with a Laravel…

5 days ago

What are Net Sales? How to Calculate Your Net Sales?

In the world of business, understanding financial metrics is crucial for making informed decisions and…

1 week ago

Magento 2 Extensions Digest April 2024 (New Release & Updates)

Welcome to the MageComp Monthly Digest, where we bring you the latest updates, releases, and…

1 week ago