Magento Tutorials

Configuration of VAT ID Validation in Magento 2

Hello Magento Friends,

This blog will discuss How to Configure VAT ID Validation in Magento 2.

Value Added Tax (VAT) is added to goods and services. Check out How to Configure/Setup Value Added Tax (VAT) in Magento 2

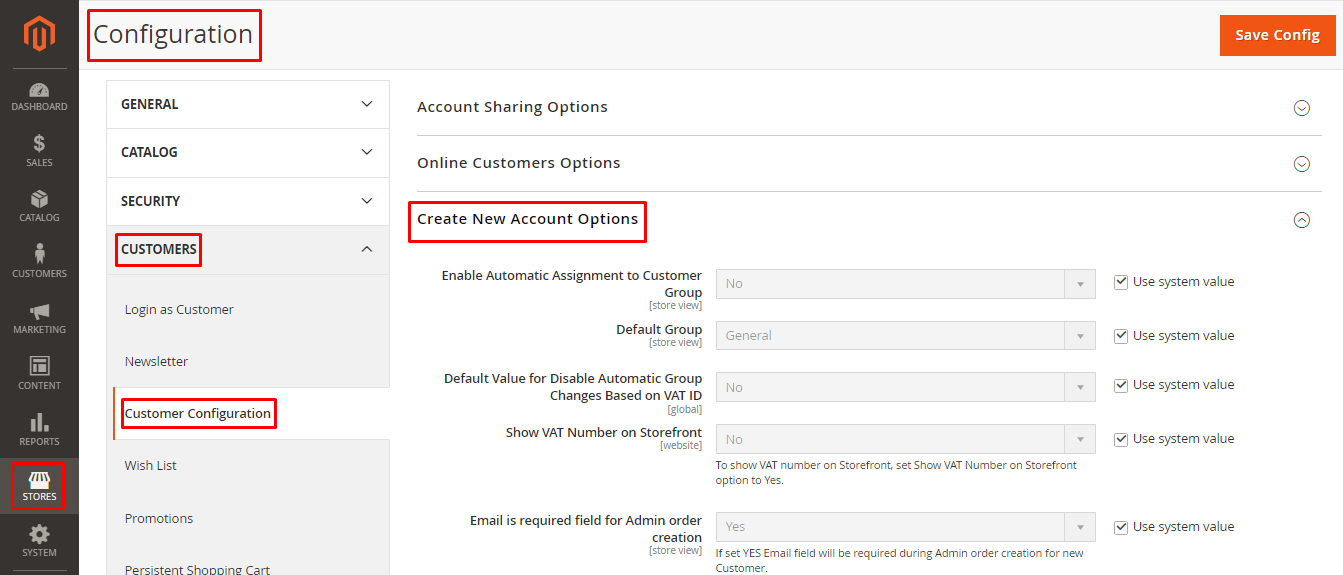
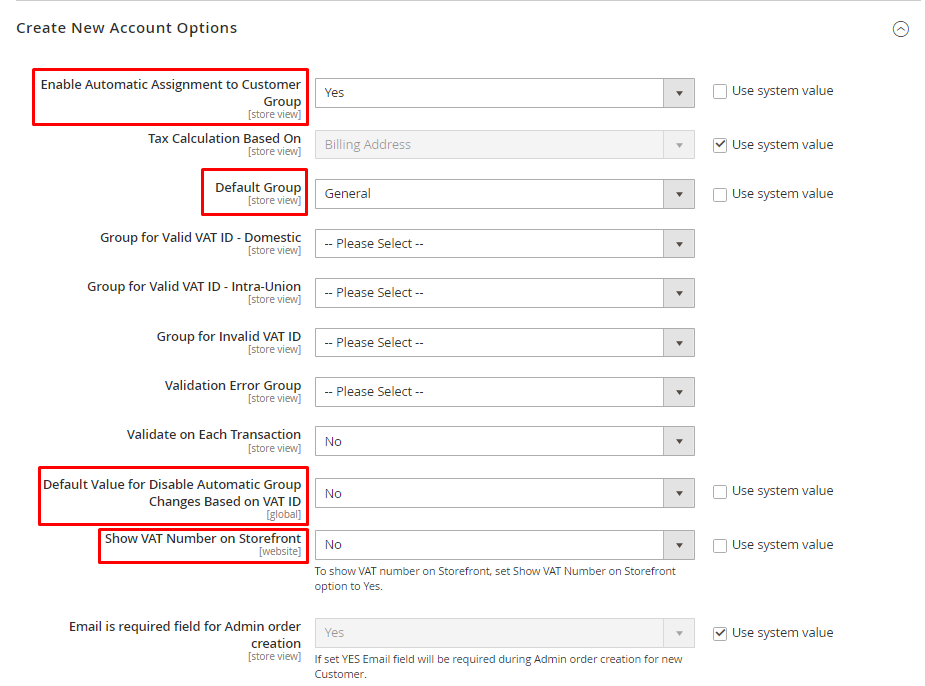
You can configure VAT ID Validation in Magento 2. You must set up customer groups and create the related tax classes, rates, and rules for that. After then, enable VAT ID Validation and complete the configuration.

Steps to Configure VAT ID Validation in Magento 2:

Step 1: Create VAT-related Customer Groups

Based on VAT ID Validation rules, it automatically assigns one of the following customer groups to customers:

  • Domestic
  • Intra-EU
  • Invalid VAT ID
  • Validation error

Create new customer groups or use existing ones. 

Step 2: Create VAT-related tax classes, rates, and rules

The following three entities define the tax rules:

  • Tax Rates
  • Product Tax Classes
  • Customer Tax Classes

Create tax rules that need to use VAT ID Validation.

  • Tax rules comprise tax classes and tax rates.
  • Tax classes are assigned to customer groups.

Step 3: Configure VAT ID Validation

  • From your Magento 2 Admin Dashboard, go to Stores > Settings > Configuration.
  • Set the Store View if necessary.
  • From the left sidebar, expand CUSTOMERS and select Customer Configuration.
  • Enlarge the Create New Account Options tab.

  • Now set the Enable Automatic Assignment to Customer Group field to Yes.
  • Now perform configuration settings for the following fields

1.  Default Group

2. Default Value for Disable Automatic Group Changes Based on VAT ID

3. Show VAT Number on Storefront

  • After completing, click on Save Config.

Step 4: Set VAT ID and select Country

  • Now from the left sidebar, expand General and select General.
  • Enlarge the Store Information section.
  • Select Country.
  • Enter VAT Number and click on Validate VAT Number.
  • At last, click Save Config.

Step 5: Verify EU Member Countries List

  • Continue in the General tab and enlarge the Country Options.
  • In the European Union Countries list, ensure each member of the EU is selected.
  • Add or remove the state as per requirement using the CTRL key.
  • After that, click Save Config.

Concluding Words:

Hence, using the above steps, you can easily configure VAT ID Validation in Magento 2. Share the tutorial with your friends and stay in touch with us.

Happy Reading!

Click to rate this post!
[Total: 5 Average: 5]
Gaurav Jain

Gaurav Jain is Co-Founder and Adobe Certified Expert-Magento Commerce Business Practitioner. Being Computer Engineer👨‍💻 and possessing Extensive Marketing skills he handles all kinds of customer Queries and his Happy😀 & Helping🙏 Nature makes customer's day Delightful. When he isn’t working, you’ll find Gaurav Reading on Books📖 or Traveling🚗. Also, he is Speaker at Magento Meetups.

View Comments

Recent Posts

6 Innovative Tools Revolutionizing E-Commerce Operations

E-commerce has transformed the way consumers shop for products and services and interact with businesses.…

18 hours ago

How Upcoming Cookie Changes Will Affect Your E-commerce Website?

The e-commerce world is constantly in flux. New tech and strategies emerge daily to help…

19 hours ago

Magento 2: How to Add Header and Footer in Checkout

Hello Magento Friends, In today’s blog, we will discuss adding a header and footer to…

2 days ago

Understanding Flexbox Layout in React Native

Hello React Native Friends, Building a visually appealing and responsive mobile app is crucial in…

4 days ago

HYVÄ Themes Releases: 1.3.6 & 1.3.7 – What’s New

We're thrilled to announce the release of Hyvä Themes 1.3.6 and 1.3.7! These latest updates…

4 days ago

How Modern E-Commerce Platforms Leverage Docker & Kubernetes for Scalability

Your e-commerce platform is surging - orders are rolling in, traffic spikes are becoming the…

5 days ago