Hello Laravel Friends,
This is Laravel 8 Rest API tutorial, where I will show detailed steps on How to Create API with Laravel.
Laravel 8 Rest API is used when you work with mobile applications. You can easily build API with Laravel. Laravel provides an easy way to create Rest API.
In this tutorial, we will learn about Create Rest API Laravel 8. Let’s start the procedure to create API with Laravel
Contents
For the Laravel 8 REST API, first, you need to install Laravel 8 with the help of the following command
composer create-project laravel/laravel:^8.0 Laravel
The next step to creating Laravel API is database configuration. For that, add the following lines in the .env file
DB_CONNECTION=mysql
DB_HOST=127.0.0.1
DB_PORT=3306
DB_DATABASE=here your database name
DB_USERNAME=here database username
DB_PASSWORD=here database password
The next step to make API in Laravel is to create a table. For that, use the below command
php artisan make:migration create_blogs_table
Now open the migration file and add the code given below
<?php

use Illuminate\Database\Migrations\Migration;
use Illuminate\Database\Schema\Blueprint;
use Illuminate\Support\Facades\Schema;

class CreateBlogsTable extends Migration
{
    /**
     * Run the migrations.
     *
     * @return void
     */    public function up()
    {
        Schema::create('blogs', function (Blueprint $table) {
            $table->id();
            $table->string('title', 255)->nullable();
            $table->text('body')->nullable();
            $table->timestamps();
        });
    }

    /**
     * Reverse the migrations.
     *
     * @return void
     */    public function down()
    {
        Schema::dropIfExists('blogs');
    }
}
Now you have to run migration using the below command
php artisan migrate
For Laravel Rest API, next, we need to add a resource route for the blog crud application.
So open your “routes/api.php” file and add the following route.
use App\Http\Controllers\BlogController;
Route::resource('blogs', BlogController::class); To create Rest API Laravel 8, now add controller and model with the help og following command
php artisan make:controller BlogController --resource –model=Blog
After the above command, you will find a new file in the below path
“app/Http/Controllers/BlogController.php”
In this controller will create seven methods by default as given below:
Now go to the path: app/Http/Controllers/BlogController.php
And update the code as follows
<?php

namespace App\Http\Controllers;

use App\Models\Blog;
use Illuminate\Http\Request;

class BlogController extends Controller
{
    /**
     * Display a listing of the resource.
     *
     * @return \Illuminate\Http\Response
     */    public function index()
    {
        $blogs = Blog::latest()->paginate(10);
        return [
            "status" => 1,
            "data" => $blogs
        ];
    }

    /**
     * Show the form for creating a new resource.
     *
     * @return \Illuminate\Http\Response
     */    public function create()
    {
        //
    }

    /**
     * Store a newly created resource in storage.
     *
     * @param  \Illuminate\Http\Request  $request
     * @return \Illuminate\Http\Response
     */    public function store(Request $request)
    {
        $request->validate([
            'title' => 'required',
            'body' => 'required',
        ]);

        $blog = Blog::create($request->all());
        return [
            "status" => 1,
            "data" => $blog
        ];
    }

    /**
     * Display the specified resource.
     *
     * @param  \App\Models\Blog  $blog
     * @return \Illuminate\Http\Response
     */    public function show(Blog $blog)
    {
        return [
            "status" => 1,
            "data" =>$blog
        ];
    }

    /**
     * Show the form for editing the specified resource.
     *
     * @param  \App\Models\Blog  $blog
     * @return \Illuminate\Http\Response
     */    public function edit(Blog $blog)
    {
        //
    }

    /**
     * Update the specified resource in storage.
     *
     * @param  \Illuminate\Http\Request  $request
     * @param  \App\Models\Blog  $blog
     * @return \Illuminate\Http\Response
     */    public function update(Request $request, Blog $blog)
    {
        $request->validate([
            'title' => 'required',
            'body' => 'required',
        ]);

        $blog->update($request->all());

        return [
            "status" => 1,
            "data" => $blog,
            "msg" => "Blog updated successfully"
        ];
    }

    /**
     * Remove the specified resource from storage.
     *
     * @param  \App\Models\Blog  $blog
     * @return \Illuminate\Http\Response
     */    public function destroy(Blog $blog)
    {
        $blog->delete();
        return [
            "status" => 1,
            "data" => $blog,
            "msg" => "Blog deleted successfully"
        ];
    }
} Now the final step in Laravel 8 Rest API tutorial, you need to run the CRUD application using this command
php artisan serve
Checkout the Step by Step Tutorial for CRUD Operation in Laravel
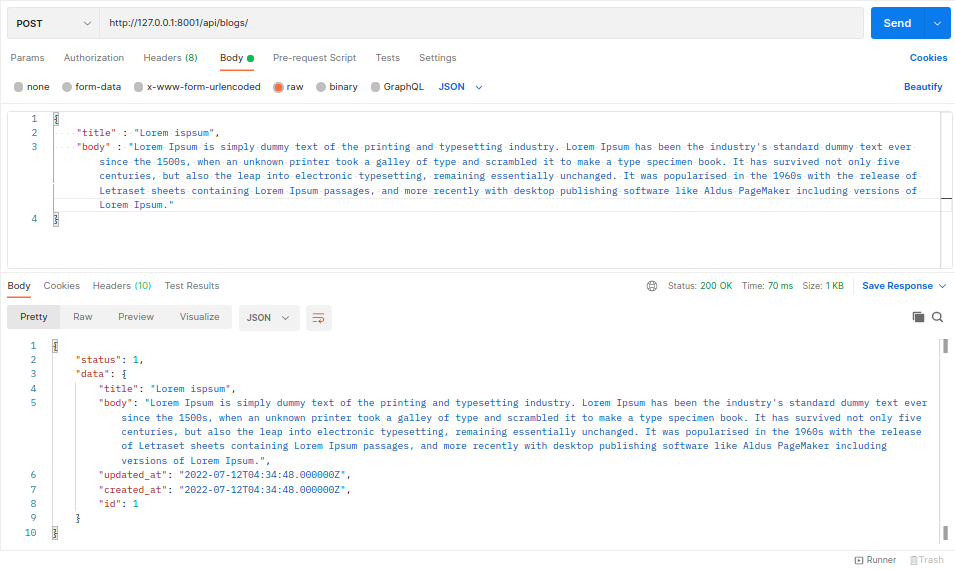
You have successfully created Laravel Rest API. Now you can open the below URL on Postman:
url: http://127.0.0.1:8000/api/blogs
method: POST
data: { title: “Title”, body: “Body here..” }
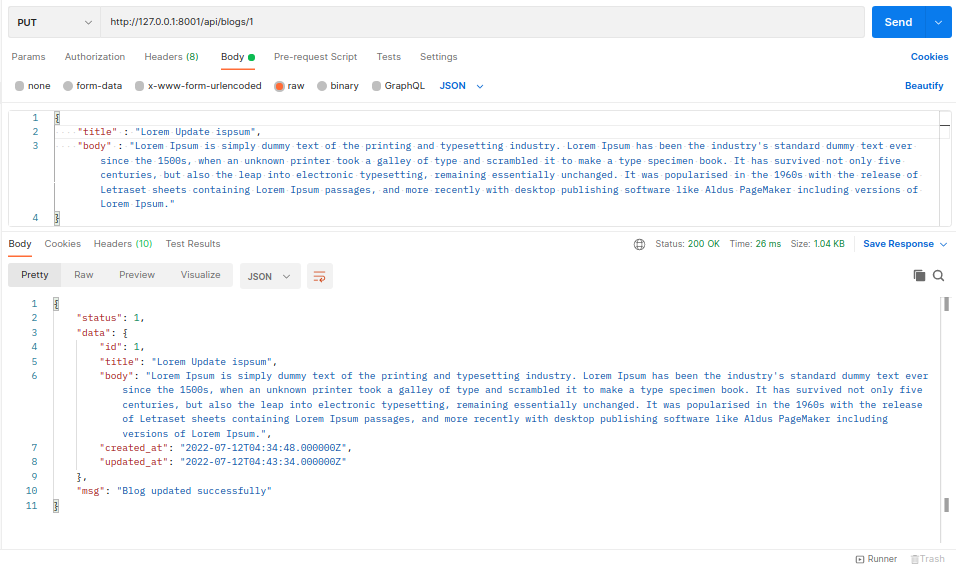
url: http://127.0.0.1:8000/api/blogs/{id}
method: PUT/PATCH
data: { title: “Update Title”, body: “Update Body here..” }
url: http://127.0.0.1:8000/api/blogs/
method: GET
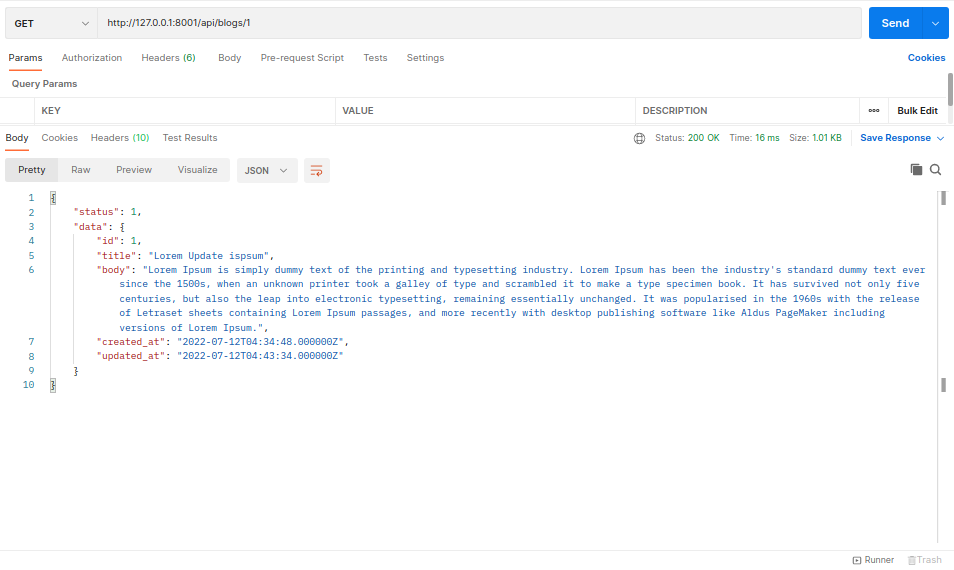
url: http://127.0.0.1:8000/api/blogs/{id}
method: GET
url: http://127.0.0.1:8000/api/blogs/{id}
method: DELETE
This way you can Create Rest API Laravel 8 with the help of above steps. If you have any doubts in this Laravel 8 Rest API tutorial you can freely share with me through the comments. Alternatively you can Hire a Laravel Developer that will help you to create Laravel Rest API.
If you found this Laravel 8 Rest API tutorial helpful, share it with your friends and stay connected with us for more information.
Happy Coding!
(1) What is REST API in Laravel?
Answer: Laravel lets you easily and quickly build RESTful APIs. This could be the back-end to a front-end web app, a data source for a mobile app, or a service for other apps or APIs. There are a lot of moving pieces to coding a RESTful API, but Laravel makes it a lot easier.
(2) What is REST API in PHP?
Answer: Rest API is an API that allows programmers to send and receive information from other programs using HTTP protocol commands such as GET and POST.
(3) What is API resource in Laravel 8?
Answer: API Resources acts as a transformation layer that sits between our Eloquent models and the JSON responses that are actually returned by our API. API resources present a way to easily transform our models into JSON responses.
(4) Why is REST API used?
Answer: One of the key advantages of REST APIs is that they provide a great deal of flexibility. Data is not tied to resources or methods, so REST can handle multiple types of calls, return different data formats and even change structurally with the correct implementation of hypermedia.
(5) What is REST vs HTTP API?
Answer: REST APIs support more features than HTTP APIs, while HTTP APIs are designed with minimal features so that they can be offered at a lower price.
Are you setting up a payroll system for your eCommerce startup? Ensuring compliance with myriad…
In the expansive universe of Laravel development, Blade serves as the stellar templating engine, propelling…
Hello Magento Friends, In this blog, we will discuss about adding quantity increment and decrement…
In this guide, we'll explore how to integrate ChatGPT, an AI-powered chatbot, with a Laravel…
In the world of business, understanding financial metrics is crucial for making informed decisions and…
Welcome to the MageComp Monthly Digest, where we bring you the latest updates, releases, and…
View Comments
Thank you for the tutorial, it helps me getting started.
I ran into a type in Step 5:
php artisan make:controller BlogController --resource –model=Blog
should be with --model ( instead of -model )
Using --model with two dashes (--) signifies a long option, whereas -model would be interpreted as an invalid option. So, ensure you use --model with two dashes to associate the controller with the Blog model.
Great, good content sharing website. I like it and I support your blog, growing more and more. Thank you very much.
thank you very much i learnt about api from here thanks alot
The return types for all the controller functions are not `Illuminate\Http\Response` but in the example are array's.
When using return type declarations (`public function index(): Response`) this will give a type error.
If you need to return Illuminate\Http\Response from the controller then please use the following syntax.
return response()->json($data, 200);
Or
use Illuminate\Support\Facades\Response;
return Response::json($data, 200);
Thanks very much for this great article Bharat Desai, as I found this very informative and helped me setup apis in Laravel 9.x! You might want to change the urls on "Step 7: Testing" though from url: http://127.0.0.1:8000/... to url: http://127.0.0.1:8000/api/... e.g. url: http://127.0.0.1:8000/blogs to url: http://127.0.0.1:8000/api/blogs.
Thank you for bringing that to our attention. We have corrected the URL now.