Hello Magento Friends,
Today I am going to help you make your Magento 2 maintenance page informative and user-friendly.
You can customize the default maintenance page when your Magento 2 site is under maintenance. Show user-friendly maintenance page with countdown timer.
When you put your site in maintenance then Magento shows a default maintenance message as an error, exception, logs or reports, etc. This does not seem amiable to customers. Hence, making Magento’s default maintenance message user-friendly is a good idea.
Step 1: Navigate to the Magento root directory and run the below command from the terminal for enabling maintenance mode in Magento.
php bin/magento maintenance:enable
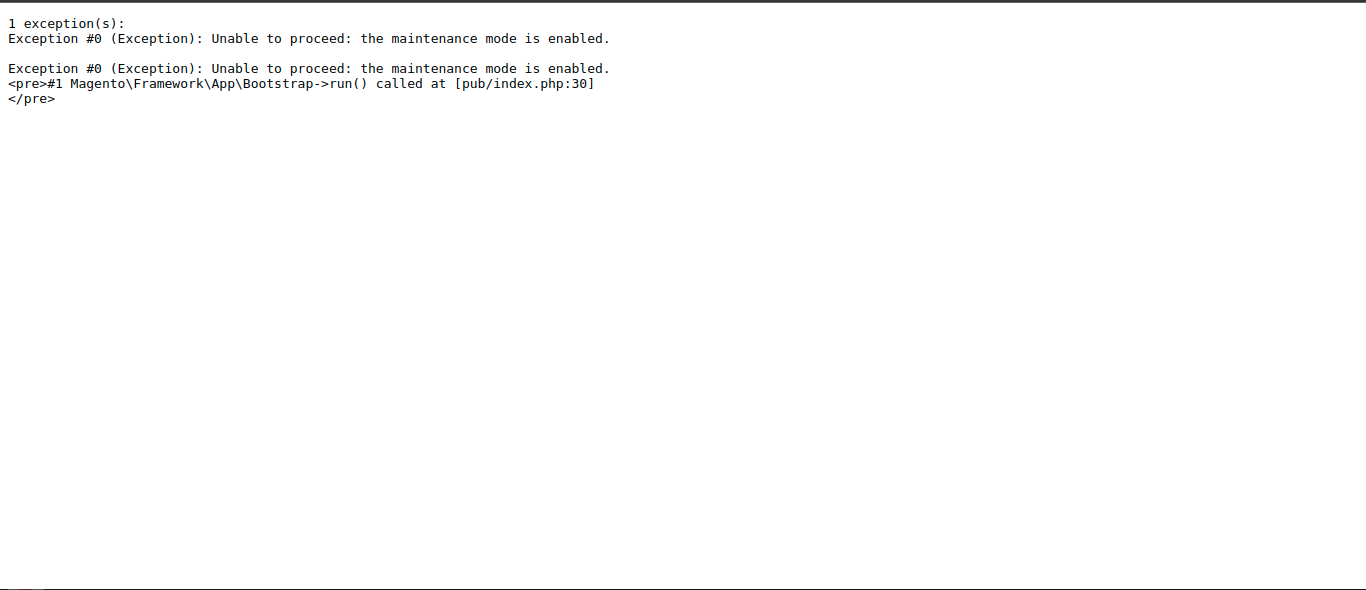
Step 2: After enabling maintenance mode your homepage looks like the below if developer mode is set to your Magento
For default and production mode, it shows as an error log or as a report message. This creates a bad user experience so you need to customize the page.
Step 3: Now to customize the Magento default maintenance page, open the .htaccess file from the Magento root directory.
Note: if you are using Magento version 2.4.x, then you need to open the .htaccess file from the pub directory of Magento.
Step 4: Then, find this code from .htaccess file: “DirectoryIndex index.php”, Now modify this code to “DirectoryIndex maintenance.html”.
Step 5: Create a maintenance.html file on your Magento root directory.
Note: If you are using Magento version 2.4.x, then you need to Create a maintenance.html file under the pub directory of Magento.
Now add the below code
<!doctype html>
<html>
<head>
<title>Site Maintenance</title>
<meta charset="utf-8"/>
<meta name="robots" content="noindex"/>
<meta name="viewport" content="width=device-width, initial-scale=1.0">
<style>
body { text-align: center; padding: 20px; font: 20px Helvetica, sans-serif; color: #333; }
@media (min-width: 768px){
body{ padding-top: 150px; }
}
h1 { font-size: 50px; }
article { display: block; text-align: left; max-width: 650px; margin: 0 auto; }
a { color: #dc8100; text-decoration: none; }
a:hover { color: #333; text-decoration: none; }
</style>
</head>
<body>
<article>
<h1>We’ll be back soon!</h1>
<div>
<p>Sorry for the inconvenience but we’re performing some maintenance at the moment. If you need to you can always contact us, otherwise we’ll be back online shortly!</p>
<p>— The Team</p>
</div>
</article>
</body>
</html> You Can modify the above code as per your requirement.
Step 6: Now open the Magento home page, your Magento default maintenance page has been changed
Hence, this way you can change the default message of the maintenance page of your Magento 2 store. Check out another way to Customize the Maintenance Page in Magento 2.
Alternatively, you can use Maintenance Page Extension for Magento 2 to make it more attractive and informative. Check How to Integrate Maintenance Page Extension for Magento 2.
In case you face any difficulty in the above steps, you can contact me via the comment section.
Happy Coding!
E-commerce has transformed the way consumers shop for products and services and interact with businesses.…
The e-commerce world is constantly in flux. New tech and strategies emerge daily to help…
Hello Magento Friends, In today’s blog, we will discuss adding a header and footer to…
Hello React Native Friends, Building a visually appealing and responsive mobile app is crucial in…
We're thrilled to announce the release of Hyvä Themes 1.3.6 and 1.3.7! These latest updates…
Your e-commerce platform is surging - orders are rolling in, traffic spikes are becoming the…