Hello Magento Friends,
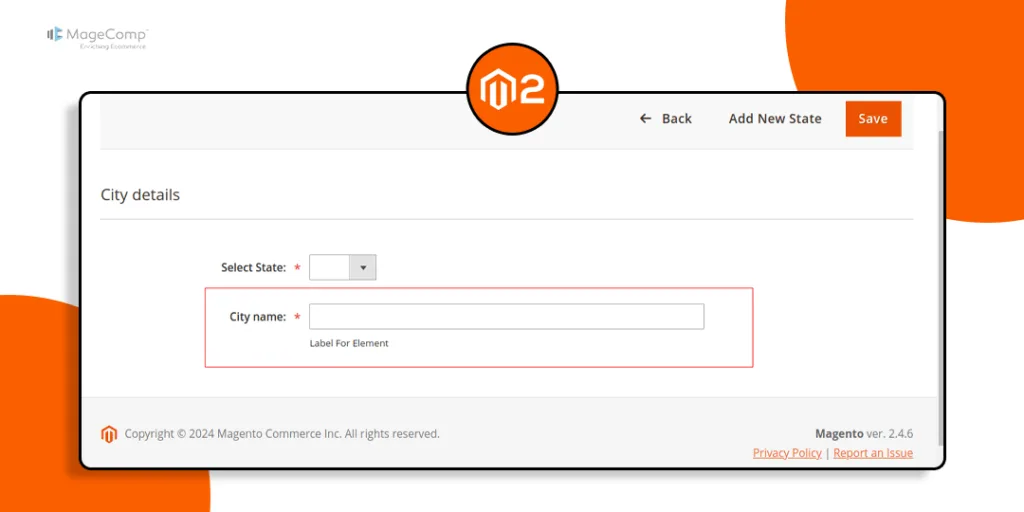
In this Magento 2 tutorial, we will learn about How to Show Field Notice Dynamically in UI Component Form in Magento 2.
UI Component Form allows developers to create interactive and user-friendly forms for managing various aspects of an e-commerce website. One common requirement when designing forms is to provide users with helpful information or notices related to specific fields. In Magento 2, showing field notices dynamically in UI Component Forms can enhance the user experience and provide valuable guidance.
Let’s learn how to Show Field Notice Dynamically in UI Component Form in Magento 2.
Steps to Show Field Notice Dynamically in UI Component Form in Magento 2:
Step 1: Create routes.xml file at the following path
app/code/Vendor/Module/etc/adminhtml/
Then add the code as follows
<?xml version="1.0"?>
<config xmlns:xsi="http://www.w3.org/2001/XMLSchema-instance" xsi:noNamespaceSchemaLocation="urn:magento:framework:App/etc/routes.xsd">
    <router id="admin">
        <route id="vendor_module" frontName="vendor_module">
            <module name="Vendor_Module" />
        </route>
    </router>
</config>
Step 2: Create Controller Edit.php file at the below-mentioned path
app/code/Vendor/Module/Controller/Adminhtml/Cities/
And add the below code snippet
<?php
namespace Vendor\Module\Controller\Adminhtml\Cities;
use Magento\Framework\Controller\ResultFactory;

class Edit extends \Magento\Backend\App\Action
{
    /**
     * @return \Magento\Backend\Model\View\Result\Page
     */
    public function execute()
    {
        $resultPage = $this->resultFactory->create(ResultFactory::TYPE_PAGE);
        return $resultPage;
    }
}
Step 3: Create layout vendor_module_cities_edit.xml file at the path mentioned below
app/code/Vendor/Module/view/adminhtml/layout/
Then add the following piece of code
<?xml version="1.0"?>
<page xmlns:xsi="http://www.w3.org/2001/XMLSchema-instance" xsi:noNamespaceSchemaLocation="urn:magento:framework:View/Layout/etc/page_configuration.xsd">
    <update handle="styles"/>
    <update handle="editor"/>
    <body>
        <referenceContainer name="content">
            <uiComponent name="vendor_module_cities_form"/>
        </referenceContainer>
    </body>
</page>
Step 4: Now, we need to create vendor_module_cities_form.xml file at the path given below
app/code/Vendor/Module/view/adminhtml/ui_component/
Then include the code as below
<form xmlns:xsi="http://www.w3.org/2001/XMLSchema-instance" xsi:noNamespaceSchemaLocation="urn:magento:module:Magento_Ui:etc/ui_configuration.xsd">
   <dataSource name="vendor_module_cities_form_data_source">
        <argument name="dataProvider" xsi:type="configurableObject">
            <argument name="class" xsi:type="string">Vendor\Module\Model\Cities\Dataprovider</argument>
            <argument name="name" xsi:type="string">vendor_module_cities_form_data_source</argument>
            <argument name="primaryFieldName" xsi:type="string">entity_id</argument>
            <argument name="requestFieldName" xsi:type="string">id</argument>
            <argument name="data" xsi:type="array">
                <item name="config" xsi:type="array">
                    <item name="submit_url" xsi:type="url" path="route/path/save"/>
                </item>
            </argument>
        </argument>
        <argument name="data" xsi:type="array">
            <item name="js_config" xsi:type="array">
                <item name="component" xsi:type="string">Magento_Ui/js/form/provider</item>
            </item>
        </argument>
    </dataSource>
    <fieldset name="data_data">
        <argument name="data" xsi:type="array">
            <item name="config" xsi:type="array">
                <item name="collapsible" xsi:type="boolean">false</item>
                <item name="label" xsi:type="string" translate="true">City details</item>
                <item name="sortOrder" xsi:type="number">20</item>
            </item>
        </argument>
        <field name="cities_name">
            <argument name="data" xsi:type="array">
                <item name="config" xsi:type="array">
                    <item name="dataType" xsi:type="string">text</item>
                    <item name="label" xsi:type="string" translate="true">City name:</item>
                    <item name="visible" xsi:type="boolean">true</item>
                    <item name="formElement" xsi:type="string">input</item>
                    <item name="source" xsi:type="string">data_data</item>
                    <item name="dataScope" xsi:type="string">cities_name</item>
                    <item name="disabled" xsi:type="boolean">false</item>
                    <item name="validation" xsi:type="array">
                        <item name="required-entry" xsi:type="boolean">true</item>
                    </item>
                </item>
            </argument>
        </field>
    </fieldset>
</form>
Step 5: After that, create DataProvider.php file at the following path
app/code/Vendor/Module/Model/Cities/
Finally, add the code as follows
<?php
namespace Vendor\Module\Model\Cities;

use Magento\Ui\DataProvider\AbstractDataProvider;
use Vendor\Module\Model\ResourceModel\Cities\CollectionFactory;

class DataProvider extends \Magento\Ui\DataProvider\AbstractDataProvider
{
   protected $_loadedData;

    public function __construct(
        $name,
        $primaryFieldName,
        $requestFieldName,
        CollectionFactory $collectionFactory,
        array $meta = [],
        array $data = []
    ) {
        $this->collection = $collectionFactory->create();
        parent::__construct($name, $primaryFieldName, $requestFieldName, $meta, $data);
    }

    public function getData()
    {
        if (isset($this->_loadedData)) {
            return $this->_loadedData;
        }
        $items = $this->collection->getItems();
        foreach ($items as $item) {
            $this->_loadedData[$item->getId()] = $item->getData();
        }
        return $this->_loadedData;
    }

     public function getMeta()
    {
        $meta = parent::getMeta();

        $meta['data_data'] = [
            'children' => [
                'cities_name' => [
                    'arguments' => [
                        'data' => [
                            'config' => [
                                'notice' => __('Label For Element')
                            ]
                        ]
                    ]
                ]
            ]
        ];

        return $meta;
    }
}
Output:
Conclusion:
By following the steps outlined above, you can easily show field notices dynamically in UI Component Forms in Magento 2. Whether you’re guiding users through form submissions or highlighting important details, dynamic field notices can significantly improve the overall user experience.
Also learn, Magento 2: Add Tooltip in ui_component Form Field
Share the tutorial with your friends and stay in the know for more such updates.
Happy Coding!
