---
title: "Magento 2: How to Secure API Endpoints with Custom ACL Resources"
url: "https://magecomp.com/blog/magento-2-secure-api-endpoints-with-custom-acl-resources/"
date: "2024-06-24T17:20:06+00:00"
modified: "2025-02-12T10:41:21+00:00"
author:
name: "Dhiren Vasoya"
url: "https://magecomp.com/"
categories:
- "How To"
- "Magento 2"
word_count: 841
reading_time: "5 min read"
summary: "Hello Magento Friends,"
description: "Learn how to secure your Magento 2 API endpoints using custom ACL resources."
keywords: "How To, Magento 2"
language: "en"
schema_type: "Article"
related_posts:
- title: "How to Add Custom Product Attribute Into Existing Product GraphQL?"
url: "https://magecomp.com/blog/add-custom-product-attribute-into-existing-product-graphql-magento-2/"
- title: "How to Get Order Status in sales_order_place_after event in Magento 2"
url: "https://magecomp.com/blog/get-order-status-sales-order-place-after-event-magento-2/"
- title: "Magento 2: How to Move Specific Extension Image Files to Magento Media Folder Programmatically?"
url: "https://magecomp.com/blog/magento-2-move-specific-extension-image-files-to-magento-media-folder-programmatically/"
---
# Magento 2: How to Secure API Endpoints with Custom ACL Resources
_Published: June 24, 2024_
_Author: Dhiren Vasoya_
**Hello Magento Friends,**
In today’s blog, we will learn about, How to Secure API Endpoints with Custom ACL Resources in Magento 2.
## What are ACL Resources in Magento 2?
Access Control Lists (ACLs) in Magento 2 are used to define permissions for different roles within the system. These roles can then be assigned to users, restricting or granting access to various functionalities based on the defined permissions. By creating custom ACL resources, you can fine-tune the security of your API endpoints, ensuring only authorized users have access.
[](https://magecomp.com/services/hyva-theme-development/)
Learn – [**How to Implement ACL in Magento 2 Extensions**](https://magecomp.com/blog/implement-acl-in-magento-2-extensions/)
## Steps to Secure API Endpoints with Custom ACL Resources in Magento 2:
**Step 1:** First, we need to create a **webapi.xml** file inside our extension at the following path
**app\code\Vendor\Extension\etc\webapi.xml**
Now add the code as follows
```
```
**Step 2:** Now, we need to create an **acl.xml** file inside our extension at the following path
**app\code\Vendor\Extension\etc\acl.xml**
Then add the following code
```
```
**Step 3:** Now, we need to create a **di.xml** file inside our extension at the following path
**app\code\Vendor\Extension\etc\di.xml**
Then include below-mentioned code
```
```
**Step 4:** Now, we need to create a **ProductUpdateInterface.php** file inside our extension at the following path
**app/code/Vendor/Extension/Api/ProductUpdateInterface.php**
And then add the following code
```
productRepository = $productRepository;
$this->stockRegistry = $stockRegistry;
}
public function UpdateProductQty($sku,$qty){
try {
$response = '';
if ($sku == "" || $qty=="") {
$response = ["status" => false, "message" => 'Invalid Parameter.'];
return json_encode($response);
}
$product = $this->productRepository->get($sku);
if($product->getTypeId() == "configurable")
{
$response = [
'status' => false,
'message' => __('Cannot update quantity for configurable product SKU.')
];
return json_encode($response);
}
if($product->getTypeId() == "grouped")
{
$response = [
'status' => false,
'message' => __('Cannot update quantity for grouped product SKU.')
];
return json_encode($response);
}
if($product->getTypeId() == "bundle")
{
$response = [
'status' => false,
'message' => __('Cannot update quantity for bundle product SKU.')
];
return json_encode($response);
}
$stockItem = $this->stockRegistry->getStockItemBySku($sku);
$stockItem->setQty($qty);
$stockItem->setIsInStock((bool)$qty);
$this->stockRegistry->updateStockItemBySku($sku, $stockItem);
$response = [
'status' => true,
'message' => __('Product quantity updated successfully.')
];
return json_encode($response);
} catch (Exception $e) {
return $e->getMessage();
}
}
}
```
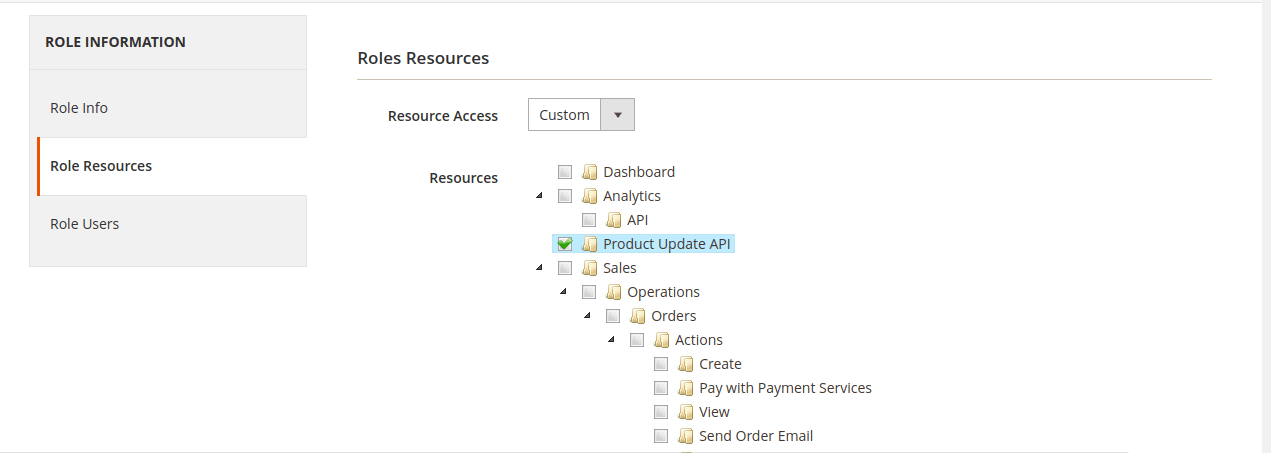
**Assign Api Resource**
## How to Execute the Product Quantity Update API?
### Step 1: Generate Admin Authorization Token
To interact with the Magento 2 API, you first need to generate an admin authorization token. This token is used to authenticate your requests.
API Type: POST
URL: {{Base_url}}/rest/all/V1/integration/admin/token
Parameters:
```
{
"username": "string",
"password": "string"
}
```
Response: “authorization_token”
### Step 2: Execute Product Quantity Update API
Use the authorization token obtained in Step 1 to call the Product Quantity Update API.
API Type: POST
Headers:
Authorization: Bearer authorization_token
URL: {{Base_url}}/rest/V1/vender-extension/updateproductquantity
Parameters:
```
{
"productSku": "simple",
"productQty": 10
}
```
Response:
```
{
"status": true,
"message": "Product quantity updated successfully."
}
```
**Note:** You need to pass the admin authorization token in the API header to execute this API. If the authorization token is valid, it will return a success response.
## [](https://magecomp.com/magento-performance-optimization.html)
## Conclusion:
Securing your Magento 2 API endpoints with custom ACL resources ensures that only authorized users can access sensitive data. By following the steps outlined in this blog, you can create, configure, and assign custom ACL resources to protect your API endpoints effectively.
Implementing these measures not only enhances security but also helps in maintaining a robust and secure eCommerce platform. Remember, a secure platform builds trust with your customers, ultimately leading to a successful online business.
**Happy Coding!**
---
_View the original post at: [https://magecomp.com/blog/magento-2-secure-api-endpoints-with-custom-acl-resources/](https://magecomp.com/blog/magento-2-secure-api-endpoints-with-custom-acl-resources/)_
_Served as markdown by [Third Audience](https://github.com/third-audience) v3.5.3_
_Generated: 2026-09-29 16:30:16 UTC_