Hello Magento Friends,
In today’s blog, I will explain How to Add a Custom Button to Open a Custom Popup in Magento 2 Admin Grid.
In Magento 2, extending the admin grid functionality can significantly improve the admin experience by making data management more efficient. One useful enhancement is adding a custom button that opens a custom popup. This tutorial will guide you through the process of adding a custom button to an admin grid and configuring it to open a custom popup.
Steps to Add a Custom Button to Open Custom Popup in Magento 2 Admin Grid:
Step 1: Create the customer_listing.xml file in given below path.
{{magento_root}}\app\code\Vendor\Extension\view\adminhtml\ui_component\customer_listing.xml
Then add the code as follows
<?xml version="1.0" encoding="UTF-8"?>
<listing xmlns:xsi="http://www.w3.org/2001/XMLSchema-instance" xsi:noNamespaceSchemaLocation="urn:magento:module:Magento_Ui:etc/ui_configuration.xsd">
    <columns name="customer_columns">
        <actionsColumn name="btn_column" class="Vendor\Extension\Ui\Component\Listing\Columns\Button">
            <argument name="data" xsi:type="array">
                <item name="config" xsi:type="array">
                    <item name="component" xsi:type="string">Vendor_Extension/js/grid/columns/button</item>
                    <item name="indexField" xsi:type="string">entity_id</item>
                    <item name="sortable" xsi:type="boolean">false</item>
                    <item name="label" xsi:type="string" translate="true">Custom label</item>
                    <item name="sortOrder" xsi:type="number">999</item>
                </item>
            </argument>
        </actionsColumn>
    </columns>
</listing>
Step 2: Create a Button.php in the following path.
{{magento_root}}\app\code\Vendor\Extension\Ui\Component\Listing\Columns\Button.php
Now include the below-mentioned piece of code
<?php

namespace Vendor\Extension\Ui\Component\Listing\Columns;

use Magento\Framework\UrlInterface;
use Magento\Framework\View\Element\UiComponent\ContextInterface;
use Magento\Framework\View\Element\UiComponentFactory;
use Magento\Ui\Component\Listing\Columns\Column;

class Button extends Column
{
    /**
     *@var UrlInterface
     */
    protected $urlBuilder;
    /**
     * Constructor
     *
     * @param ContextInterface $context
     * @param UiComponentFactory $uiComponentFactory
     * @param UrlInterface $urlBuilder
     * @param array $components
     * @param array $data
     */
    public function __construct(
        ContextInterface $context,
        UiComponentFactory $uiComponentFactory,
        UrlInterface $urlBuilder,
        array $components = [],
        array $data = []
    ) {
        $this->urlBuilder = $urlBuilder;
        parent::__construct($context, $uiComponentFactory, $components, $data);
    }
    /**
     * Prepare Data Source
     *
     * @param array $dataSource
     * @return array
     */
    public function prepareDataSource(array $dataSource)
    {
        if (isset($dataSource['data']['items'])) {
            $fieldName = $this->getData('name');
            foreach ($dataSource['data']['items'] as &$item) {
                $item[$fieldName . '_html'] = "<button class='button'><span>Custom Button</span></button>";
                $item[$fieldName . '_title'] = __('Please enter your custom message');
                $item[$fieldName . '_submitlabel'] = __('Send');
                $item[$fieldName . '_cancellabel'] = __('Reset');
                $item[$fieldName . '_customerid'] = $item['entity_id'];
                $item[$fieldName . '_formaction'] = $this->urlBuilder->getUrl('router/actionname/index');
            }
        }
        return $dataSource;
    }
}
Step 3: Create a button.js file in the following path.
{{magento_root}}\app\code\Vendor\Extension\view\base\web\js\grid\columns\button.js
Now add the following code
define(
    ['Magento_Ui/js/grid/columns/column',
        'jquery', 'mage/template',
        'text!Vendor_Extension/templates/grid/cells/customer/button.html',
        'Magento_Ui/js/modal/modal'], function (Column, $, mageTemplate, extensionPreviewTemplate) {
            'use strict'; return Column.extend({
                defaults: {
                    bodyTmpl: 'ui/grid/cells/html',
                    fieldClass: { 'data-grid-html-cell': true }
                },
                gethtml: function (row) {
                    return row[this.index + '_html'];
                },
                getFormaction: function (row) {
                    return row[this.index + '_formaction'];
                },
                getCustomerid: function (row) {
                    return row[this.index + '_customerid'];
                },
                getLabel: function (row) { return row[this.index + '_html'] },
                getTitle: function (row) { return row[this.index + '_title'] },
                getSubmitlabel: function (row) { return row[this.index + '_submitlabel'] },
                getCancellabel: function (row) { return row[this.index + '_cancellabel'] },
                preview: function (row) {
                    var modalHtml = mageTemplate(extensionPreviewTemplate, {
                        html: this.gethtml(row),
                        title: this.getTitle(row),
                        label: this.getLabel(row),
                        formaction: this.getFormaction(row),
                        customerid: this.getCustomerid(row),
                        submitlabel: this.getSubmitlabel(row),
                        cancellabel: this.getCancellabel(row),
                        linkText: $.mage.__('Go to Details Page')
                    });
                    var previewPopup = $('<div/>').html(modalHtml);
                    previewPopup.modal({
                        title: this.getTitle(row),
                        innerScroll: true, modalClass: '_image-box',
                        buttons: []
                    }).trigger('openModal');
                },
                getFieldHandler: function (row) { return this.preview.bind(this, row); }
            });
        });
Step 4: Create a button.html file in the path given below.
{{magento_root}}\app\code\Vendor\Extension\view\base\web\templates\grid\cells\customer\button.html
Now, add the following code
<form id="send-msg-form-<%- customerid %>" method="get" enctype="multipart/form-data" action="<%- formaction %>">
    <div class="modal-body">
        <div class="bootbox-body">
              <textarea class="bootbox-input bootbox-input-text form-control required-entry"
                name="message" rows="4" cols="83"></textarea> <input type="hidden" name="entity_id"
                value="<%- customerid %>">
        </div>
    </div>
    <div class="modal-footer">
            <span class="error"></span> <button type="reset" class="btn btn-default"><span><%-
                    cancellabel %></span></button> <button type="submit" class="btn btn-primary"><span><%- submitlabel
                    %></span></button> <span class="clear">
           </span>
   </div>
</form>
Output:
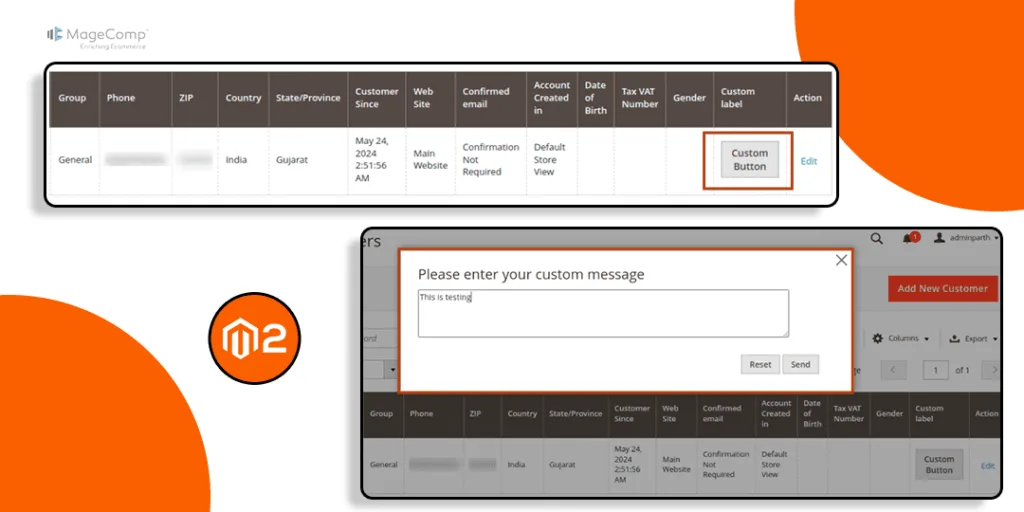
You can see that the admin grid now contains a custom button.
Clicking on the custom button will open a custom popup as shown below
Conclusion:
By following these steps, you can add a custom button to an admin grid in Magento 2 that opens a custom popup. This enhancement can greatly improve the user experience by providing quick access to additional information or actions without leaving the current page.
For any other customization requirement, connect with experienced Magento Developers.
Happy Coding!
