Hello Laravel Friends,
In today’s blog, I will explain How to Create User Register and Login GraphQL API in Laravel.
GraphQL is a powerful query language for APIs that provides a flexible and efficient way to retrieve and manipulate data. In this tutorial, we’ll explore how to create a user register and login GraphQL API using the Laravel framework. Before that, learn How to Create GraphQL API in Laravel?
By the end of this tutorial, you’ll have a working GraphQL API that allows users to register and log in to your application.
Steps to Create User Register & Login GraphQL API in Laravel
Create Project and Install GraphQL Package
Step 1: Create a Laravel project using the below command
composer create-project laravel/laravel:^9.0 laravel-blog
Step 2: Install the GraphQL package via composer using the below command
composer require rebing/graphql-laravel
Step 3: Publish the configuration file using the below command
php artisan vendor:publish –provider="Rebing\GraphQL\GraphQLServiceProvider"
After running this command, the graphql.php file will be created in your config folder
Step 4: After that, run the migration command to add a users table in your database
php artisan migrate
Register User API
Step 5: Now, we will create a type to use for the GraphQL API.
php artisan make:graphql:type RegisterUser
You will find this type on this path in your Laravel project – App\GraphQL\Types
Now add the below code in your type file.
<?php

declare(strict_types=1);

namespace App\GraphQL\Types;

use Rebing\GraphQL\Support\Type as GraphQLType;
use GraphQL\Type\Definition\Type;

class RegisterUser extends GraphQLType
{
    protected $attributes = [
        'name' => 'RegisterUser',
        'description' => 'A type'
    ];

    public function fields(): array
    {
        return [
            "name" => [
                "type" => Type::string(),
                "description" => "Name of user",
            ],
            "email" => [
                "type" => Type::string(),
                "description" => "User email",
            ]
        ];
    }
}
Step 6: Now, we will create a mutation to use for the GraphQL API.
php artisan make:graphql:mutation RegisterUser
You will find this type on this path in your Laravel project – App\GraphQL\Mutations
Now add the below code to your mutation file
<?php

declare(strict_types=1);

namespace App\GraphQL\Mutations;

use App\Models\User;
use Closure;
use GraphQL\Type\Definition\ResolveInfo;
use GraphQL\Type\Definition\Type;
use Rebing\GraphQL\Support\Facades\GraphQL;
use Rebing\GraphQL\Support\Mutation;
use Rebing\GraphQL\Support\SelectFields;

class RegisterUser extends Mutation
{
    protected $attributes = [
        'name' => 'registerUser',
        'description' => 'A mutation'
    ];

    public function type(): Type
    {
        return GraphQL::type("RegisterUser");
    }

    public function args(): array
    {
        return [
            'name' => [
                "name" => "name",
                 "type" => Type::string(),
            ],
            'email' => [
                "name" => "email",
                "type" => Type::string()
            ],
            'password' => [
                "name" => "password",
                 "type" => Type::string()
            ]
        ];
    }

    public function rules(array $args = []): array
    {
        return [
            'name' => ['required'],
            'email' => ['required', 'email', 'unique:users'],
            'password' => ['required'],
        ];
    }

    public function resolve($root, array $args, $context, ResolveInfo $resolveInfo, 			Closure $getSelectFields)
    {
        $fields = $getSelectFields();
        $select = $fields->getSelect();
        $with = $fields->getRelations();

        $user = User::create([
            'name' =>$args['name'],
            'email' =>$args['email'],
            'password' => bcrypt($args['password'])
        ]);

        return $user;
    }
}
Step 7: Now configure both your types in the graphql.php file like the below code
'schemas' => [
    'default' => [
        'query' => [
            // ExampleQuery::class,
        ],
        'mutation' => [
            "registerUser" => \App\GraphQL\Mutations\RegisterUser::class,
        ],
        // The types only available in this schema
        'types' => [
            "RegisterUser" => \App\GraphQL\Types\RegisterUser::class,
        ],

        // Laravel HTTP middleware
         'middleware' => null,

        // Which HTTP methods to support; must be given in UPPERCASE!
         method' => ['GET', 'POST'],

        // An array of middlewares, overrides the global ones
        'execution_middleware' => null,
    ],
],
After that, clear the config cache using the below command
php artisan config:cache
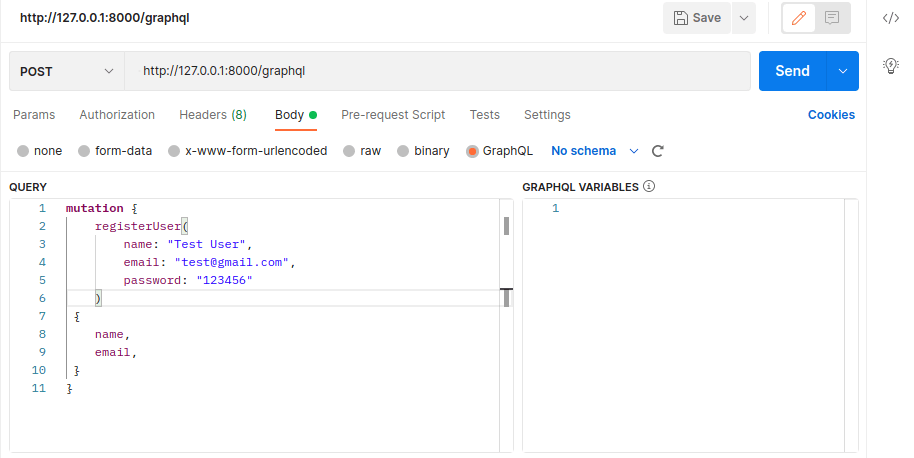
Step 8: Now open Postman
- Add Graphql endpoint – http://127.0.0.1/graphql
- Select Graphql in the body
- Add the below code to your Postman
mutation {
    registerUser(
        name: "Test User",
        email: "test@gmail.com",
        password: "123456"
    )
    {
        name,
        email,
   }
}
Output –
{
    "data": {
        "registerUser": {
            "name": "Test User",
            "email": "test@gmail.com"
        }
    }
}
Login User API
For Login, we have to use the Laravel Sanctum package.
Intro laravel-sanctum :
Laravel Sanctum is provided for token-based authorization to SPA(single page application) like mobile apps and React web apps. It provides multiple API tokens to its associative user. The token provides the ability to access restricted APIs/platforms.
On the web, we can use a session to authenticate. But in headless APIs, we need to use token-based authorization.
First, you have to check in your composer.json file whether the laravel-sanctum composer is already installed or not. If not, you have to follow the below steps to configure the sanctum composer
Step 9: Install the sanctum via composer
composer require laravel/sanctum
Step 10: Publish the configuration file using the below command
You should publish the Sanctum configuration and migration files using the vendor:publish Artisan command. The sanctum configuration file will be placed in your application’s config directory.
php artisan vendor:publish –provider="Laravel\Sanctum\SanctumServiceProvider"
Sanctum will create one database table to store API tokens, so run the migration command.
php artisan migrate
Step 11: Create login user graphql type
php artisan make:graphql:type LoginUser
php artisan make:graphql:type User
And add the below code in LoginUser File.
<?php

declare(strict_types=1);

namespace App\GraphQL\Types;

use GraphQL\GraphQL;
use GraphQL\Type\Definition\Type;
use Rebing\GraphQL\Support\Facades\GraphQL as FacadesGraphQL;
use Rebing\GraphQL\Support\Type as GraphQLType;

class LoginUser extends GraphQLType
{
    protected $attributes = [
        'name' => 'LoginUser',
        'description' => 'A type'
    ];

    public function fields(): array
    {
        return [
            "user" => [
                'type' => FacadesGraphQL::type('User'),
                'description' => "user"
            ],
            "token" => [
                "type" => Type::string(),
                "description" => "Name of user",
            ]
        ];
    }
}
And add the below code in User File.
<?php

declare(strict_types=1);

namespace App\GraphQL\Types;

use GraphQL\Type\Definition\Type;
use Rebing\GraphQL\Support\Type as GraphQLType;

class User extends GraphQLType
{
    protected $attributes = [
        'name' => 'User',
        'description' => 'A type'
    ];

    public function fields(): array
    {
        return [
            "name" => [
                "type" => Type::string(),
                "description" => "Name of user",
            ],
            "email" => [
                "type" => Type::string(),
                "description" => "User email",
            ]
        ];
    }
}
Step 12: Create login user graphql mutation
php artisan make:graphql:mutation LoginUser
And add the below code to LoginUser File.
<?php

declare(strict_types=1);

namespace App\GraphQL\Mutations;

use App\Models\User;
use Closure;
use GraphQL\Type\Definition\ResolveInfo;
use GraphQL\Type\Definition\Type;
use Illuminate\Support\Facades\Hash;
use Illuminate\Validation\ValidationException;
use Rebing\GraphQL\Support\Facades\GraphQL;
use Rebing\GraphQL\Support\Mutation;
use Rebing\GraphQL\Support\SelectFields;

class LoginUser extends Mutation
{
    protected $attributes = [
        'name' => 'loginUser',
        'description' => 'A mutation'
    ];

    public function type(): Type
    {
        return GraphQL::type("User");
    }

    public function args(): array
    {
        return [
            'email' => [
                "name" => "email",
                "type" => Type::string()
            ],
            'password' => [
                "name" => "password",
                "type" => Type::string()
            ]
        ];
    }

    public function resolve($root, array $args, $context, ResolveInfo $resolveInfo, Closure $getSelectFields)
    {
        $fields = $getSelectFields();
        $select = $fields->getSelect();
        $with = $fields->getRelations();


        $user = User::where('email', $args['email'])->first();
        if (! $user || ! Hash::check($args['password'], $user->password)) {
            throw ValidationException::withMessages([
                'email' => ['The provided credentials are incorrect.'],
            ]);
        }

        return collect([
            "user" => $user,
            "token" => $user->createToken('App')->plainTextToken
        ]);
    }
}
Step 13: Add type and mutation in the graphql.php file
'schemas' => [
        'default' => [
            'query' => [
                // ExampleQuery::class,
            ],
            'mutation' => [
                "registerUser" => \App\GraphQL\Mutations\RegisterUser::class,
                "loginUser" => \App\GraphQL\Mutations\LoginUser::class,
            ],
            // The types only available in this schema
            'types' => [
                "RegisterUser" => \App\GraphQL\Types\RegisterUser::class,
                "LoginUser" => \App\GraphQL\Types\LoginUser::class,
	     "User" => \App\GraphQL\Types\User::class,
            ],

            // Laravel HTTP middleware
            'middleware' => null,

            // Which HTTP methods to support; must be given in UPPERCASE!
            'method' => ['GET', 'POST'],

            // An array of middlewares, overrides the global ones
            'execution_middleware' => null,
        ],
],
And clear the config cache.
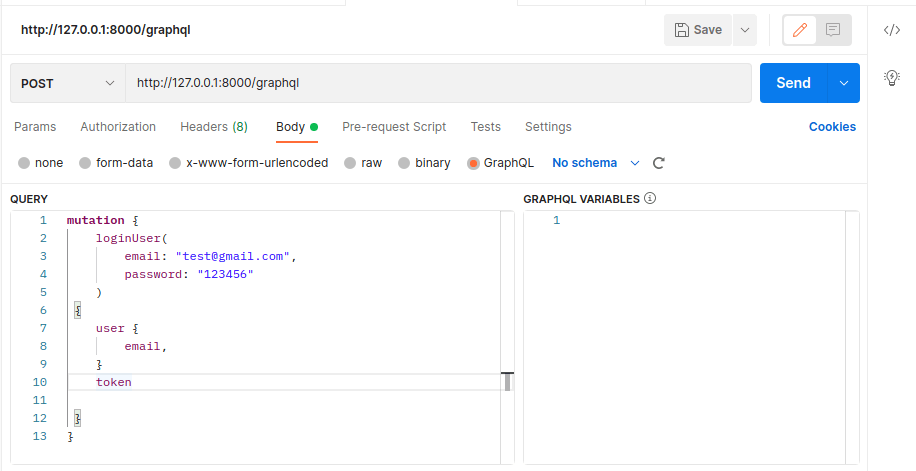
Step 14: Now open Postman
- Add Graphql endpoint – http://127.0.0.1/graphql
- Select GraphQL in the body
- Add the below code in your Postman
mutation {
    loginUser(
        email: "test@gmail.com",
        password: "123456"
    )
    {
        user {
            email,
        }
        token
    }
}
Output –
{
    "data": {
        "loginUser": {
            "user": {
                "email": "test@gmail.com"
            },
            "token": "1|r6RMyvy0UqWps2vWU8ujEUwX2ka9zmowBOB19kws"
        }
    }
}
Here a token is generated now; you can use this token for any after login process.
Conclusion:
In this tutorial, we’ve learned how to create a user register and login GraphQL API in Laravel. If you have any doubts, share them with me through the comment section. Stay in touch with us to learn more about Laravel.
Happy Coding!


“message”: “Cannot query field \”user\” on type \”User\”.”,
getting this error while try to login
You may be trying to get the user(field) in User(type).
User(type) does not include user(field). you may use the direct User model’s attribute. like below.
{
user {
name
}
}
In LoginUser Mutation,
change
from : return GraphQL::type(“User”);
to return GraphQL::type(“LoginUser”);
Then it will work….